The April 2023 release of Xirrus Management System – Cloud (XMS-Cloud) is now available. This release adds support for band-steering on W-Fi 6E APs, the ability to export device details for an EasyPass Voucher portals, and a Number of Registered Devices column in EasyPass Self-registration guest portals.
Band-steering for Wi-Fi 6E access points
XMS-Cloud supports band-steering for Wi-Fi 6E access points (XE5-8, XE3-4, XE3-4TN). When band-steering is enabled, in an effort to get the client to connect to the higher speed radio, the AP will not reply to probe requests from a tri-radio capable client on the 2.4GHz band. Configure band steering by opening a Profile and going to the Access Points page. Click the Band Steering column, at the end of the SSID row, and on the drop-down window, you can select the level, Low, Normal, or Aggressive.
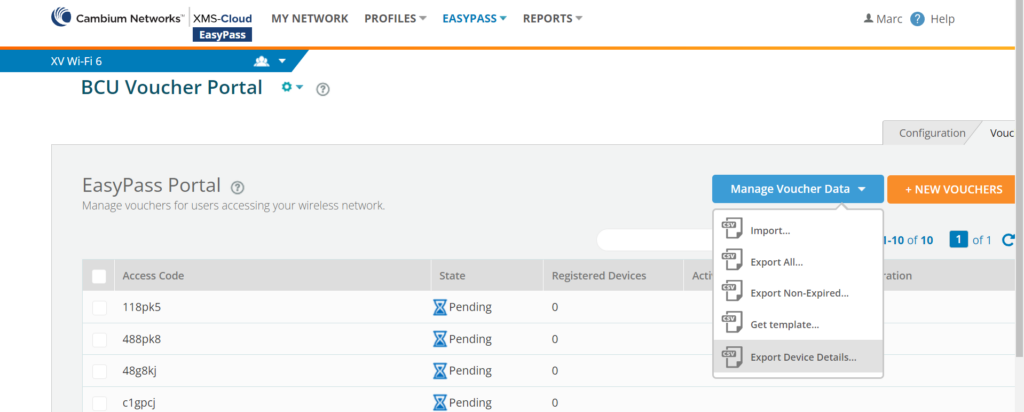
Export client information in EasyPass Voucher portal
When clients start to connect to the wi-fi network using EasyPass vouchers, you are able to export client device information such as Access Activation Date, Access Termination Date, Last Connect Date, Device MAC Address, and Device Hostname, into a .csv file. To create this export file, go to EasyPass and open your Voucher portal. Click the Vouchers tab, and then the Manage Voucher Data button. On the pop-up window, click Export Device Details to generate the .csv file which is automatically downloaded to your local system.
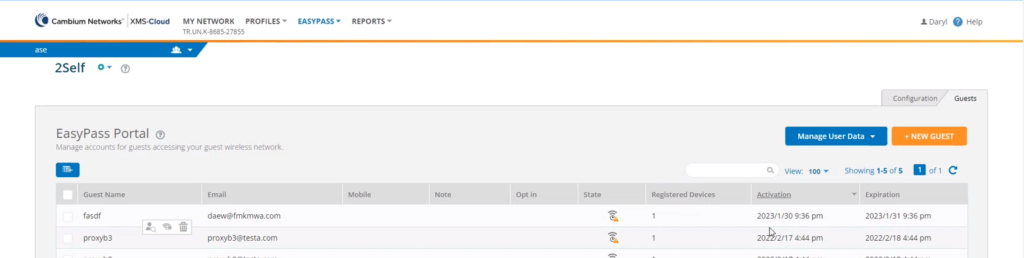
Number of registered devices per client in EasyPass Self-registration portal
To assist in monitoring and managing guest activity on your wi-fi network, the EasyPass Self-registration portal supports a new column that reports the number of registered devices a client has used to connect to the network with. To view the Registered Devices column, go to EasyPass and open your Self-Registration portal. Click Guests tab and you will see the new Registered Devices column in the table of information provided for each guest.
The February 2023 release of Xirrus Management System – Cloud (XMS-Cloud) is now available. This release adds support for OWE and OWE Transitions SSIDs and enhancements to Dashboard widgets and configuration.
Click the thumbnail below to view the video:
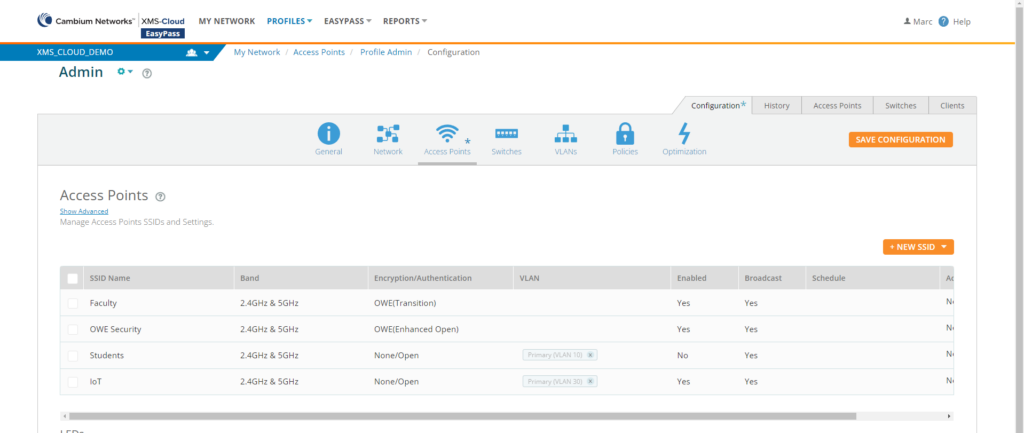
Configuration support for OWE and OWE Transition SSID
XMS-Cloud now supports Wi-Fi 6 OWE (enhanced open) mode and OWE Transition SSIDs for Enhanced Open SSID encryption. OWE will support Wi-Fi 6 clients only. OWE Transition allows you to configure OWE security when Wi-Fi 5 and Wi-Fi 6 clients are using this Open SSID. OWE Transition requires the configuration of 2 SSIDs, one optionally hidden SSID for OWE and a second open SSID that is broadcasted. These SSIDs are linked via the OWE Transition mode. The AP will only send beacons for the open SSID and also carry OWE Transition Mode Information Elements.
When using OWE Transition mode, Wi-Fi 5 clients will connect to the open SSID with no authentication and no encryption. When a Wi-Fi 6 client connects to this Open SSID, they will be redirected to the OWE SSID where OWE encryption will be applied.
To configure OWE Transition, you will first create the OWE SSID. Open your Profile, go to Access Points and click NEW SSID. Give the SSID a name and for Encryption/Authentication, select OWE (Enhanced Open). The next step is to create the Transition SSID. Click NEW SSID, give the SSID a name and for Encryption/Authentication, select OWE (Transition). You have the option of either broadcasting or not broadcasting this SSID.
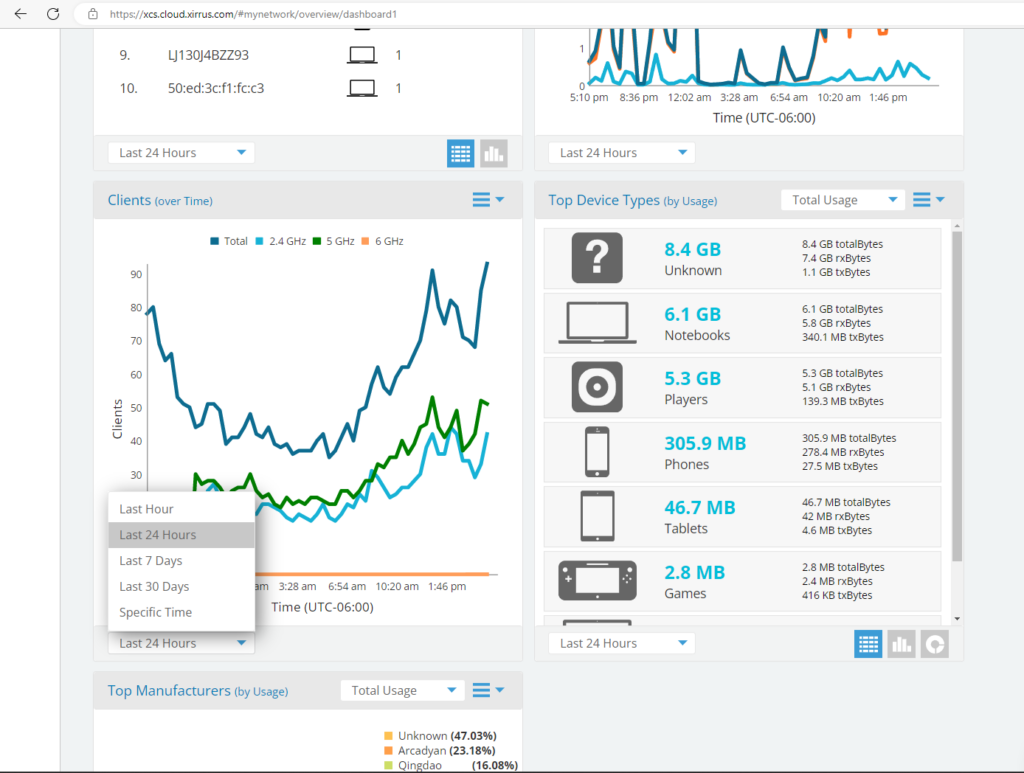
Clients (over Time) widgets breaks out clients per band
The Clients (over Time) widget on the Dashboard now provides a breakout of the number of clients per RF band – 2.4GHz, 5GHz, 6GHz, and a total of all three bands. You can select a time period of the last hour, last 24 hours, last 7 days, last 30 days, or select a specific time period to display. Click on a specific datapoint to Create a custom alert, Zoom in to that specific time.
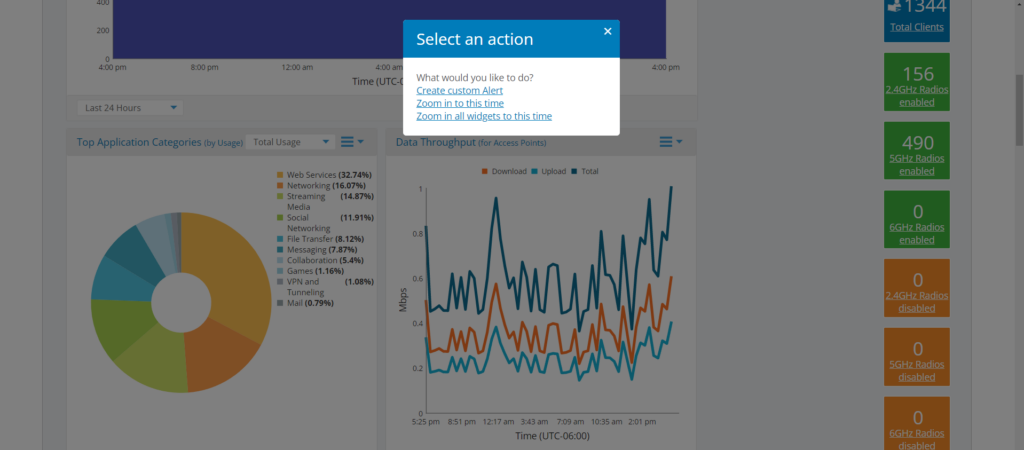
Zoom in on network dashboard data
When reviewing dashboard charts that show data over long periods of time, it can be difficult to pinpoint activity at a certain moment in time. Click on a data point on a chart that you are interested in and a window pops up which allows you to zoom in to the chart at that particular point in time. You also have the option to zoom in all widgets to that point in time. The time period displayed on the widget is 2 hours. You can move the displayed time forward or backwards by clicking the + or – button below the chart. You can also click the time interval drop down window below the widget and select Specific Time and enter the time you want to zoom in on.
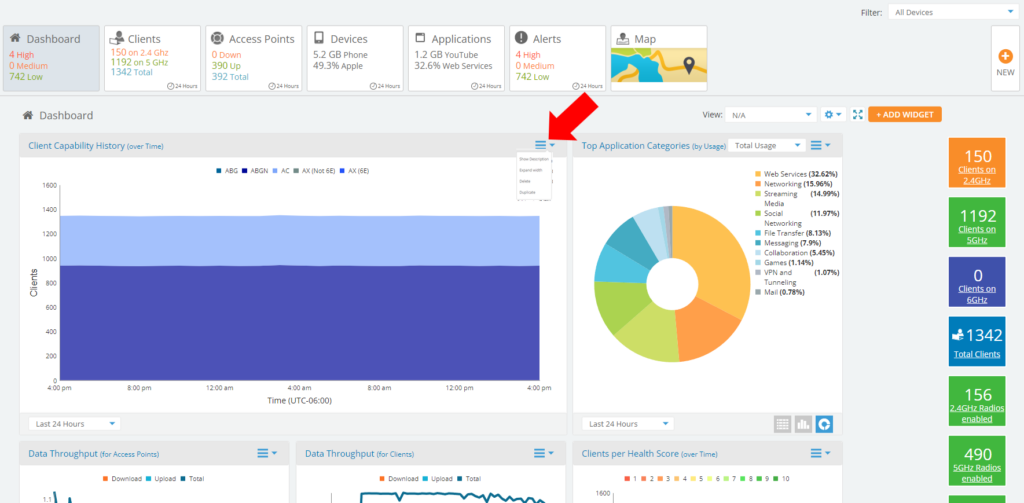
Expand width of widgets on Dashboard
To get a better view of the data on a Dashboard widget, you can expand the width of the widget so that it will take the space of two widgets. When you are finished viewing the widget in expanded mode, you can reduce the width of the widget back to it’s original size. To expand a widget, click the drop-down menu in the upper right corner of the widget and select Expand width.
The December 2022 release of Xirrus Management System – Cloud (XMS-Cloud) is now available. This release includes an Easypass Usage Report, RADIUS server configuration templates, and client device roaming history.
Click the thumbnail below to view the video:
EasyPass usage report
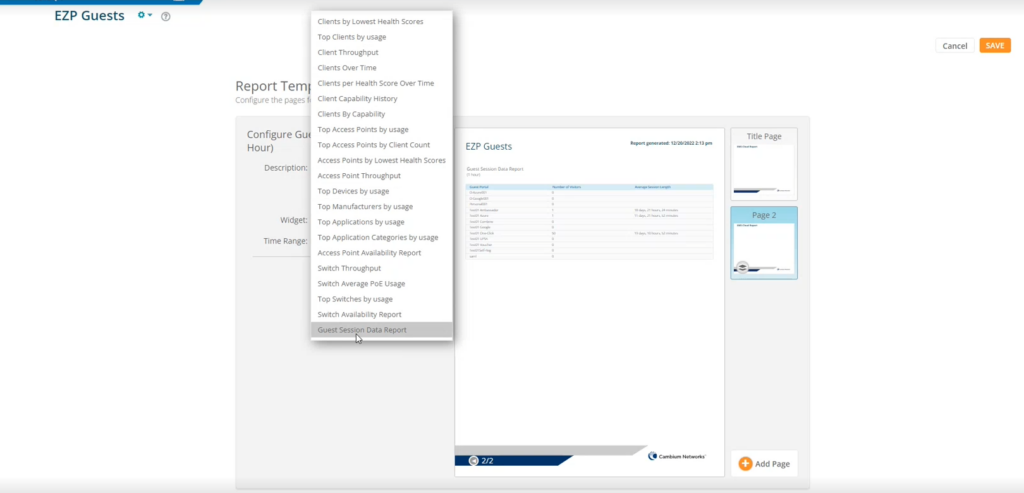
XMS-Cloud provides a Guest Session Data Report which produces information about all your EasyPass portals including the number of visitors and average session time length for all EasyPass portals within your specified time range. The results of the reports will show and aggregated view of the information for all your EasyPass portals and the information is broken out into a separate page for each individual EasyPass portal. To create a Guest Session Data Report, go to MY NETWORK > REPORTS and open an existing report or create a new report. Click the ADD PAGE button and on the Widget drop-down menu, scroll to the bottom and select Guest Session Data Report. When the report is run, a separate page will be generated for each EasyPass portal.
Radius server configuration templates
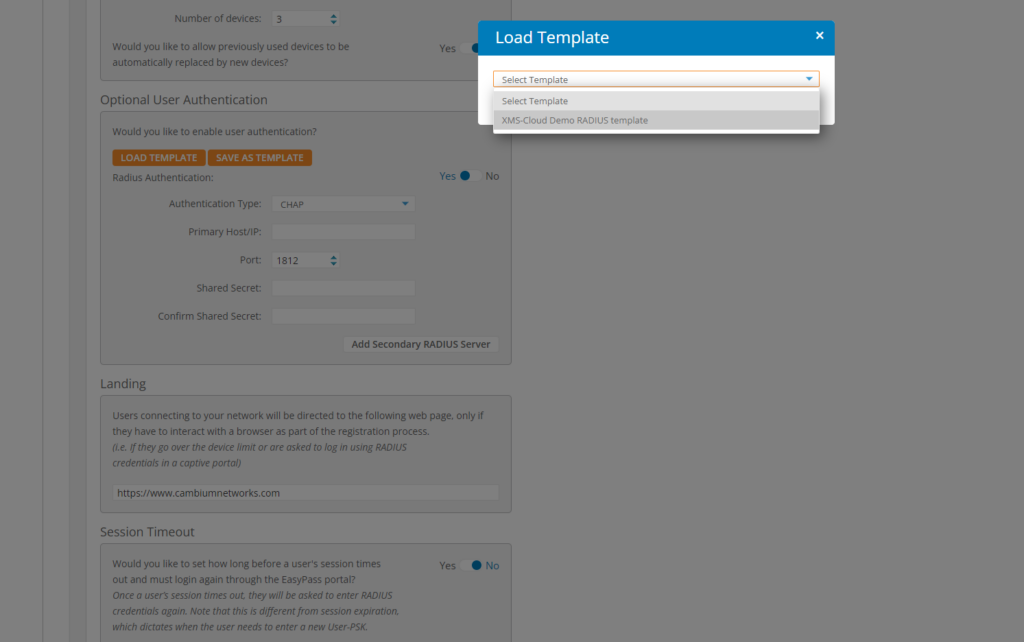
XMS-Cloud allows you to create RADIUS server configuration templates providing a quick and easy way to configure RADIUS servers in your different networks. There are several areas in XMS-Cloud where you can configure a RADIUS server, and this template will allow you to do this with minimal effort. To create a RADIUS server configuration template, go to PROFILES > Templates > Radius. Click the NEW TEMPLATE button and on the New Template popup window, configure and save the RADIUS server settings. Now when you are configuring a PROFILE, by clicking the LOAD TEMPLATE button, you can use the RADIUS template on the Network page when configuring Radius settings for Switch, or on the Access Points page when you are configuring SSIDs for EAP authentication, or when you create a Captive Portal Basic Login Page, or when you are configuring Optional User Authentication on an EasyPass Onboarding portal.
Client roaming history
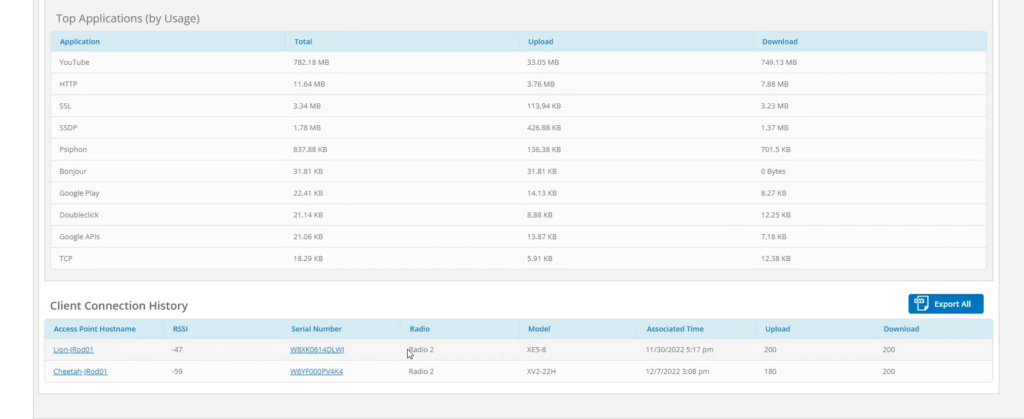
XMS-Cloud allows you to review a client devices’ roaming history, providing another tool when troubleshooting client device performance issues. To review a client devices’ roaming history, on the MY NETWORK > Clients page, click on the hostname of a client to open the client details fly-out window. Then click the Details button. At the bottom of the client details page is a Client Connect History table showing the access point hostnames that the client has connected to, the RSSI level, the Associated Time to the access point and the Upload and Download data rates.
The November 2022 release of Xirrus Management System – Cloud (XMS-Cloud) is now available. This release includes support for assigning users to specific Microsoft Active Directory groups when logging in with the EasyPass Microsoft Azure portal, new custom alerts with configurable thresholds for client counts, the ability to add CLI commands to a snippet tool for cnMatrix switches, and two new Top Domains charts for CommandCenter.
Click the thumbnail below to view the video:
Easypass On-boarding portal with Azure authentication
When creating an EasyPass Onboarding portal, the administrator has the option to allow end users to self-onboard. This enables network clients to register on an open SSID to receive a User-Preshared Key which can be used to connect to a secure SSID. When authenticating using Microsoft Azure, the end user access will be placed in their assigned active directory group.
To create the EasyPass Onboarding portal using Microsoft Azure for authentication, go to EASYPASS > NEW PORTAL > Onboarding. Give the portal a name and click OK. On the General page, go to the Self-Onboarding section and move the slider bar to Yes. Click SELECT for the Registration SSID and select the SSID that clients will use when authenticating to the Microsoft Azure environment. The client will use their MS Active Directory credentials to login to this portal. Move the Azure SSID over to the Onboarding portal section of the window and click SELECT. Click SELECT for the Network SSID and select the SSID that clients will use when authenticating to your company network. Move the company SSID over to the Onboarding portal section of the window and click SELECT. Select Azure as the authentication type. A Microsoft admin will need to authenticate the Onboarding portal so that the portal can interact with with the Microsoft Azure environment. Click AUTHORIZE and login using your Microsoft administrator credentials. Next, enter the Azure Primary Domain and the domain that clients will connect to. In the Would you like to restrict access to specific groups section, move the slide bar to Yes. Select the Active Directory groups that will be associated with this SSID and click ADD. Click SAVE ALL.
Now when a client logs in to the Azure portal successfully, the system will send an automated email with a User Pre-Shared key that will be used to login to the company network. Once the client successfully logs into the network using the User Pre-shared key, they will be placed in the proper Active Directory group in XMS-Cloud.
Snippet tool available on Switches page in Profile, and Switch Template
When a feature is not available in XMS-Cloud, but resides in the OS, you are able to use the Snippet tool to add the CLI commands to the Profile or Template so that the features are enabled and configured on the device when the device is added to the Profile. XMS-Cloud provides the Snippet tool for cnMatrix switch configuration in both the Profiles > Switches page and in the Profiles > Templates > Switches page.
New charts on CommandCenter Overview page
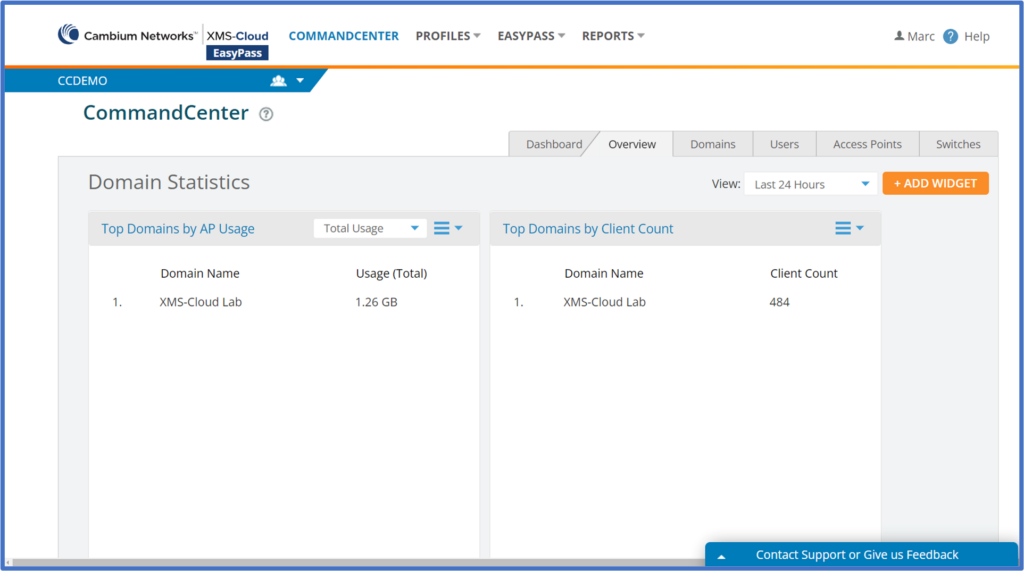
MSPs using XMS-Cloud CommandCenter can easily display which of their managed accounts are generating the most traffic and which managed accounts have the highest number of client devices. XMS-Cloud CommandCenter includes two new charts designed to identify the Top Domains by AP Usage and Top Domains by Client Count. To access the two new charts, go to your CommandCenter account and to the Overview page. Click the ADD WIDGET button, select the two new charts, Top Domains by Client Count and Top Domains by AP Usage, and click the ADD button.
Push Switch Template to selected Profiles
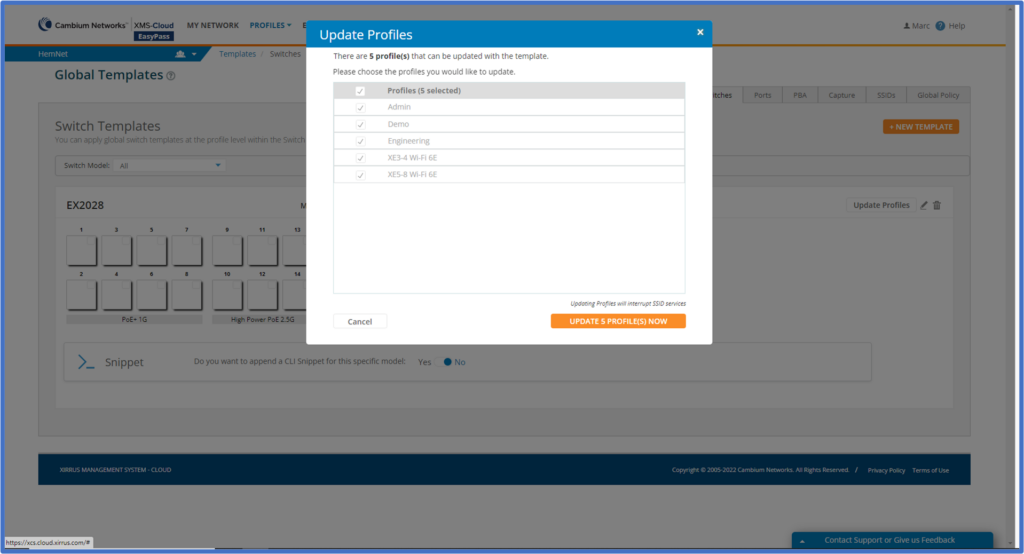
When you make changes to existing Switch Templates, or create a new Switch Template, XMS-Cloud allows you to push the Templates in bulk, to multiple Profiles at the same time.
To push a Switch Template to multiple Profiles, go to PROFILES > Templates. Select the Template you want to push and click the Update Profiles button. Select the Profiles to be updated and click the UPDATE PROFILES NOW button.
The September 2022 release of Xirrus Management System – Cloud (XMS-Cloud) in now available. This new release includes support for native VLAN configuration in access points, per-switch throughput alerts, the ability to create packet capture files on alerts, configuration device class filters, the ability to deploy Global Policy Templates to Profiles, support for the new XE3-4TN outdoor access point, and more.
Click the thumbnail below to view the video:
Native VLAN configuration in access points
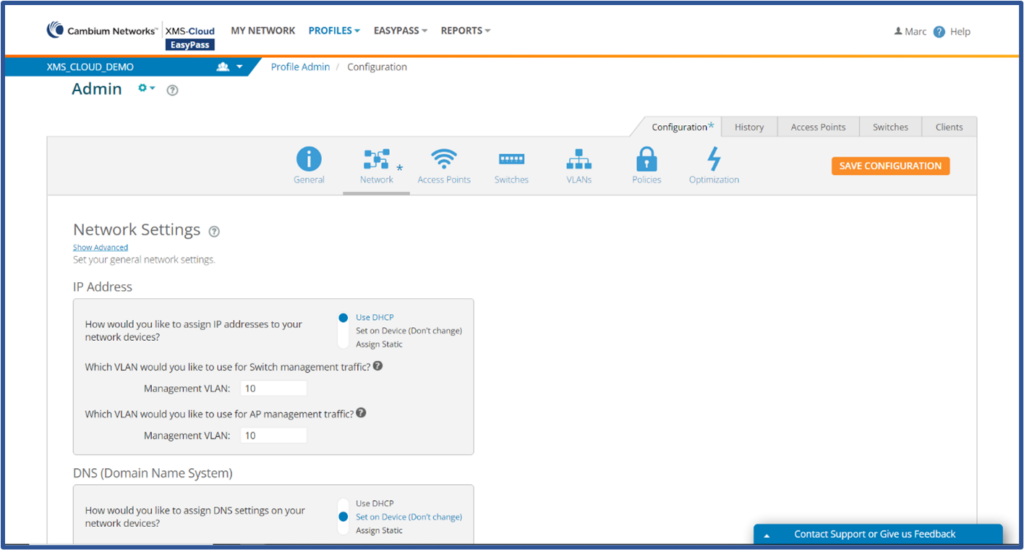
For security purposes, many network administrators will change the network native VLAN from the default of VLAN 1 to a different VLAN. In a previous release of XMS-Cloud, we allowed you to configure a native VLAN on cnMatrix switches, and now XMS-Cloud allows you to configure native VLANs on the access points in the network Profile.
To configure a native VLAN in a Network Profile, open an existing Profile and go to the Network page. Under the IP Address section, move the slider bar to Use DHCP and you can configure the Management VLAN for both the cnMatrix switches and Enterprise access points.
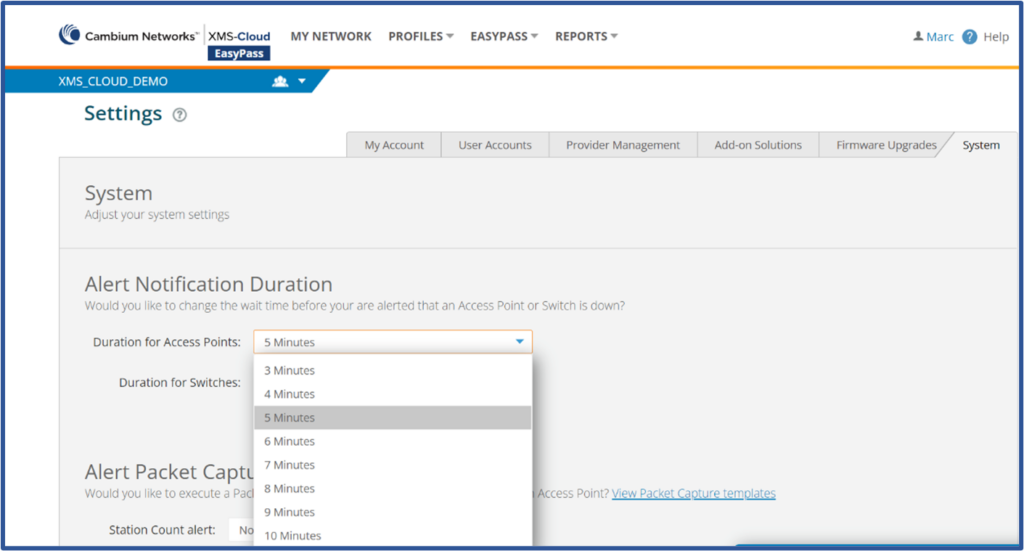
Configurable Alert Notification Duration
When an access point goes offline, it can be up to 5 minutes before an alert is generated in XMS-Cloud. In this release, we allow you to configure the amount of time that passes before an alert is generated when an access point goes offline. You are able to select from a range of 3 minutes to 10 minutes before an alert is generated.
To configure the time threshold before an alert is generated by an access point or cnMatrix switch going offline, go to System Profile > Settings > System. In the Alert NotificationDuration section and click the dropdown next to Access Points and/or Switches to configure the amount of time that can pass before an alert is generated.
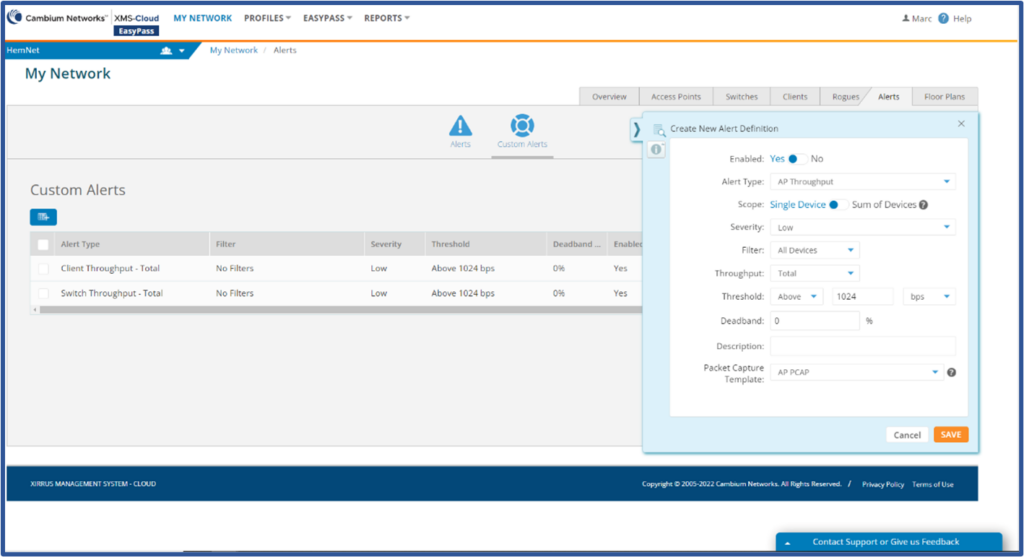
Create packet capture files on alerts
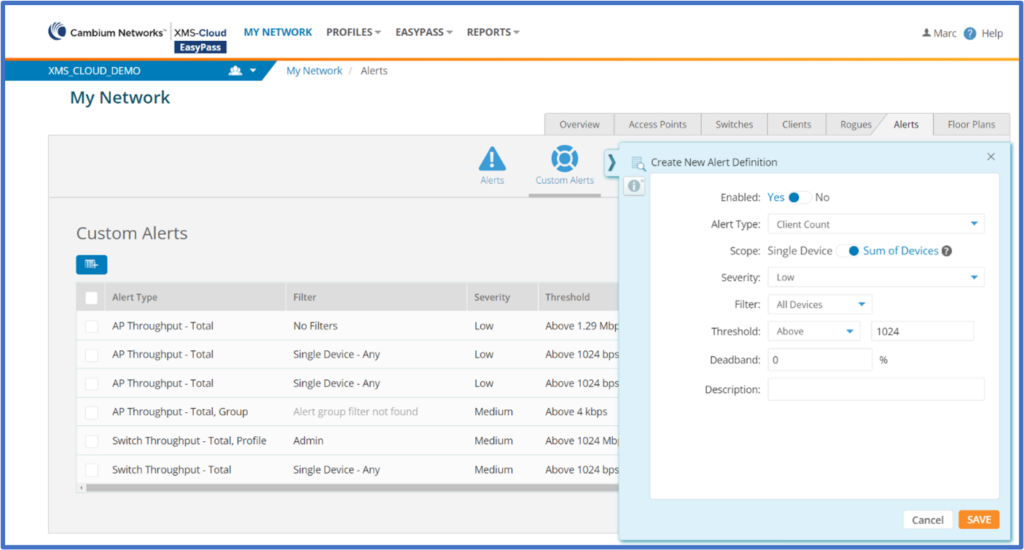
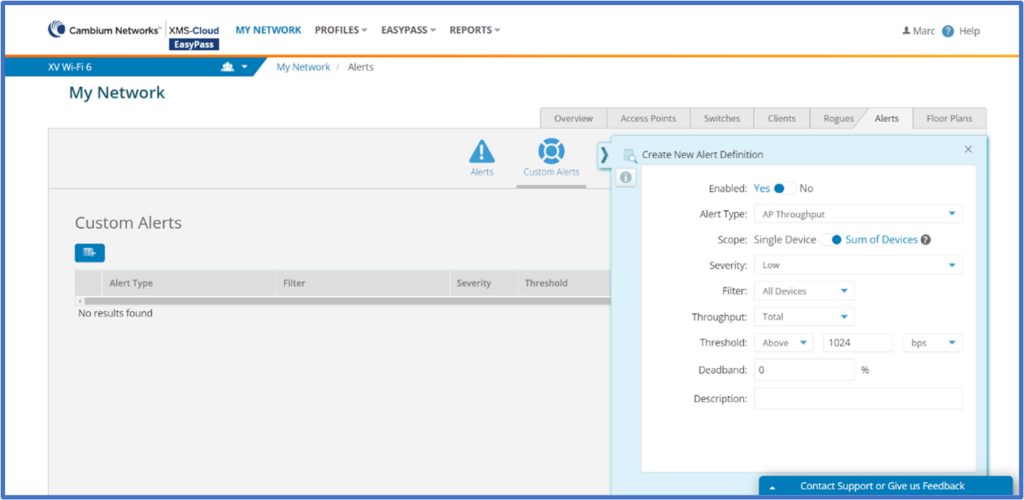
XMS-Cloud allows you to configure thresholds on a custom AP Throughput Alert, that when met, will trigger the creation of a packet capture file. This packet capture file can be used for analysis to help determine why the threshold was reached and the alert was generated. You can also configure thresholds for Station Counts per AP and DHCP Failures.
To configure an alert that will automatically trigger the creation of a packet capture file, go to MY NETWORK > Alerts > Custom Alerts > +NEW ALERT DEFINITION. Next to Alert Type:, select AP Throughput. Next to Scope:, select Single Device and this will reveal the Packet Capture Template selection section at the bottom of the page. Select a previously configured Packet Capture Template and click SAVE.
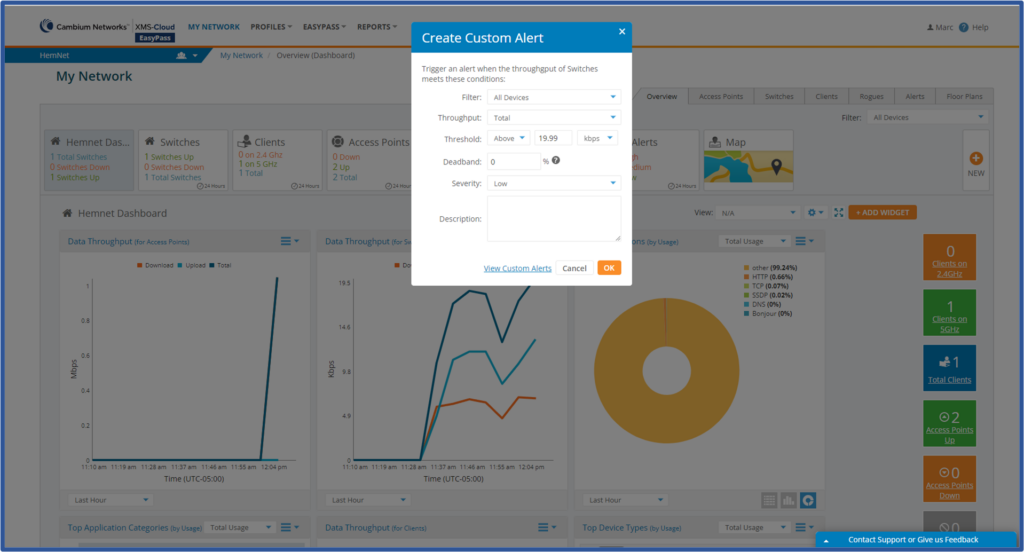
Per-Switch throughput alerts
XMS-Cloud now provides alerts for thresholds reached by a single cnMatrix switch or a sum of the throughput of multiple switches. There are several ways to configure the thresholds for the Alerts. The first is to go to the MY NETWORK > Alerts > Custom Alerts page and click the +NEW ALERT DEFINITION button. Next to the Alert Type field, click the drop-down arrow and select Switch Throughput. You can configure the threshold for a single switch or an aggregate of switches that belong to a Profile or Group. The Alert can be configured as Low, Medium, or High severity. Under the Filter field, you can select All Devices or filter by the switches in a Profile or in a Group. Then set the threshold for when an alert is generated. You can also create an alert by going to the Data Throughput (for Switches) widget on the Dashboard and clicking on a data point in the graph. This will open the Custom Alerts page where you can create the custom alert. If you configure a custom description on the alert, that description will be displayed on the alerts page when the alert is triggered.
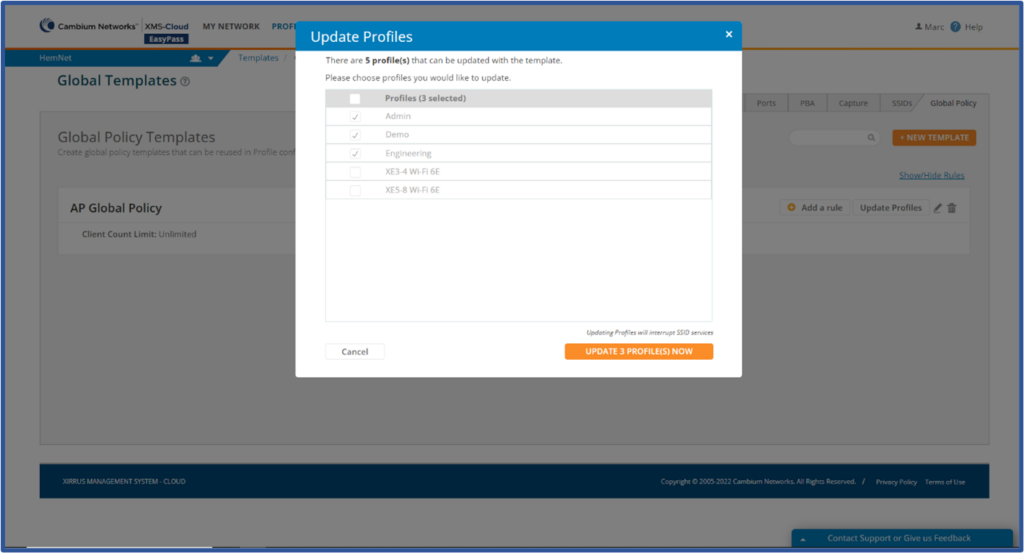
Deploy Templates to Selected Profiles
When you make changes to existing Templates, or create a new Template, XMS-Cloud allows you to push the Templates in bulk, to multiple Profiles at the same time.
To push a Template to multiple Profiles, go to PROFILES > Templates. Select the Template you want to push and click the Update Profiles button. Select the Profiles to be updated and click the UPDATE PROFILES NOW button.
Support for XE3-4TN outdoor access point
This release adds support for the new XE3-4TN outdoor access point. The XE3-4TN has three radios and allows for the use of external antennas. The radios currently operate in the 2.4GHz and 5GHz bands. One of the radios is software-defined and has the ability to support either 5GHz and 6GHz (Wi-Fi 6E) operation. 6GHz functionality is not currently operable but will be introduced when the outdoor 6GHz Automated Frequency Coordination (AFC) system is in place.
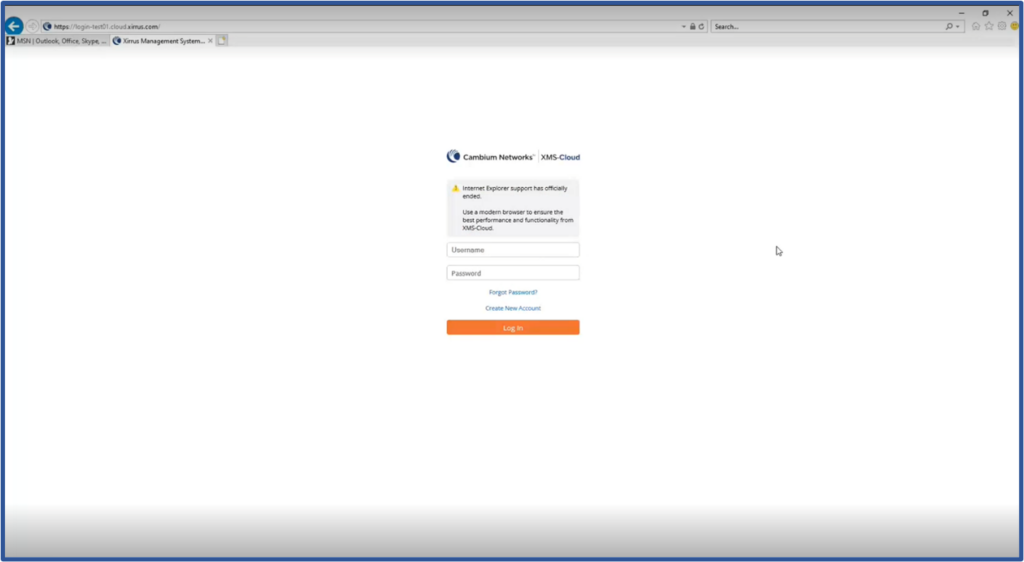
Microsoft Internet Explorer no longer supported
As Microsoft is no longer supporting its Internet Explorer browser, XMS-Cloud is also no longer supporting Internet Explorer. You may use other web browsers such as Edge, Firefox, Chrome, or Safari.
The August 2022 release of Xirrus Management System – Cloud (XMS-Cloud) in now available. This new release includes new data throughput alerts, global policy templates, profile configuration comparisons, additions to the Wi-Fi 6E Migration Assistant widgets, beta support for the new XV2-22H wall plate AP, and more.
Click the thumbnail below to view the video:
Alerts for data throughput thresholds
To help administrators stay ahead of potential problems, XMS-Cloud now provides alerts for thresholds reached for a single AP, an aggregated throughput of APs and client devices. There are several ways to configure the thresholds for the Alerts. The first is to go to the MY NETWORK > Alerts > Custom Alerts page and click the +NEW ALERT DEFINITION button. Next to the Alert Type field, click the drop-down arrow and select AP Throughput or Client Throughput. If you select AP Throughput, you can configure the threshold for a single AP or an aggregate of all APs. The Alert can be configured as Low, Medium, or High severity. Under the Filter field, you can select All Devices or filter by the APs in a Profile or in a Group. Then set the threshold for when an alert is generated. You can also create an alert by going to either the Data Throughput (for Access Points) or Data Throughput (for Clients) widget on the Dashboard and clicking on a data point in the graph. This will open the Custom Alerts page where you can create the custom alert. If you configure a custom description on the alert, that description will be displayed on the alerts page when the alert is triggered.
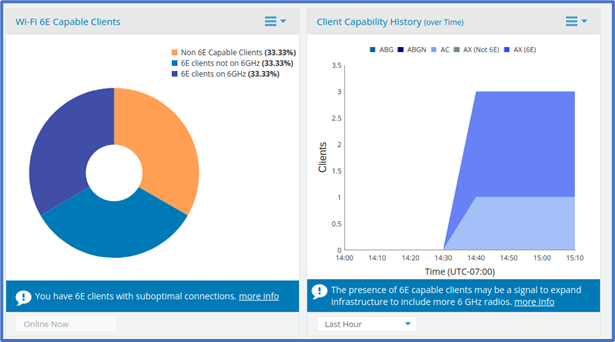
Added recommendations to Wi-Fi 6E migration assistant
As Wi-Fi 6E clients start to use the Wi-Fi network, XMS-Cloud will indicate these clients on the Dashboard in the Wi-Fi 6E Capable Clients and Client Capability History widgets. When Wi-Fi 6E clients start to use the network, XMS-Cloud will display a banner suggesting that you start switching 5GHz radios to 6GHz radios.
Global Policy Templates
XMS-Cloud allows you to create Global Policy Templates which can be applied to Profile Policies in your XMS-Cloud account. This allows a single template to be applied to all of your Profiles
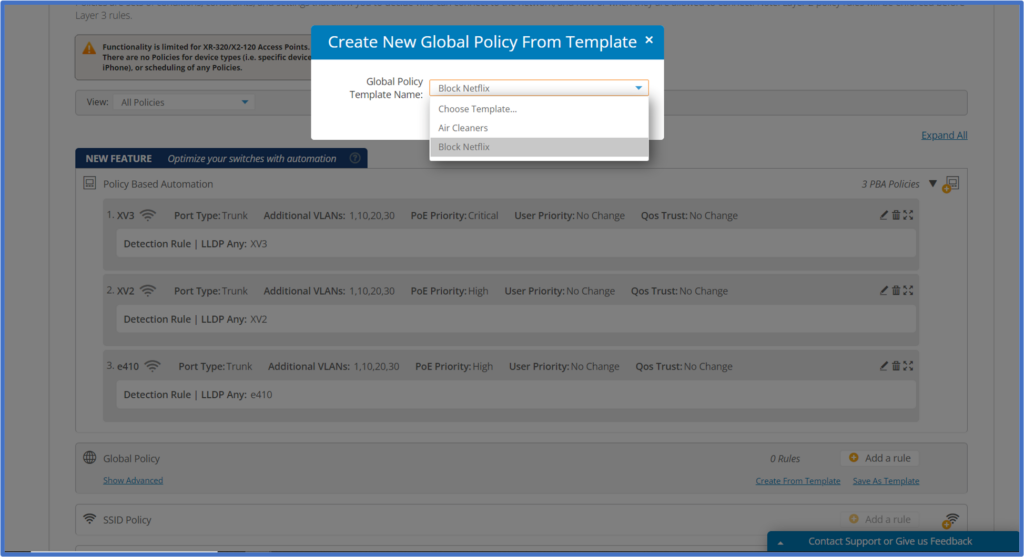
To create a global policy, go to PROFILES > Templates > Global Policy > +NEW TEMPLATE. Give the template a name. You can allow an unlimited number of clients to connect to the network or limit the number of clients by selecting Limited and entering the maximum number of clients allowed to connect to the network. You can also block or allow station-to-station traffic by moving the slider to Block or Allow. Click SAVE. On the Global Policy Template page, go the template you just created and add the policy rule by clicking the Add a rule button and configuring the rule that will be applied with this policy.
Open the Profile that you want to apply this template to and go to Policies > Global Policy and click the Create From Template link. On the Create New Global Policy From Template popup window, click the dropdown and select the policy template you want to apply and click OK.
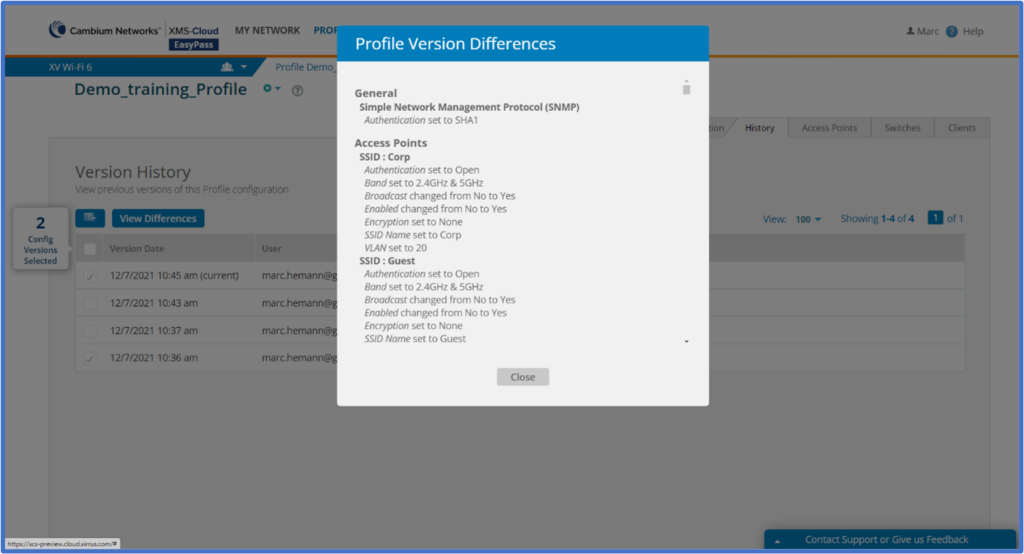
Profile Configuration Comparisons
You are now able to view the differences between two versions of a Profile in XMS-Cloud. To compare two versions of a Profile, open a Profile and go to the History page. Select 2 versions of the Profile and click the View Differences button. A Profile Version Differences page pops up with the configuration differences between the two versions of the Profile.
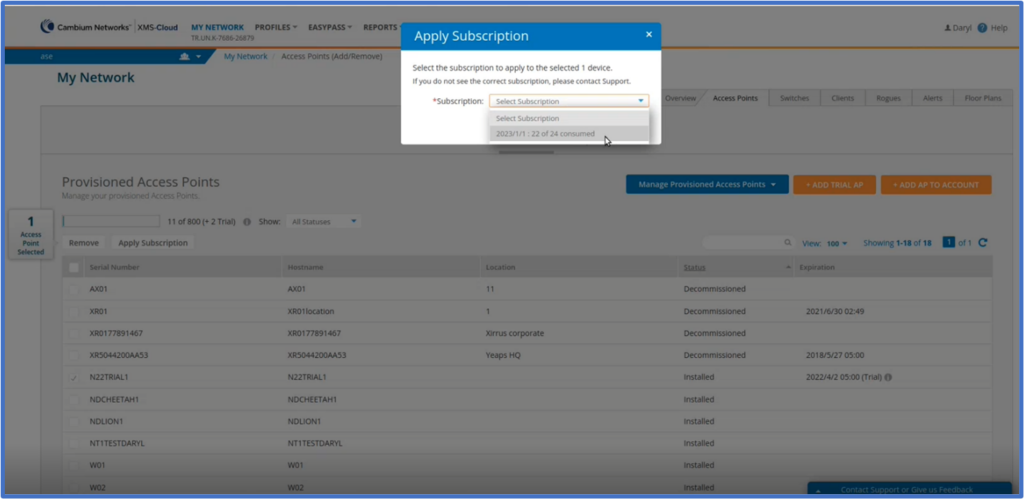
Select a subscription to apply to a trial switch / AP
In the event you do not yet have activated subscriptions for new APs or switches, XMS-Cloud allows you to onboard and manage APs and Switches with 60-day trial licenses. To apply a subscription to a switch or AP and remove the trial status, you will need to select a subscription to assign this device to. To replace a trial license on a switch or AP with a valid slot/subscription, go to Access Points > Add/Remove and select the device with the trial license. Then click Apply Subscription and from the Subscription drop-down, select the subscription you wish to apply to this device.
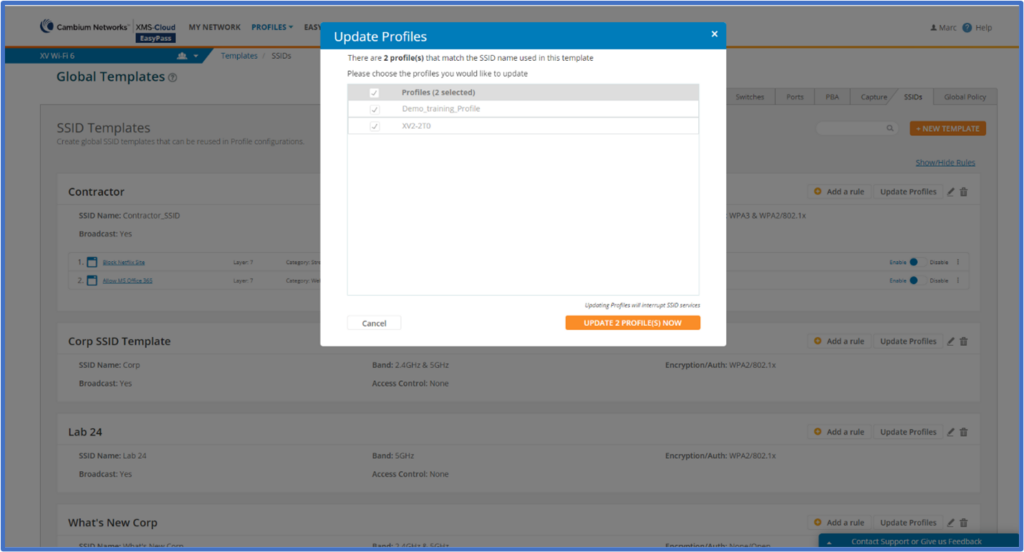
Update Selected Profiles from Template page
There may be times when you edit the configuration of an SSID template and want to push the update to multiple profiles. XMS-Cloud allows you to push the updated template to multiple profiles that you select.
To push an SSID template to multiple profiles at the same time, go to Profiles >Templates and select the template page you are working with. In the Template section of the template you are working with, click the Update Profiles button. Select the Profiles you wish to update and click the UPDATE PROFILE(S) NOW button.
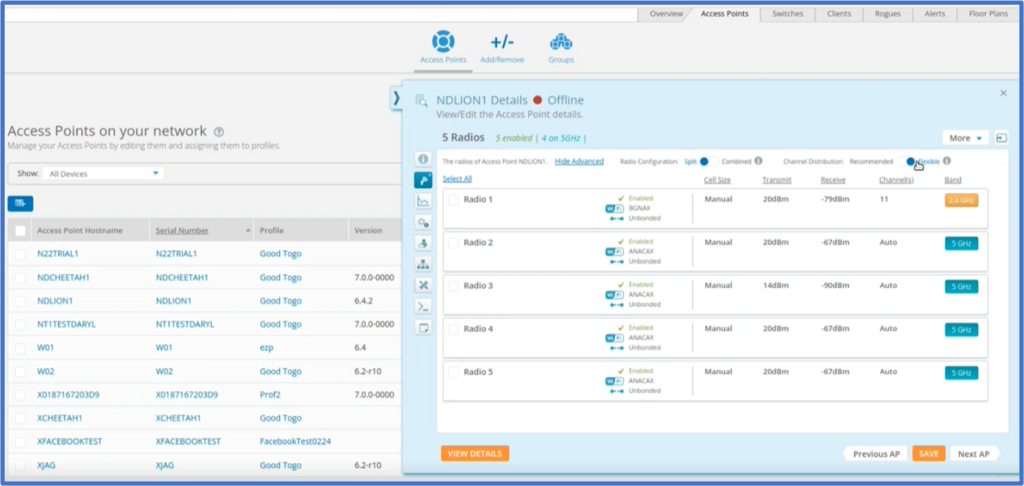
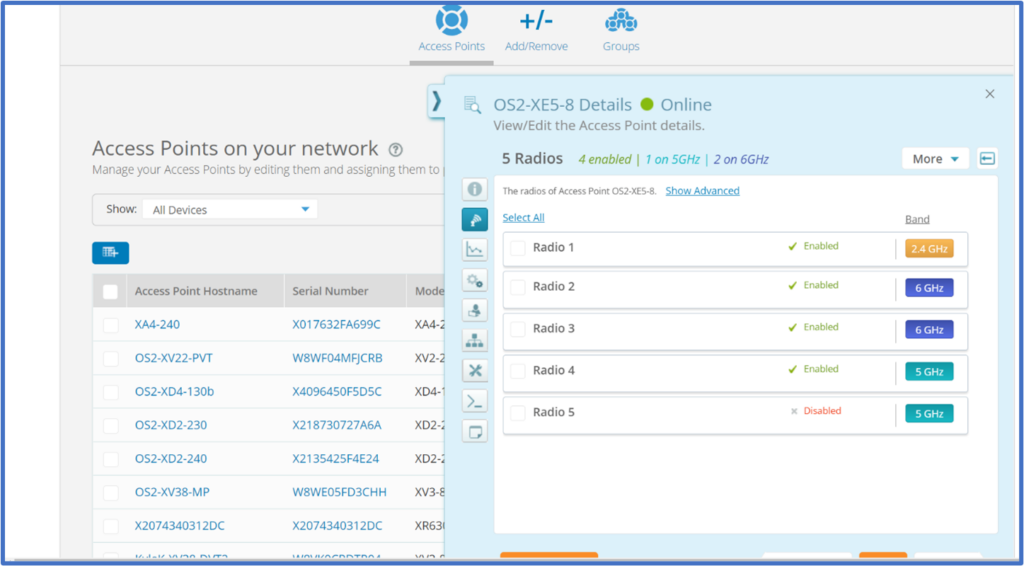
Channel Distribution available in XE3-4 and XE5-8 details radio page
To add flexibility when configuring channels in the XE3-4 and XE5-8 high density access points, you can select the Flexible option which will open additional channels that can be assigned to 5GHz radios allowing for greater channel reuse in high density environments where channel plans and channel reuse are critical for the overall performance of the network. To open the flexible channels available for the 5GHz radios, go to MY NETWORK > Access Points, select an XE3-4 or XE5-8 access point, open the Details fly-out window and go to the Radios page. On the top right of the fly-out window, move the slider button to Flexible to open a larger set of channels which can be assigned to the radio.
Support for new XV2-22H access points
This release adds beta support for the wall plate mounted Wi-Fi 6E XV2-22H access point. The XV2-22H is a Wi-Fi 6 access point designed for use in hospitality environments such as hotel rooms and dormitory rooms.
The June 2022 release of Xirrus Management System – Cloud (XMS-Cloud) is now available. This new release includes the ability to assign an AP to a selectable subscription, the ability to sort by any column header on the Access Points page, the ability to sort APs by their provisioning status, a new column that shows the last time an AP was seen on the network, and the ability to export information on 100,000 client devices.
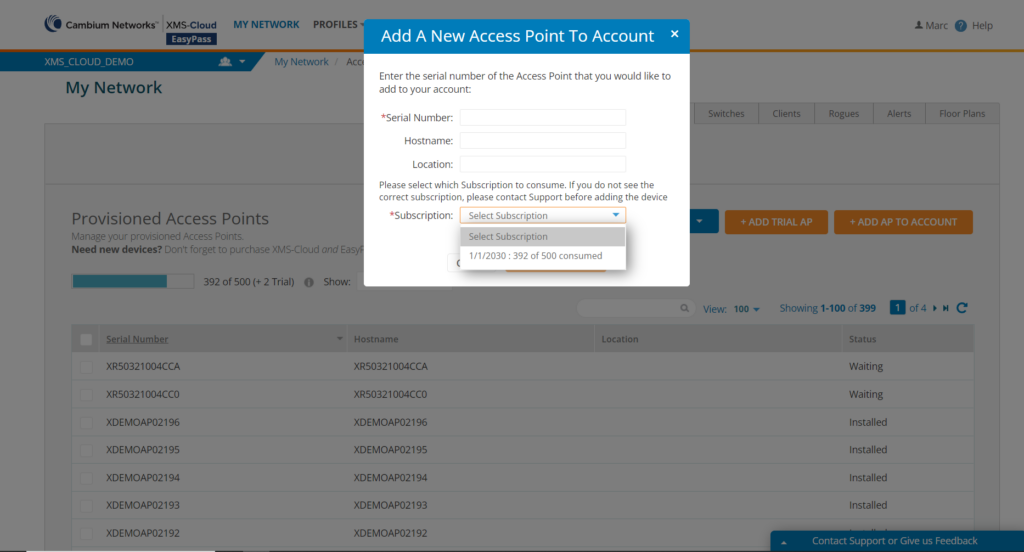
Ability for customer to add AP to selectable subscription.
For those customers who have multiple access point purchases and therefore multiple XMS-Cloud subscriptions, XMS-Cloud allows the customer to assign the desired subscription while adding the access point to XMS-Cloud.
To assign a subscription to an access point during the onboarding process, go to the Access Points page, click ADD AP TO ACCOUNT, and on the Add A New Access Point to Account page, click the subscription drop-down box and select the subscription you want to assign to the access point.
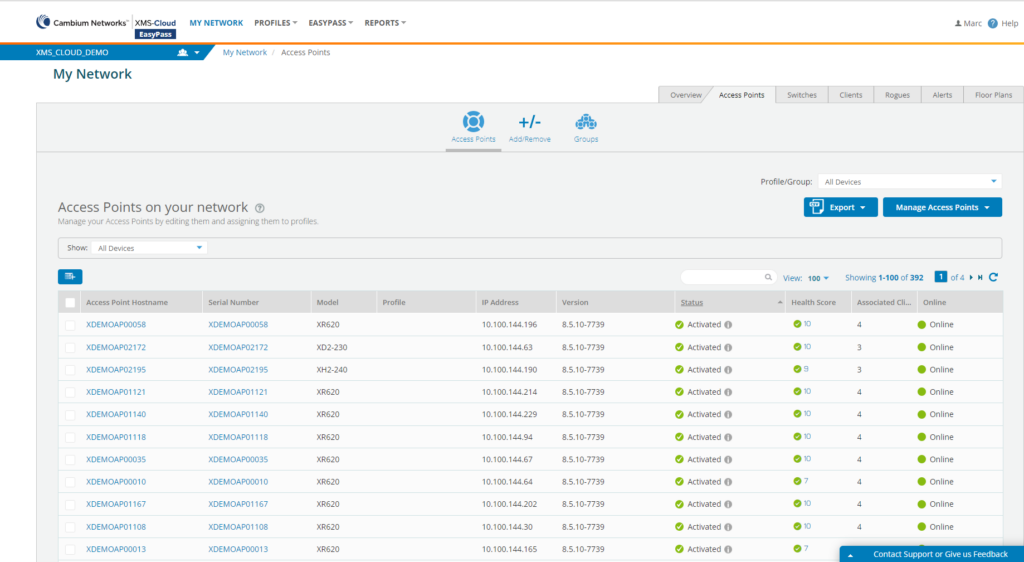
Sort by any column header on APs page
To assist you in finding information quickly, XMS-Cloud allows you to sort by any information column on the Access Points page.
Go to the Access Points page to add, remove, or rearrange columns by clicking the Columns button and editing the Select Columns page to fit your needs. Then, on the Access Points on your network page, click on any of the column headers to sort the page by the information in that column.
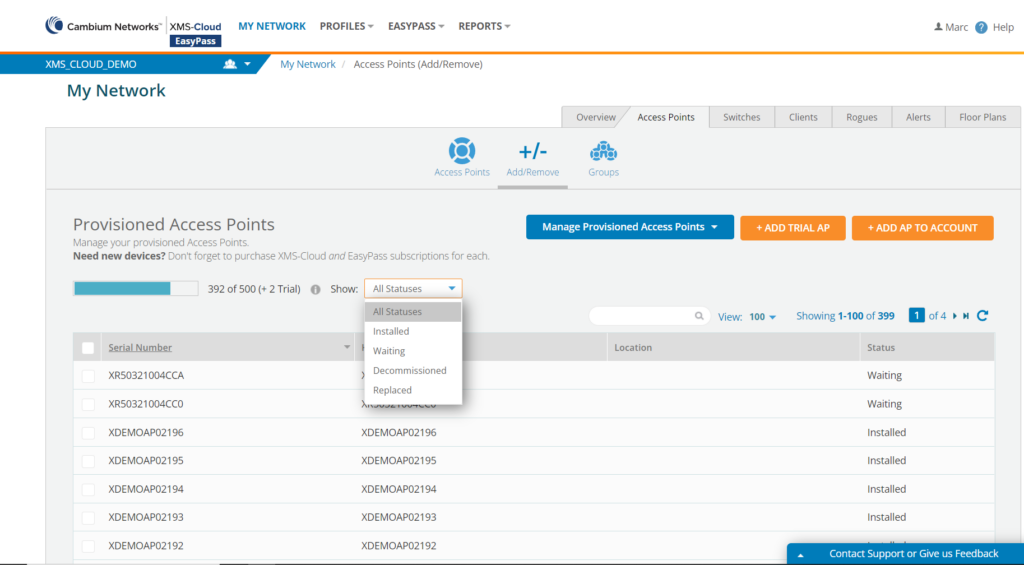
Filter to Focus on Provisioned Access Point Status
XMS-Cloud makes it easy to focus on access points with a certain provisioning status. You can now filter by All Statuses, Installed, Waiting, Decommissioned, or Replaced access points.
To change the filter on the Provisioned Access Points page, go to the Access Points page and click the Show drop-down box.
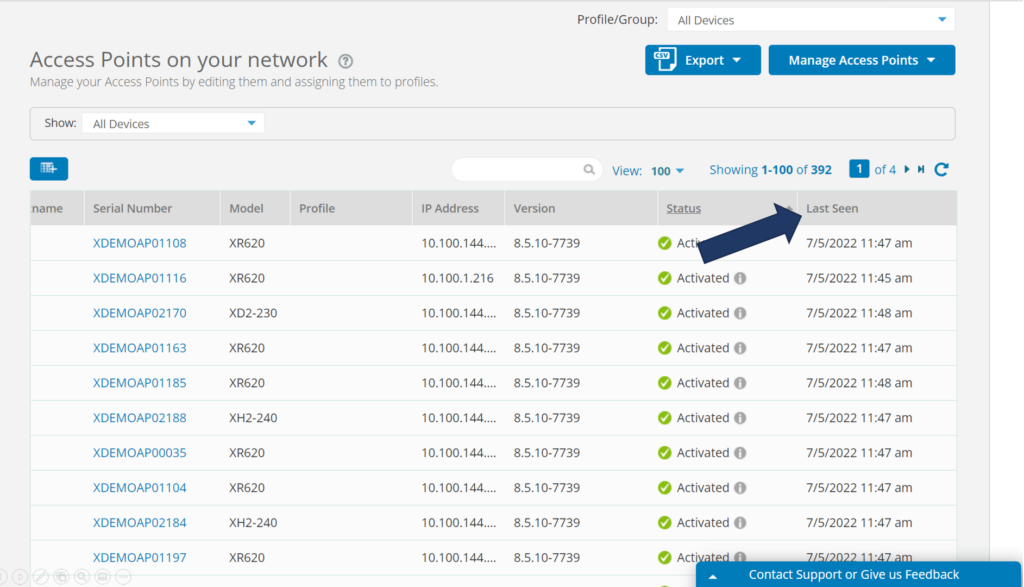
Last Seen Column added to Access Points page tells you the last time an access point was seen online
XMS-Cloud will show you when an access point was last seen on the network.
Go to the Access Points page to add, remove, or rearrange columns by clicking the Columns button and editing the Select Columns page to fit your needs. Add the Last Seen column and click SAVE. Then, on the Access Points on your network page, you can review the last time an access point was seen on the network.
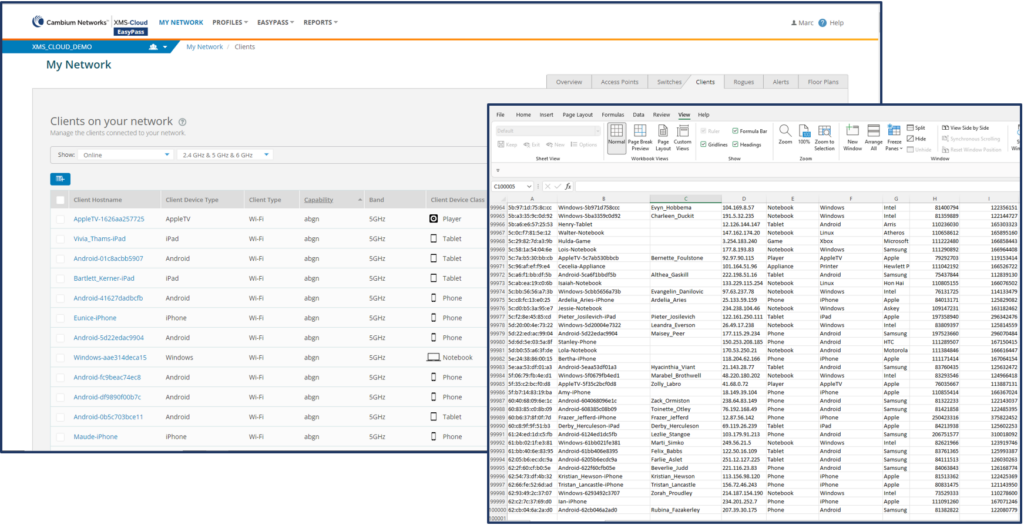
Increased the number of clients info exported on clients page to 100k.
When exporting client device information from XMS-Cloud into a .csv file, you are now able to export information for up to 100,000 clients.
To export client information, go to the Clients page and click the Export button.
The May 2022 release of Xirrus Management System – Cloud (XMS-Cloud) in now available. This new release includes a new EasyPass SAML SSO portal, a Wi-Fi 6E Migration Assistant, the ability to combine more than 2 EasyPass portals, new packet capture templates, voice VLAN support in cnMatrix switches, and more.
Click the thumbnail below to view the video:
EasyPass SAML portal
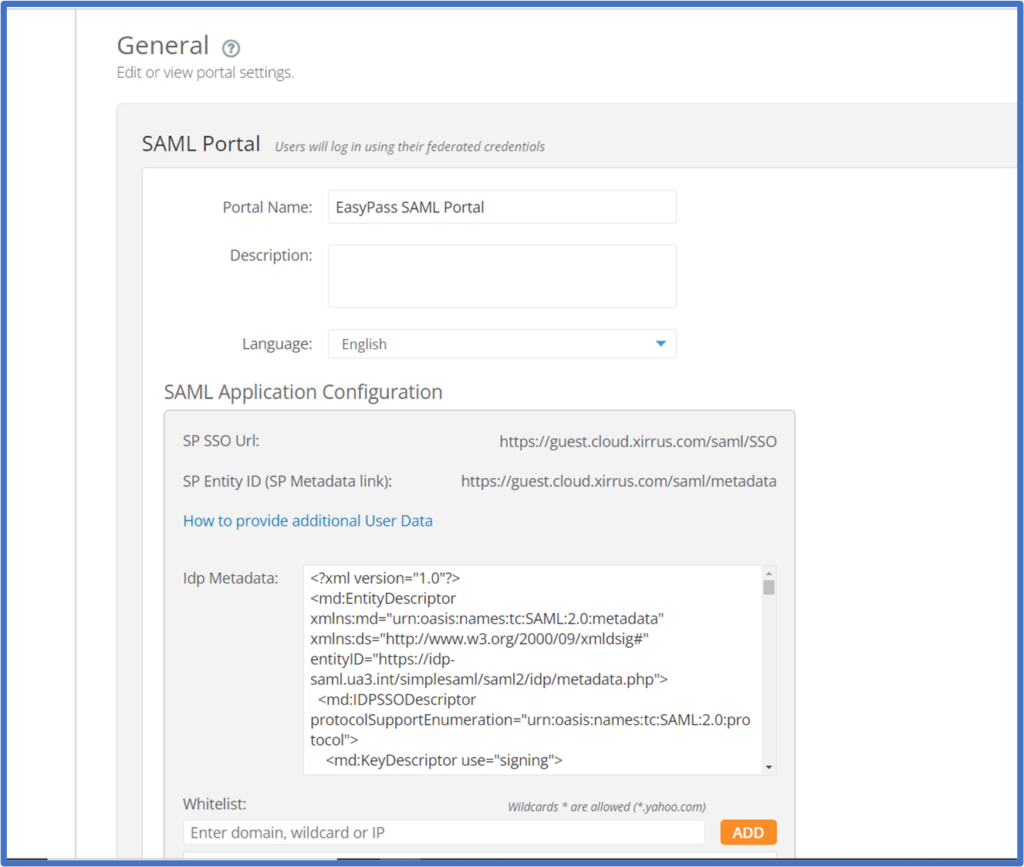
EasyPass now offers a SAML Single Sign-On portal that integrates with third-party identity providers. This portal is very similar to our Microsoft Azure and Google login portals. An end user will first authenticate to the third party server and then they will gain access to the network and network resources. To create an EasyPass SAML portal, go to EasyPass > New Portal > SAML. On the General page, you will need to enter the third-party identity provider’s SSO URL and Entity ID. Then you will need to whitelist the required domains to reach your SAML identity provider such as OKTA or CyberArk. The rest of the portal configuration will be similar to the Azure and Google portals. Once clients start using the portal, you will be able to monitor their login information on the Users page.
Wi-Fi 6E Migration Assistant
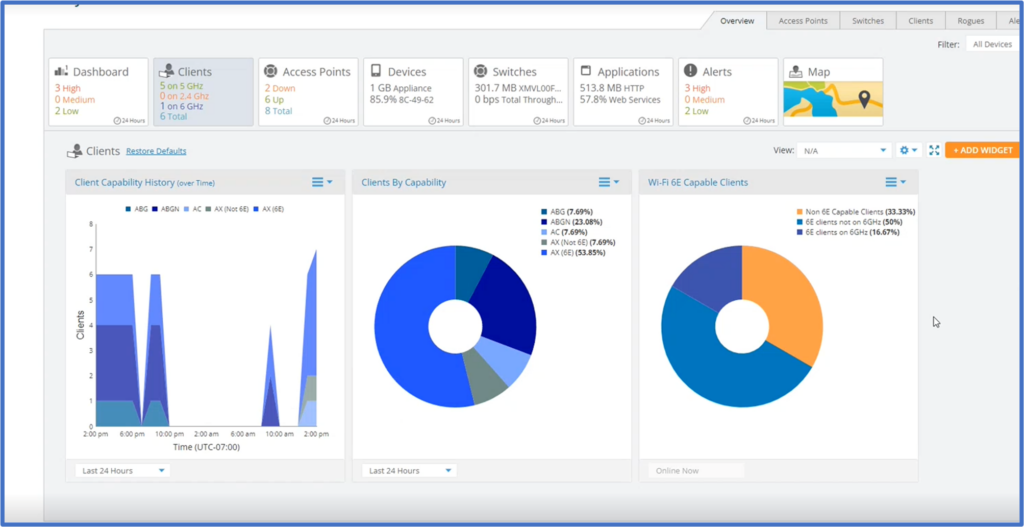
As the number of Wi-Fi 6E clients on Wi-Fi networks increase over time, the software-defined radios (SDRs) in Cambium’s Wi-Fi 6E solutions can be leveraged to manage this transition. The new Wi-Fi 6E Migration Assistant consists of several XMS-Cloud widgets to assist with this. The Clients By Capability widget tracks client capabilities and recommends when it may be appropriate to switch SDR radios from 5GHz to 6GHz. The new Client Capability History widget tracks client device capabilities over time allowing you to monitor 6E client growth trend. This also assists with the decision to change 5 GHz radios to 6 GHz radios. The Wi-Fi 6E Capable Clients shows you the current client device capability mix. To view these new widgets, go to the MY NETWORK > Overview page. Add the new widgets to your dashboard by clicking the ADD WIDGET button. Add the Clients by Capability, Wi-Fi 6E Capable Clients and Client Capability History (over Time) widgets to your dashboard. Hover your mouse over any of the fields in the widgets to reveal a popup window with information for those clients at that point in time.
Client Capabilities on the Clients tab
XMS-Cloud now displays Wi-Fi client device capabilities, i.e. the type of 802.11 technology they support, whether 802.11ax, 802.11ac, etc. To view a client device’s capabilities, go to MY NETWORK > Clients. On the Clients on your network page, client device band Capabilities are shown. A client with a capability of ac indicates 802.11ac is the highest level of Wi-Fi technology that the device supports. A client with a capability of ax indicates the client device is capable of Wi-Fi 6 on the 5GHz band. A client with a capability of ax (6E), indicates the client device is capable of Wi-Fi 6E in the 6GHz band.
Administrator SAML login
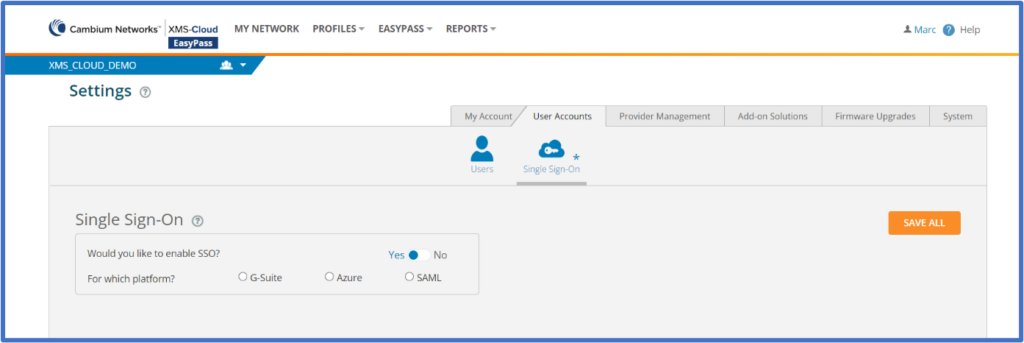
You are now able to configure single sign-on access for XMS-Cloud administrator accounts using a third-party identity provider that uses SAML 2.0. To configure SAML single sign-on access, go to your user profile > Settings > User Accounts > Single Sign-On. Enable Single Sign-On and select SAML.
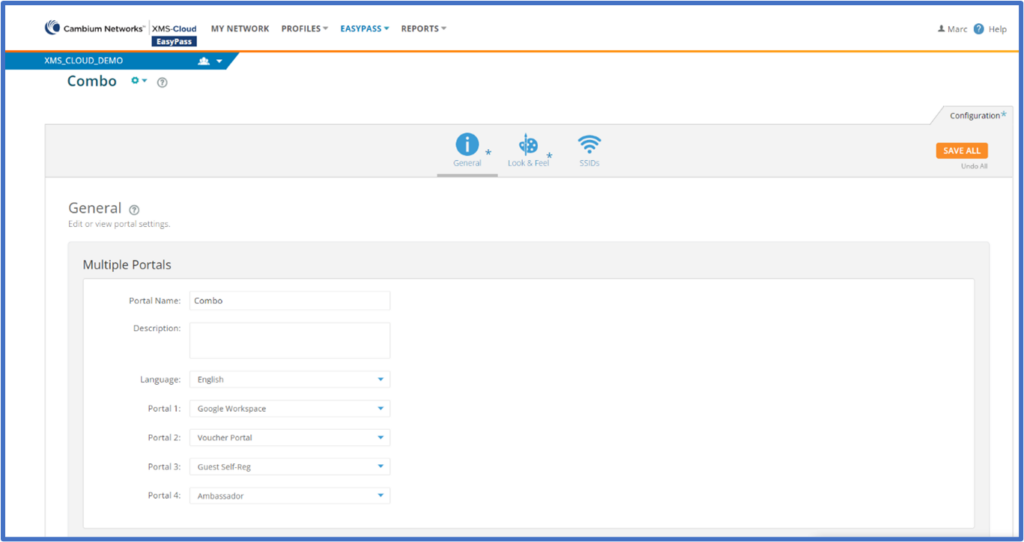
Combine 2 or more EasyPass portals
XMS-Cloud offers the capability of combining up to 4 different EasyPass portals on a single SSID to create a portal that is uniquely suited to meet your client device onboarding needs and minimize the number of SSIDs required. To combine EasyPass portals, go to EasyPass > Combine Portals on One SSID. On the General page, select the portals you wish to combine before customizing the look and feel of the landing page and assigning the portal to an SSID.
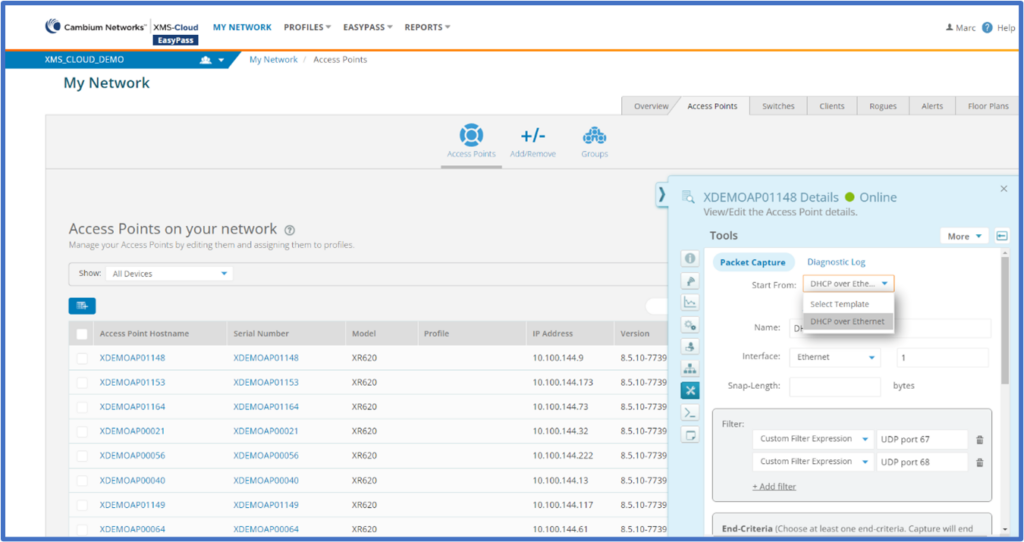
Enhanced packet capture capabilities
XMS-Cloud has enhanced its Wi-Fi packet capture capabilities by allowing you to create file parameter templates which you can easily apply when creating a packet capture file. This allows for increased efficiency as you will only need to pull up a template instead of configuring individual packet capture files each time. To create a packet capture file template, go to PROFILES > Templates > Capture > NEW TEMPLATE. Configure the new template by adding a name selecting an interface and applying the filters. To apply the template, go to MY NETWORK > Access Points. Hover your mouse over the Hostname of the AP you are working on and click the View Details popup window to access the access point fly-out window. Click the Tools button and go to the Packet Capture page. In the Start From field, click the drop-down arrow and select the desired Template.
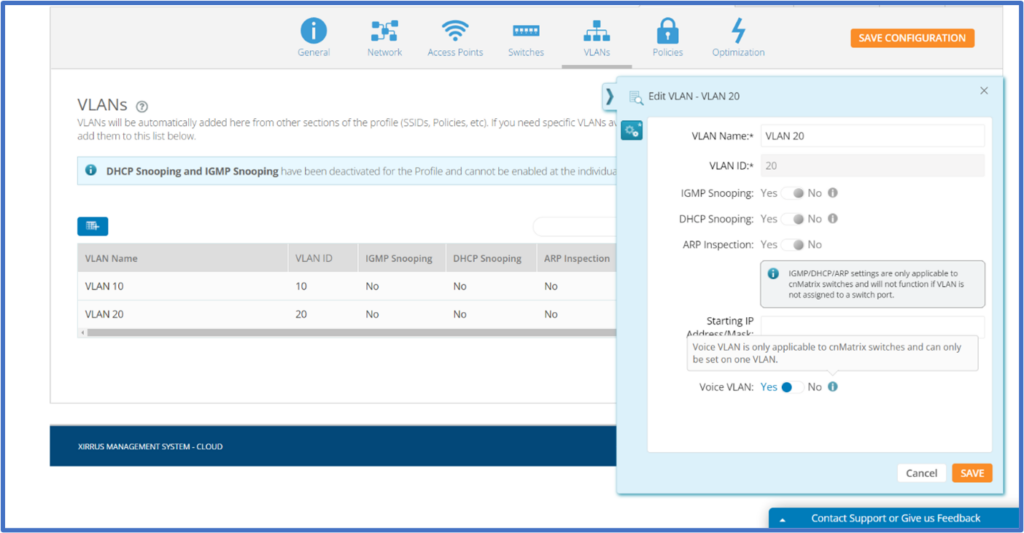
Voice only VLAN
A new XMS-Cloud integration feature with cnMatrix switches provides the ability to set a VLAN exclusively for voice traffic. When selected, TCP traffic will be optimized for performance which is critical for VoWi-Fi traffic. You are only allowed to have one VLAN designated for voice traffic. To designate a VLAN for voice traffic, open an existing Profile and go to the VLANs page. Hover your mouse over the VLAN Name and click the Edit VLAN popup window. On the VLAN fly-out window, select Yes for Voice VLAN.
Ability to deploy configuration to a specific device
Whether it’s done for troubleshooting or testing purposes, there will be times when an AP or switch configuration gets out of sync with the Profile configuration. XMS-Cloud allows you to select an individual device and re-deploy the Profile. To redeploy a Profile to a device, go to MY NETWORK > Access Points and select the access point you want to re-sync. You can also select multiple access points if necessary. Then click the More drop-down window and click Redeploy.
The March 2022 release of Xirrus Management System – Cloud (XMS-Cloud) is now available. This new release includes: support for the XE5-8 Wi-Fi 6E access point, 2-month trial cnMatrix switch license subscriptions, support for the cnMatrix TX2012R-P switch, increased visibility into cnMatrix client devices, new PoE Usage widgets on the Dashboard and in Reports, the ability to select the firmware version you need running on your devices, and more.
Click the thumbnail below to view the video:
Support for new XE5-8 access points
This release adds support for the 5-radio high density XE5-8 Wi-Fi 6E access point. The XE5-8 is the highest performance Wi-Fi solution in the industry with 5 user radios capable of servicing up to 2500 clients and with 15.6Gbps total Wi-Fi bandwidth. 1 radio is a 2.4GHz radio, 2 radios are 5GHz radios, and 2 radios are software definable radios. They can be configured as 5GHz radios to match today’s client mix of .11ac and 5GHz .11ax clients. In the future, when your client mix matures to include mostly 6GHz clients, you can change the 5GHz radios to 6GHz radios. This feature allows you to deploy a solution that matches today’s clients mix and be prepared to accommodate future 6GHz clients without the need to replace APs with only 5GHz radios. XMS-Cloud supports full configuration and management of the XE5-8, including software-defined radio configuration between 5GHz and 6GHz on two of the five radios.
Trial cnMatrix switch license subscriptions
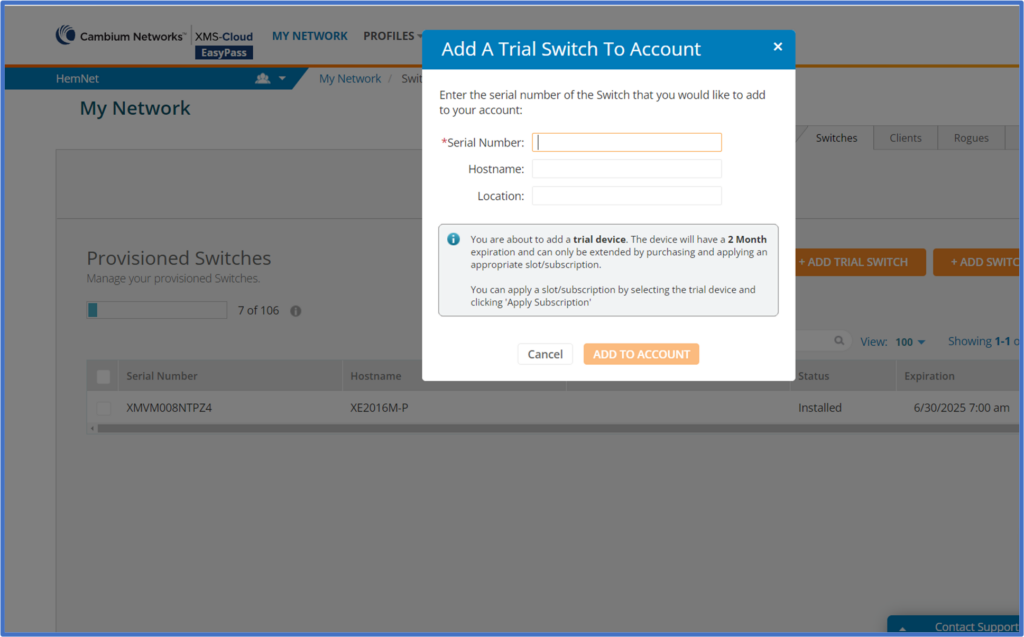
For customers who are evaluating Cambium cnMatrix switches, XMS-Cloud now offers a two-month cnMatrix switch trial license without the need for assistance from Cambium Licensing or Support teams. Convert the trial license to a permanent license by purchasing and applying the appropriate subscription, otherwise the switch license slot will expire after two months. To add a Trial Switch to your account, go to My Network > Switches > Add/Remove > ADD Trial Switch. Enter the Switch serial number and click ADD TO ACCOUNT.
cnMatrix support and connected device visibility
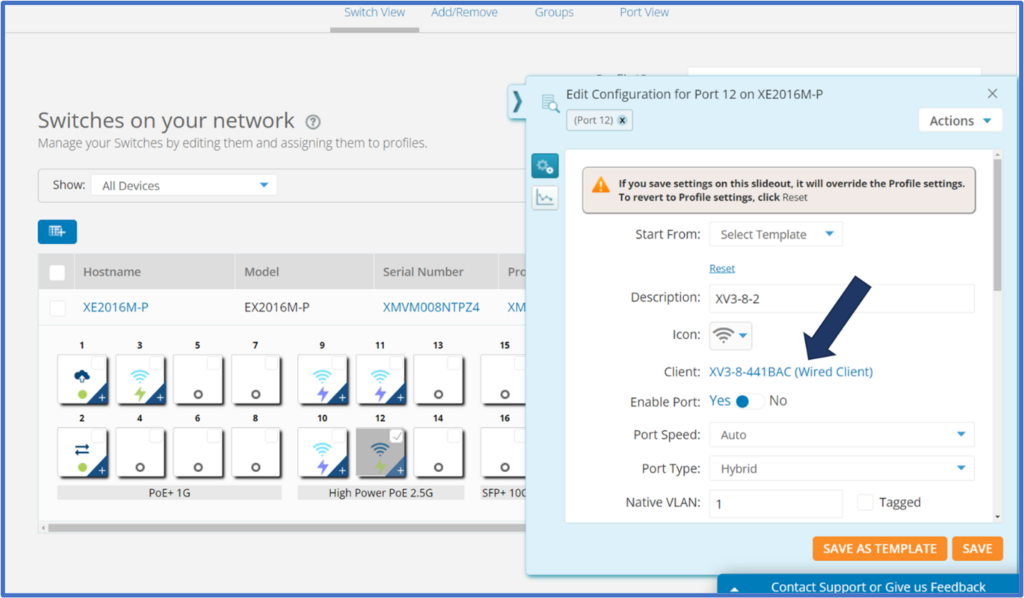
This release adds support for the cnMatrix the TX2012R-P tower switch. In addition, visibility has been added into the device type plugged into a given switch port. When you go to the MY NETWORK > Switches page, select a switch and hover your mouse over an active switch port, the type of device is displayed. When you click on the switch port to reveal the fly-out window, you will see the type of device and client hostname for the connected device. You can click on the client information to go directly to the client device on the Clients page where you can continue to drill down by clicking the client hostname.
Monitor cnMatrix connected device PoE usage
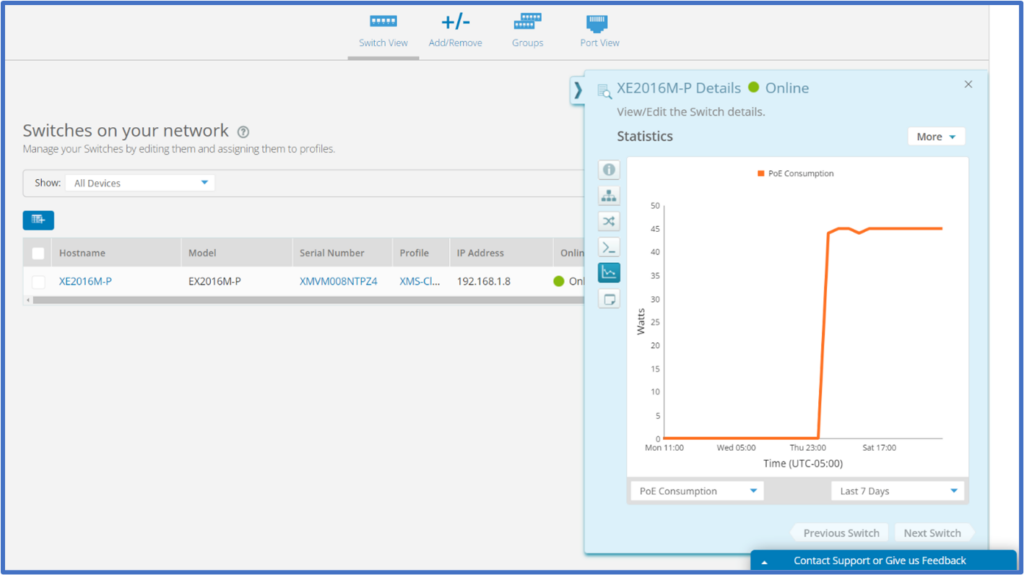
You can review a connected device’s PoE consumption over time by going to the MY NETWORK > Switches page and clicking on the hostname of a switch to reveal the switch fly-out window. On the Statistics > PoE Consumption page, you can review the PoE Consumption graph to determine how much PoE power that switch has been providing over a period of time.
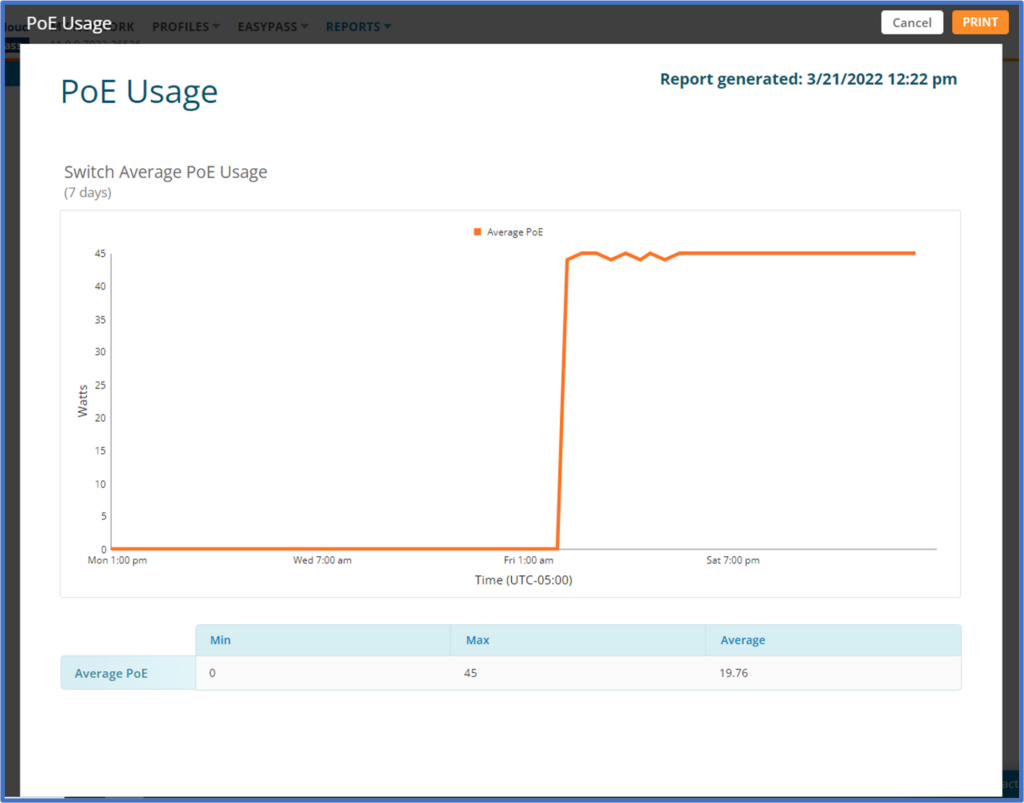
PoE usage widget added to Dashboard
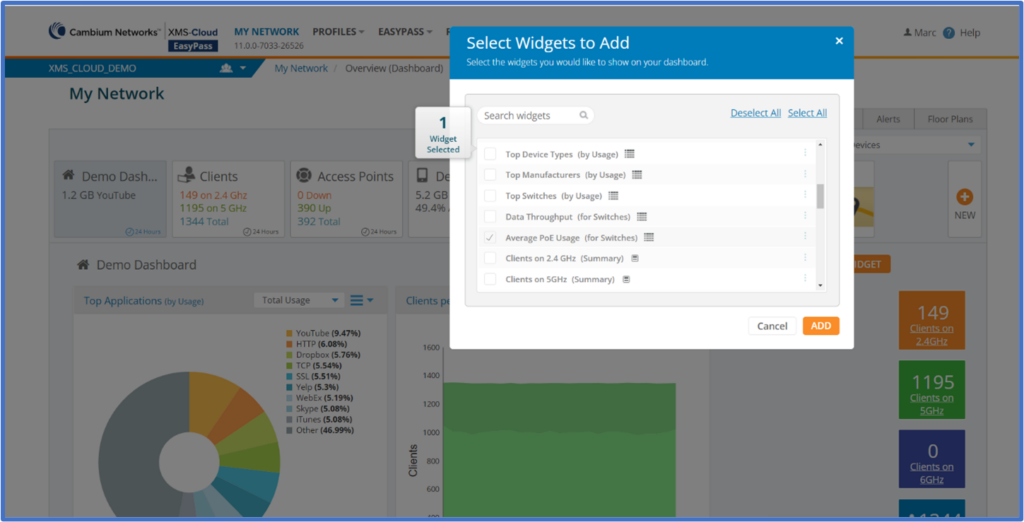
A PoE Usage widget can be added to the Dashboard by clicking ADD WIDGET and selecting the Average PoE Usage(for Switches) widget and clicking ADD. This will display a graph with the average PoE usage for all of your switches over a period of time.
PoE usage widget added to Reports
This same PoE usage widget has been added to the reports. To add the widget to a report, go to REPORTS, and create a NEW REPORT. Give the Report a name and click Add Page. Click the Widget drop-down window, select the Switch Average PoE Usage widget, select the time range to report on and SAVE the report.
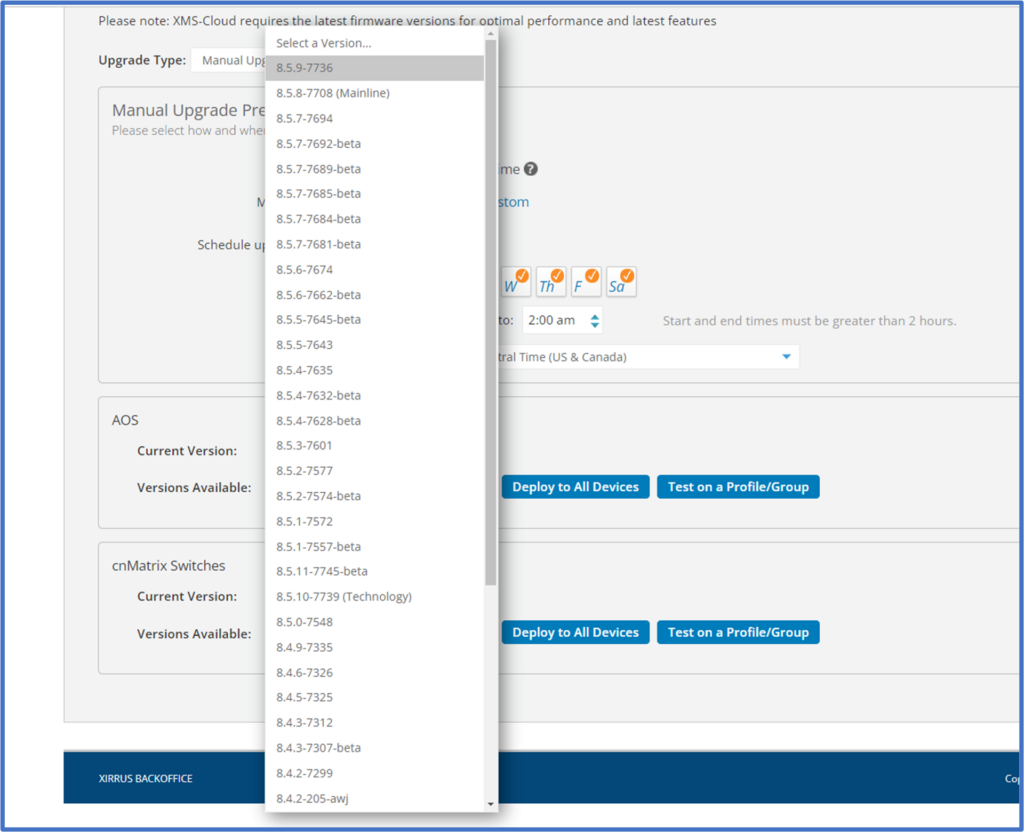
Added flexibility for applying Firmware versions
When managing Firmware Versions and Upgrades, you are able to select the software version from a drop-down window that contains a list of previous firmware versions. To select the firmware version that you need running on your APs and switches, go to your Account Profile > Settings > Firmware Upgrades. For Upgrade Type, select Manual Upgrades. Under the AOS, or CAOS, or cnMatrix Switches section, click the drop-down window next to Versions Available. Then select the firmware version and Deploy to All Devices or Test on a Profile/Group.
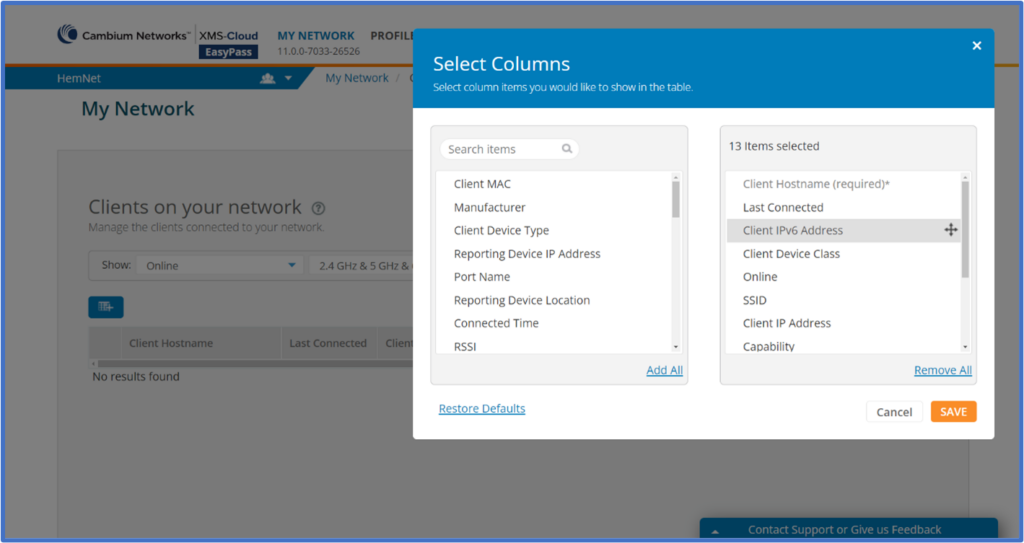
Visibility into Client IPv6 configuration
XMS-Cloud will display client device IPv6 information, including IPv6 addresses, on the Clients page. Configuration of IPv6 information is currently accomplished in the CLI as these features are added as being added to XMS-Cloud. To review the client device IPv6 information, go to MY NETWORK > Clients. Click the Add Columns button, select the Client IPv6 Address widget and move it to the right side of the window and click SAVE.
The February 2022 release of Xirrus Management System – Cloud (XMS-Cloud) in now available. This new release includes new trial AP license subscriptions, an SSID Usage analytics report, CSV file format output for reports, a new Technician User account, and additional cnMatrix switch status information.
Click the thumbnail below to view the video:
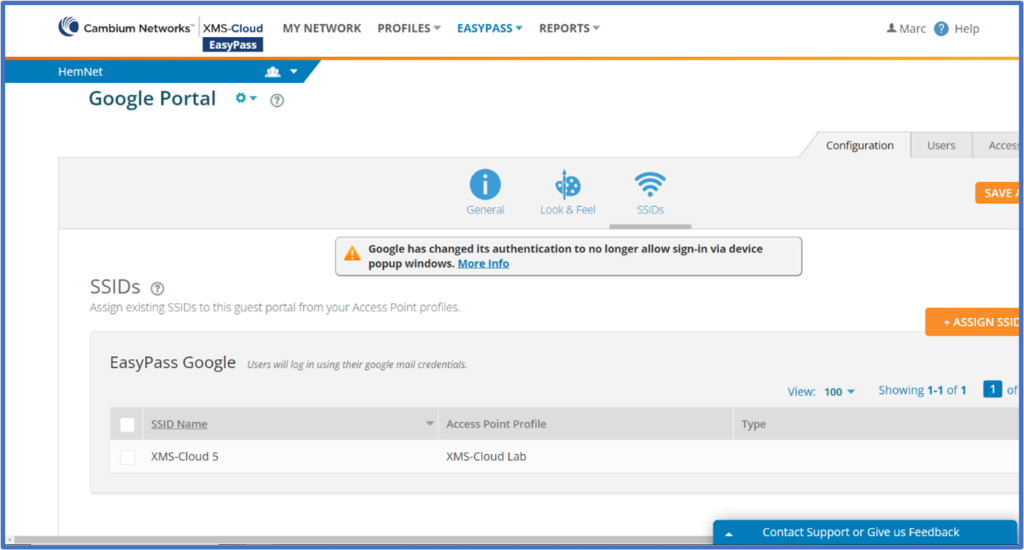
Change to device behavior when using EasyPass Google Login Portals
Google no longer allows devices to sign-in using device popup windows. When using the Google Login portal, after selecting the Google portal SSID, end-users will need to open an internet browser to reach the EasyPass login page and complete the Google sign-in process.
Trial AP license subscriptions
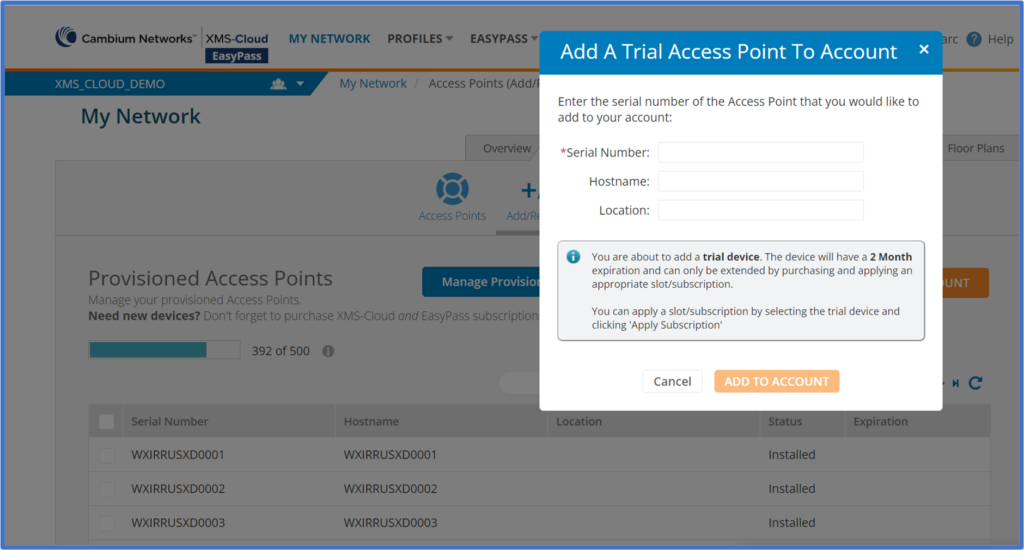
For customers who are evaluating Cambium access points, XMS-Cloud now offers two-month AP trial licenses without the need to obtain them from our Licensing or Support teams. Convert the trial license to a permanent license by purchasing and applying the appropriate subscription, otherwise the AP license slot will expire after two months. To add a Trial Access Point to your account, go to My Network > Access Points > Add/Remove > ADD Trial AP. Enter the AP serial number and click ADD TO ACCOUNT.
SSID Usage analytics report
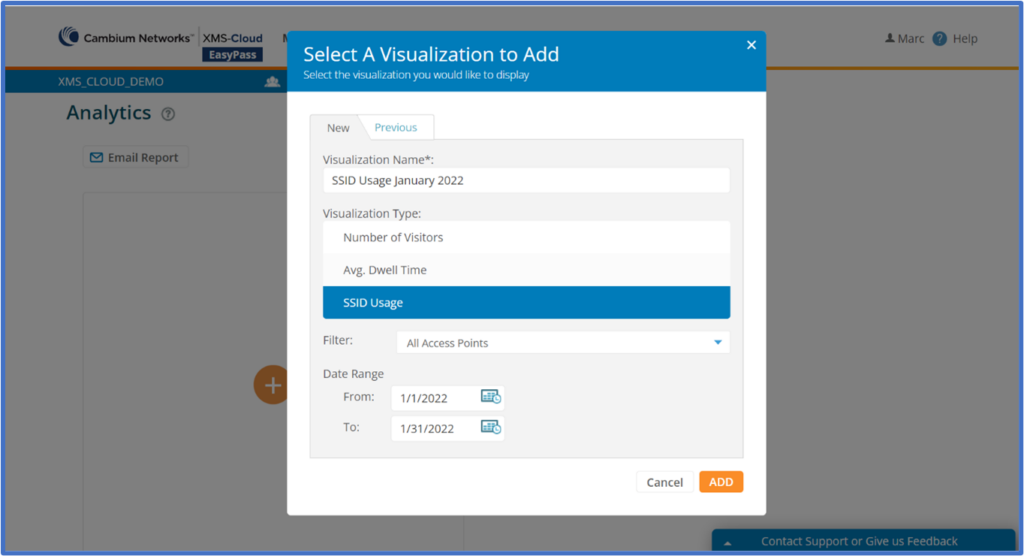
XMS-Cloud now offers an Analytics Report showing SSID Usage over a configurable period of time. You can filter the report by AP Groups and set a date range. The report includes number of clients, client sessions, time, and amount of data used. To create the SSID Usage Report, go to REPORTS > Analytics > Choose Visualization à SSID Usage. Set a date range and click ADD. When the report is ready, click the Email Report button to send the report out via email.
Report output in CSV file format
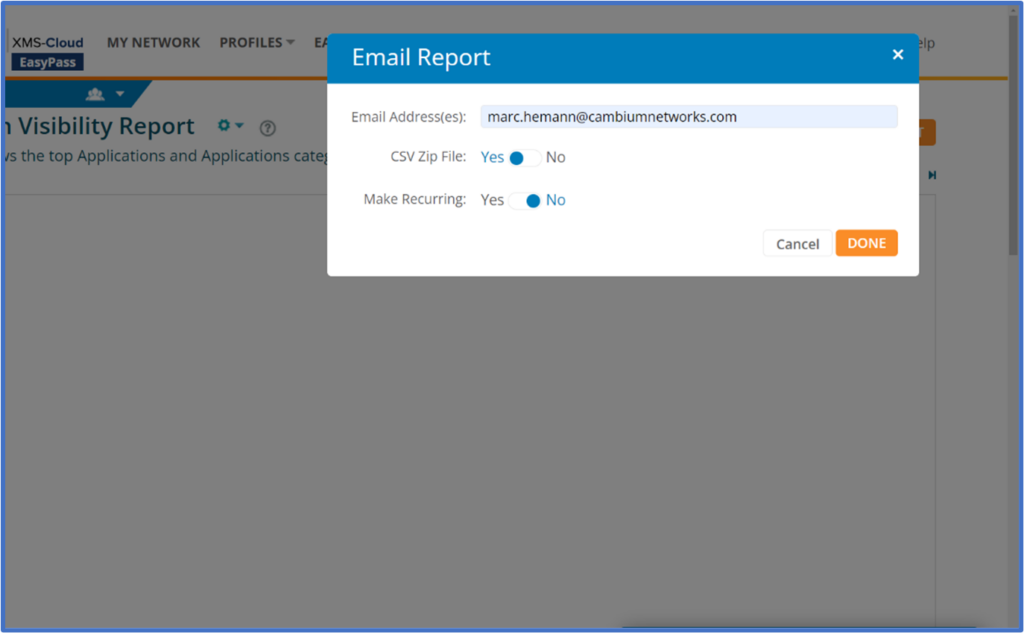
When creating reports, in addition to PDF format, you now have the option of creating output in a .csv zip file to be emailed. The information in the .csv file can easily be imported into other third-party systems for further analysis. To create reports CSV file format, open a Report, click Email Report, and select Yes for CSV Zip File.
Technician user account with extended Read-Only permissions
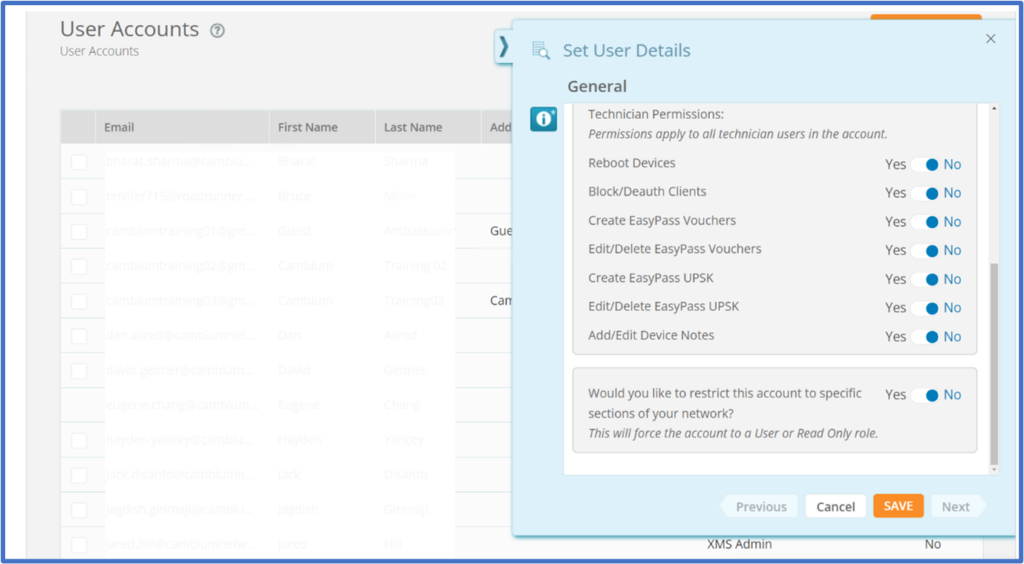
You can create a new Technician XMS-Cloud User account with customized permissions. The Technician account will have Read-Only permissions plus the additional permissions you assign to it. The additional permissions include the ability to reboot devices, manage client device access to the network, EasyPass Vouchers, UPSKs, and device Notes. To create and configure a Technician user account, go to your Profile icon > Settings > User Accounts. Click Add User and click the drop down for the user privileges and select Technician. Configure the permissions appropriately and click SAVE. Another use for the Technician account is to restrict Read-Only access to the network based on Network Profiles, Groups, or EasyPass portals.
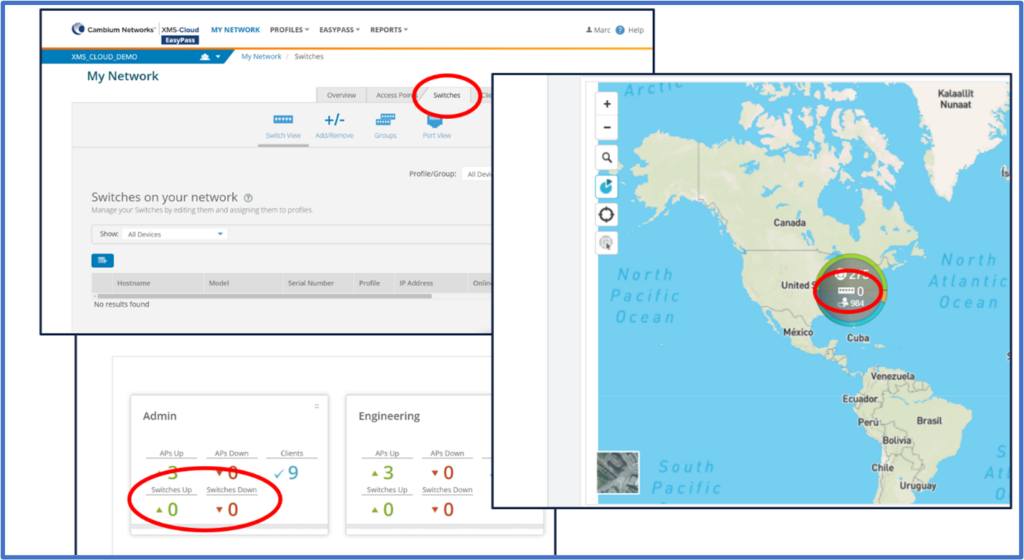
Switch management information display and trials Switch information is now displayed by default in XMS-Cloud, even if no switches are currently being managed. Switch information and status is displayed on the Switch tab on the My Network page, Profile Summary page, and on the Map geo marker. In addition, a 2 month temporary license is available for one switch by default for new XMS-Cloud tenants.