Skip to content

XMS Cloud Posts

New Release – December 2021

The December 2021 release of Xirrus Management System – Cloud (XMS-Cloud) is now available.  This major new release includes new troubleshooting and maintenance tools, new configuration options for cnMatrix switches, support for new Wi-Fi 6/6E access points and TX-series switches, and more. 

Click the thumbnail below to view the video:

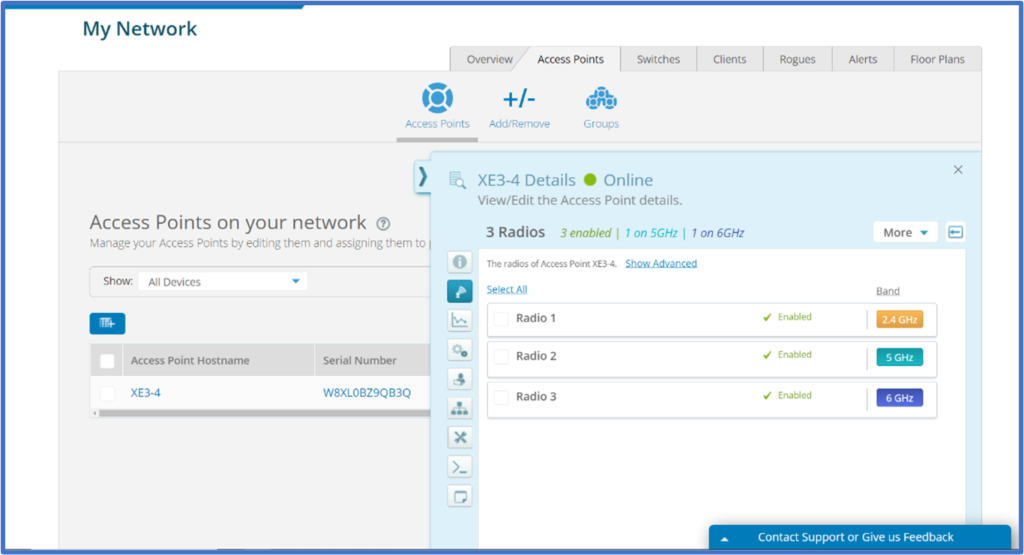
Support for new Wi-Fi 6/6E access points and TX-series switches

Support for the new XE3-4 Wi-Fi 6E and outdoor XV2-2T1 Wi-Fi 6 access points and cnMatrix TX2020R-P and TX2028RF-P switches have been added in this release. In tandem with support for the XE3-4 AP, XMS-Cloud now provides visibility and configuration of the new 6 GHz unlicensed Wi-Fi band.

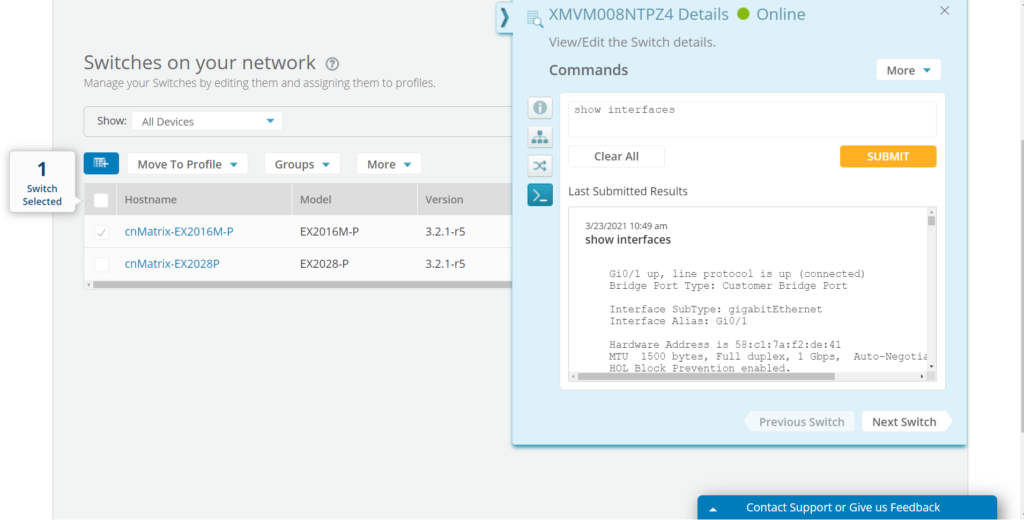
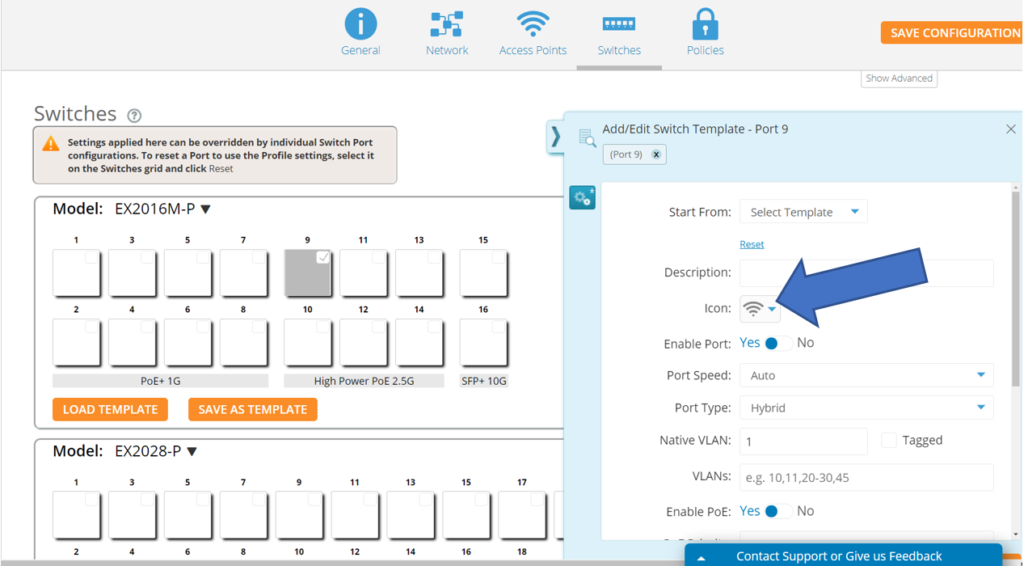
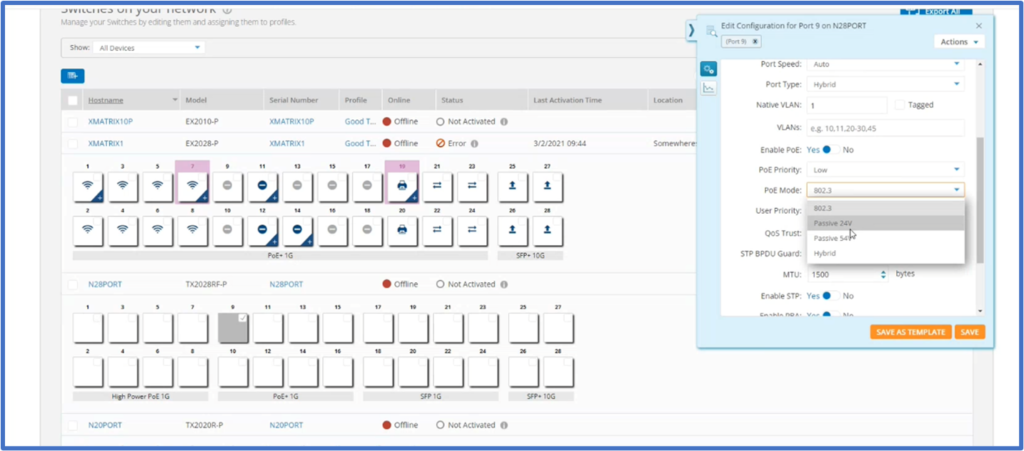
cnMatrix switch port PoE Mode configuration

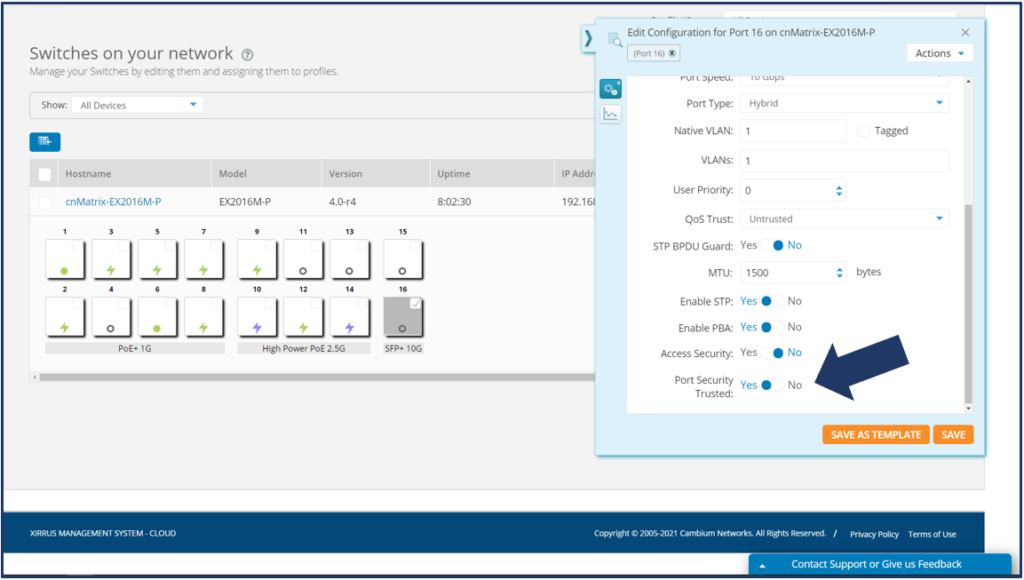
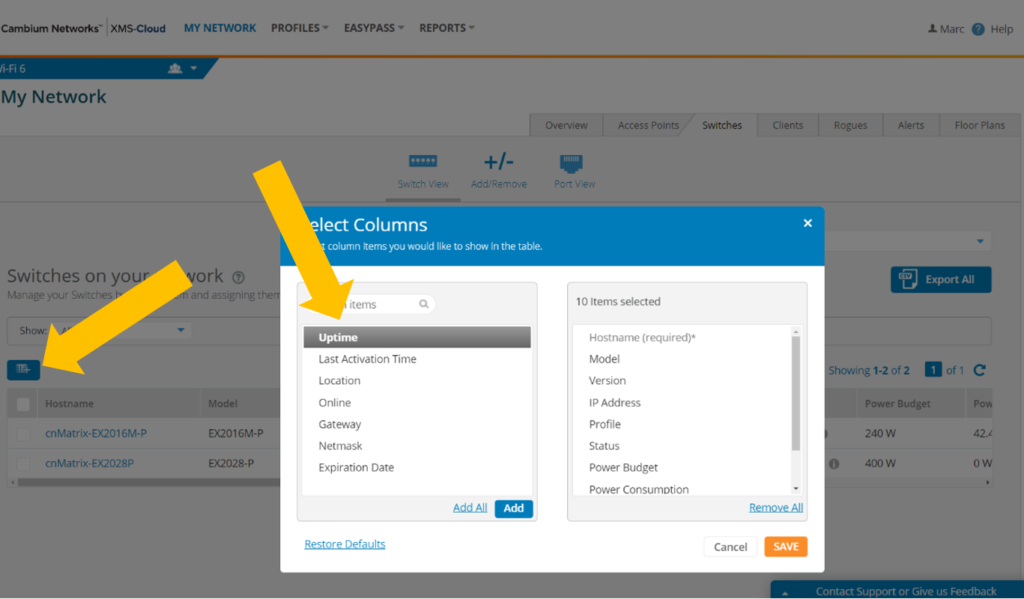
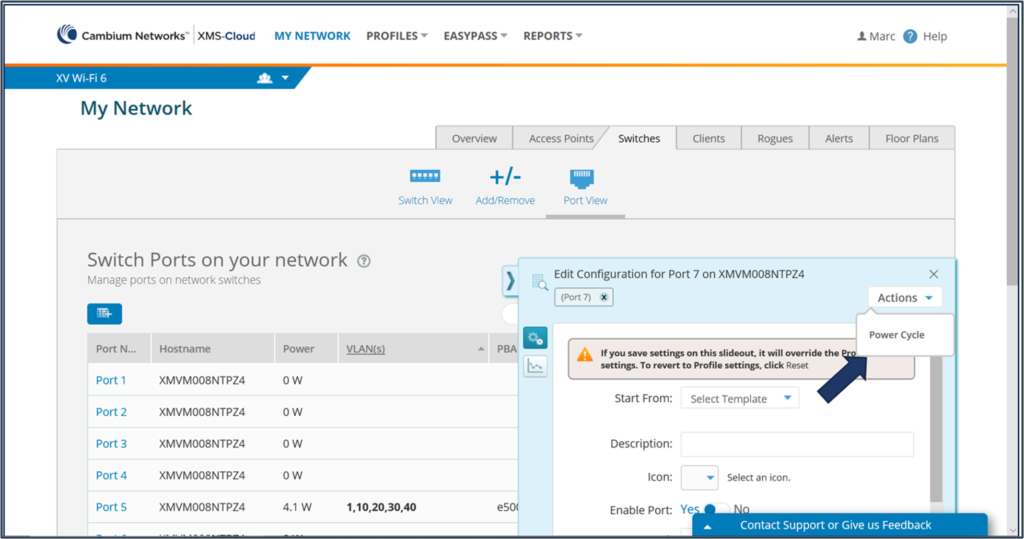
With this release of XMS-Cloud, you can configure the PoE mode for individual cnMatrix switch ports.  To configure the port PoE mode, go to the My Network page > Switches page.  Click the Model on the switch to open the switch port layout.  Select the port you want to configure and on the switch details fly-out window, go to PoE Mode:, click the drop-down window and select 802.3 or Hybrid.  The TX switches also support Passive 24V & Passive 54V configuration Options.

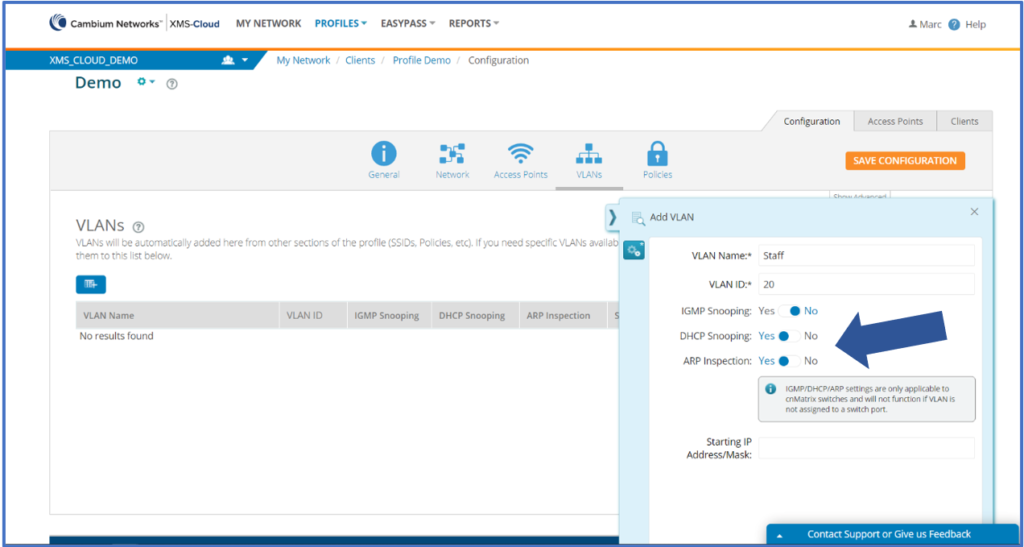
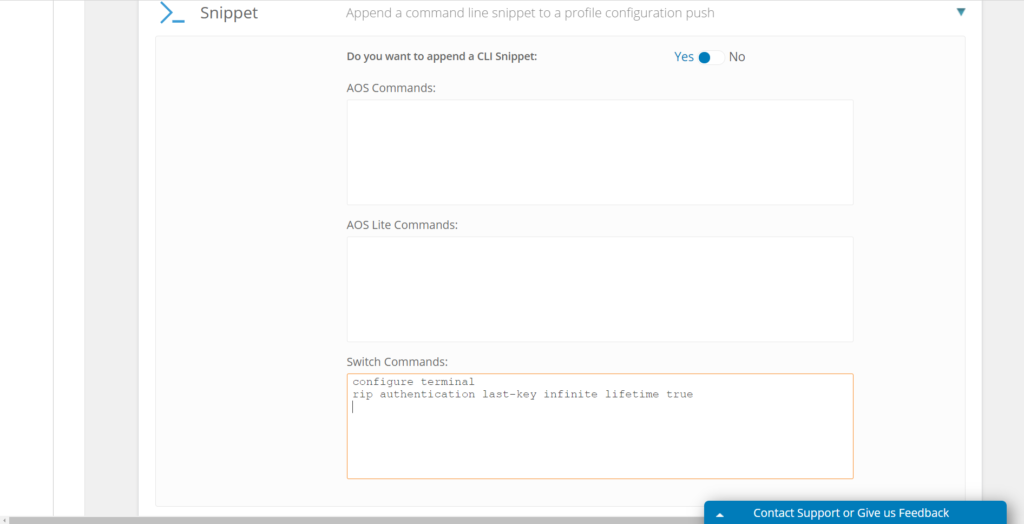
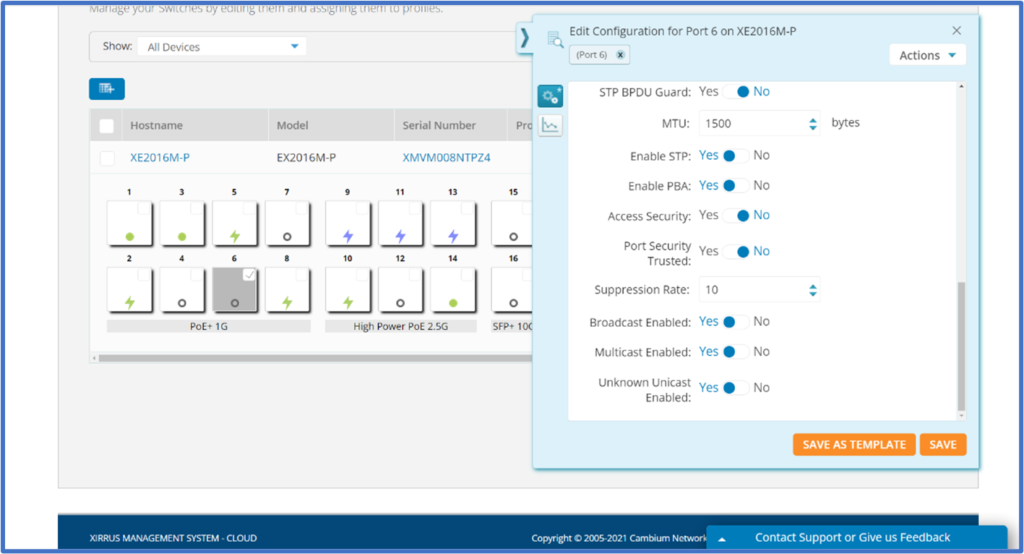
cnMatrix switch Suppression Rates

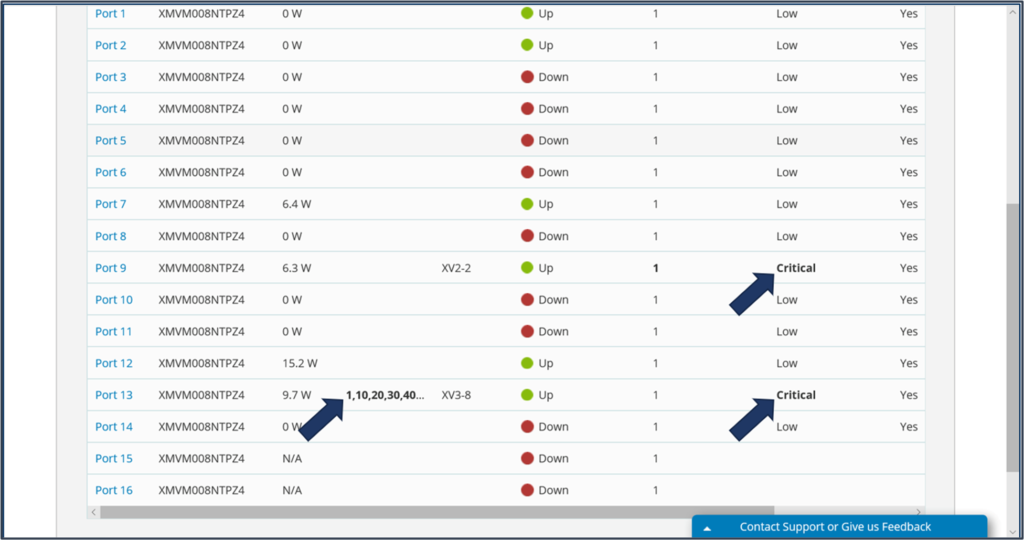
You are now able to configure suppression rates for broadcast, multicast and unknown unicast in cnMatrix switches.  This allows you to prevent traffic storms caused when excessive broadcast, multicast and unknown unicast packets flood inbound and outbound ports by limiting the number of packets the switch will process at a time.  To configure suppressions rates, go to the My Network page > Switches page.  Click the Model on the switch to open the switch port layout.  Select the port you want to configure and on the switch details fly-out window, go to Suppression Rate.  When you configure any number larger than 0, you will need to enable Broadcast, and/or Multicast, and/or Unknow Unicast traffic to apply this suppression rate to.

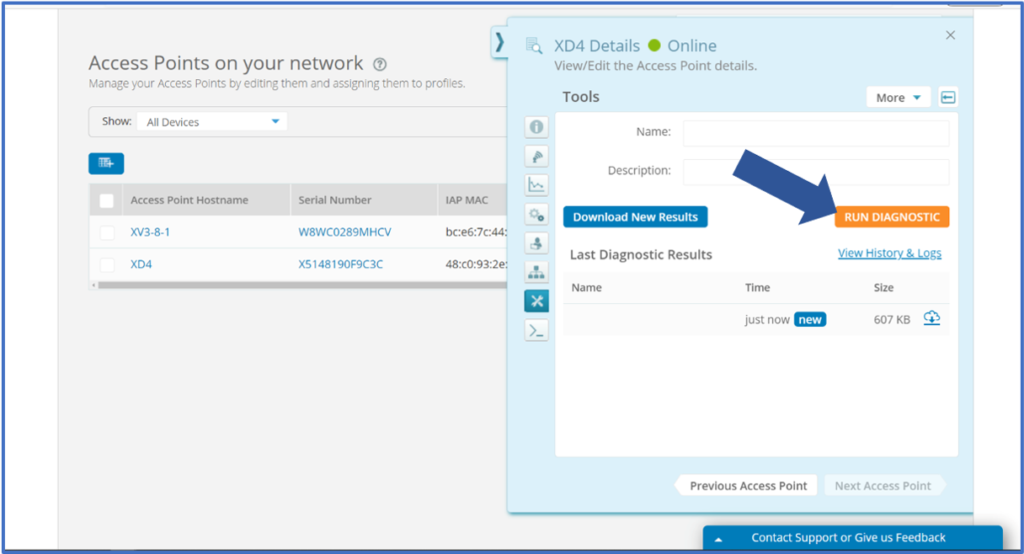
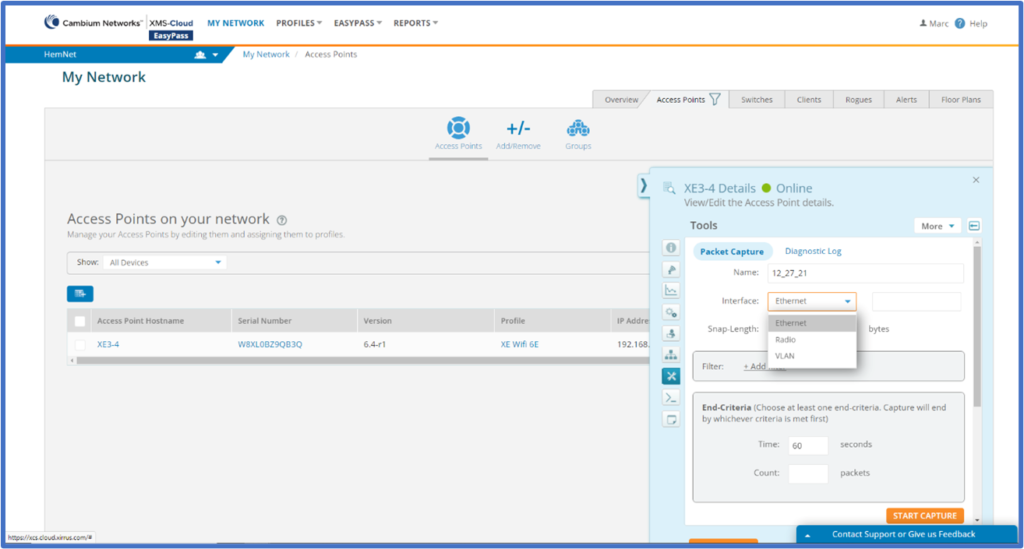
Create packet capture files

When troubleshooting access point or client performance issues, packet capture files are a valuable tool for support engineers.  In this release of XMS-Cloud, we have added the ability to create and open packet capture files on the access points page.  To create a packet capture file, go to My Network > Access Points.  Once a packet capture file has been created, you can access it on your profile page under History & Logs > Tools > Packet Capture.

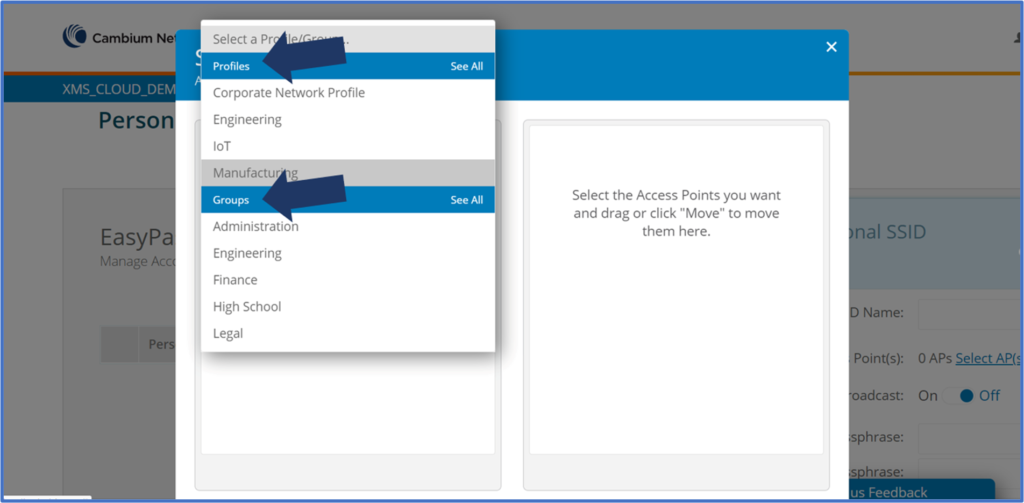
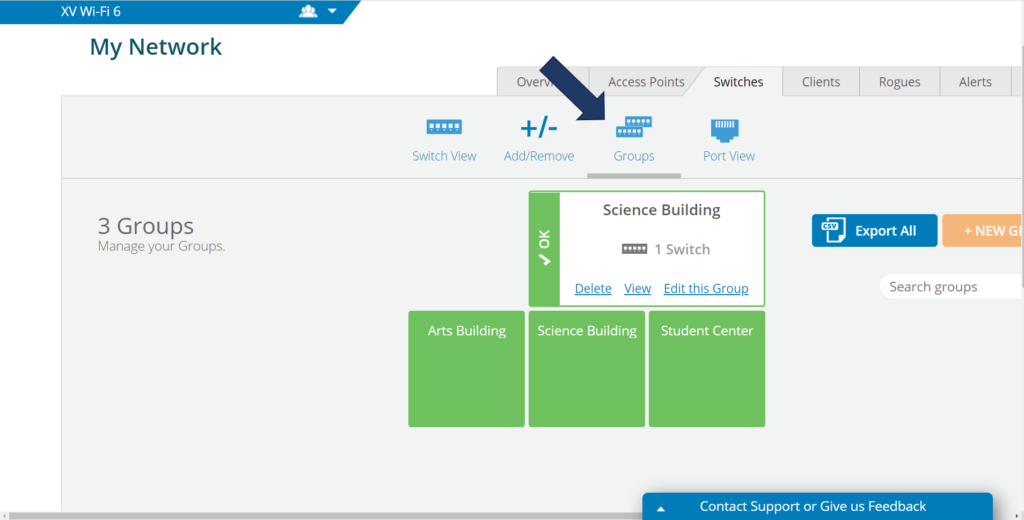
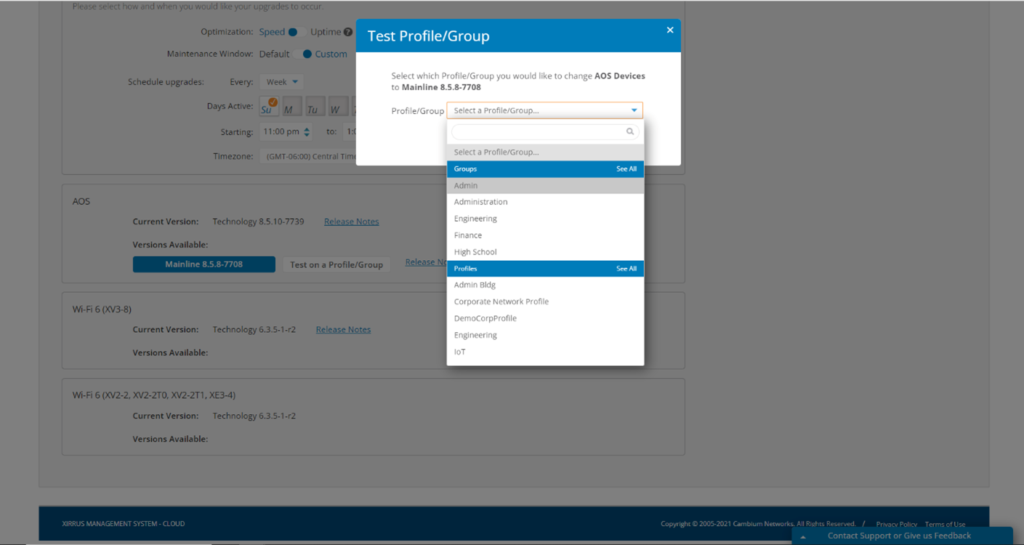
Test a new software version on a Group before releasing to rest of network

When performing a manual software upgrade to access points and switches you have been able to test the new software version on devices within a Profile before releasing the new version to the rest of your network.  In this release, you have the option of testing the new version on a Group, allowing you to separate the test devices even further before releasing the new software version to the rest of your network.

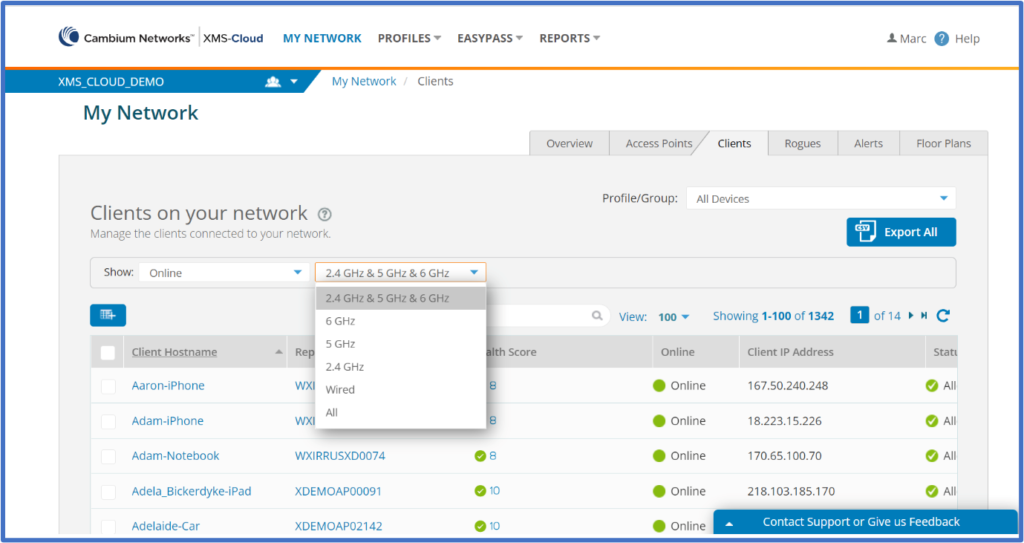
Reassociate Client device

With this release of XMS-Cloud, you can force a client to deassociate from the network. In most cases, the client will immediately reassociate to the network.  This is very useful when the client needs to re-associate to the Wi-Fi network to receive new network information, such as getting placed in a different VLAN.  To deassociate/reassociate a client device, go to My Network > Clients and select a client device by clicking the box next to the client Hostname.  Then click the Reassociate button at the top of the client list.

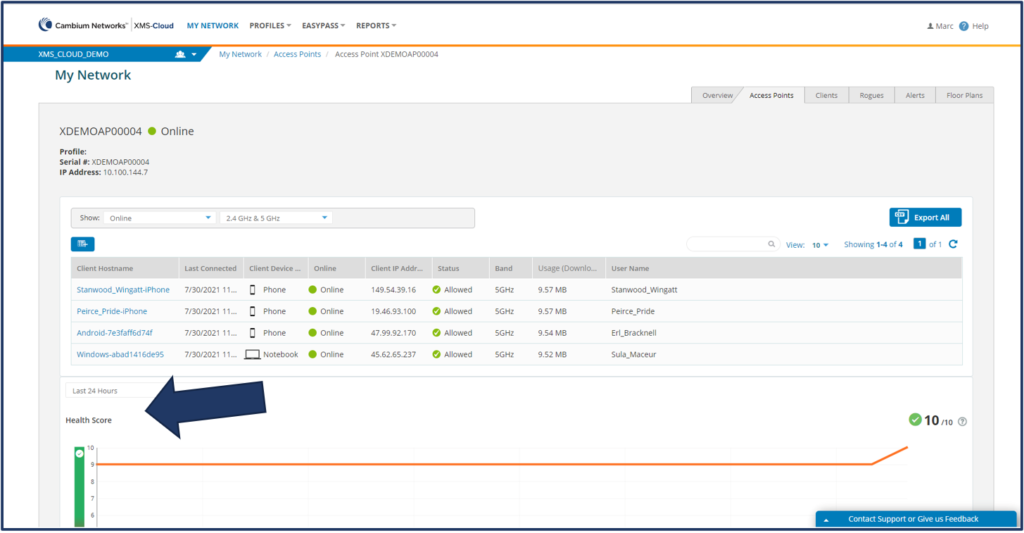
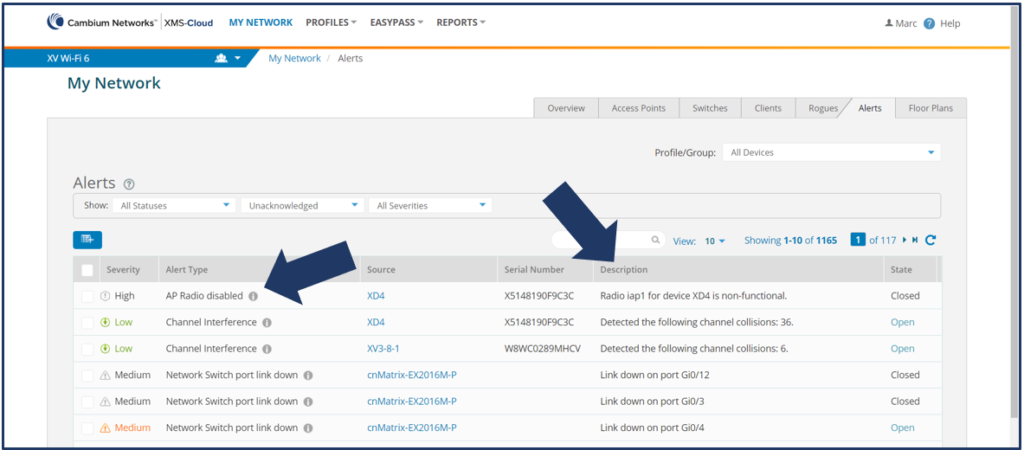
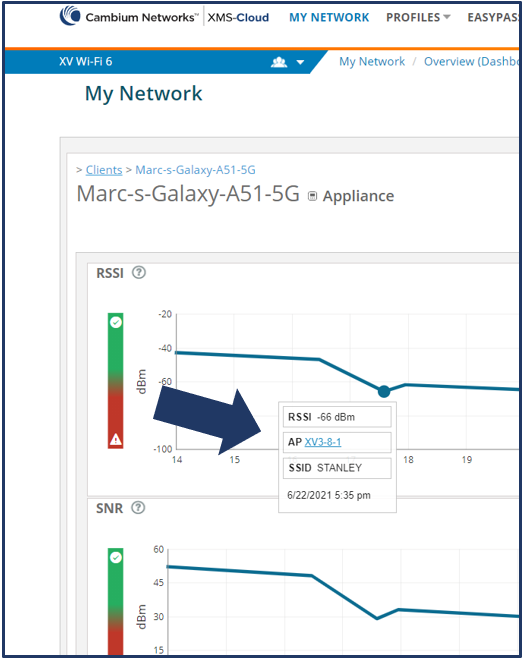
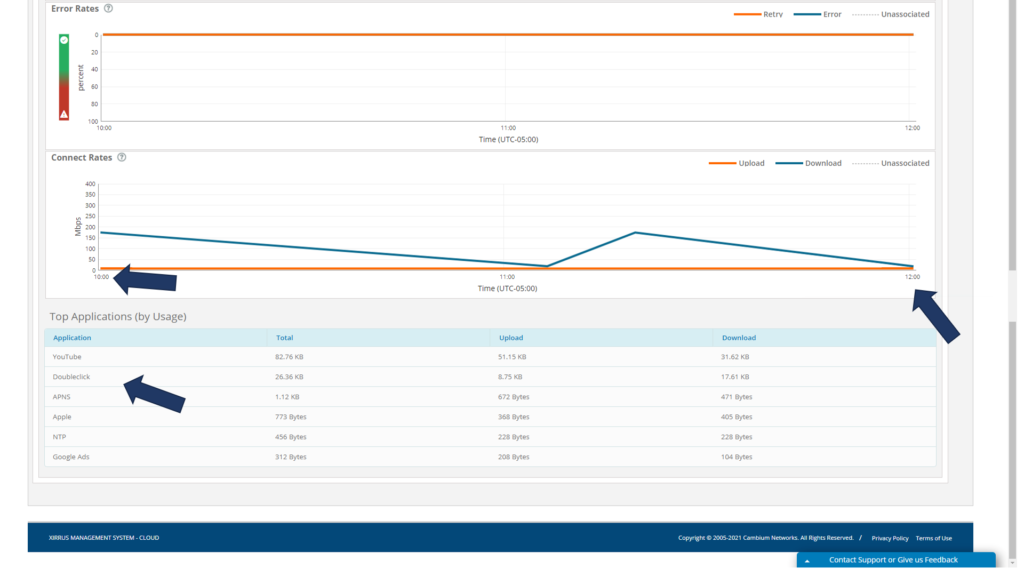
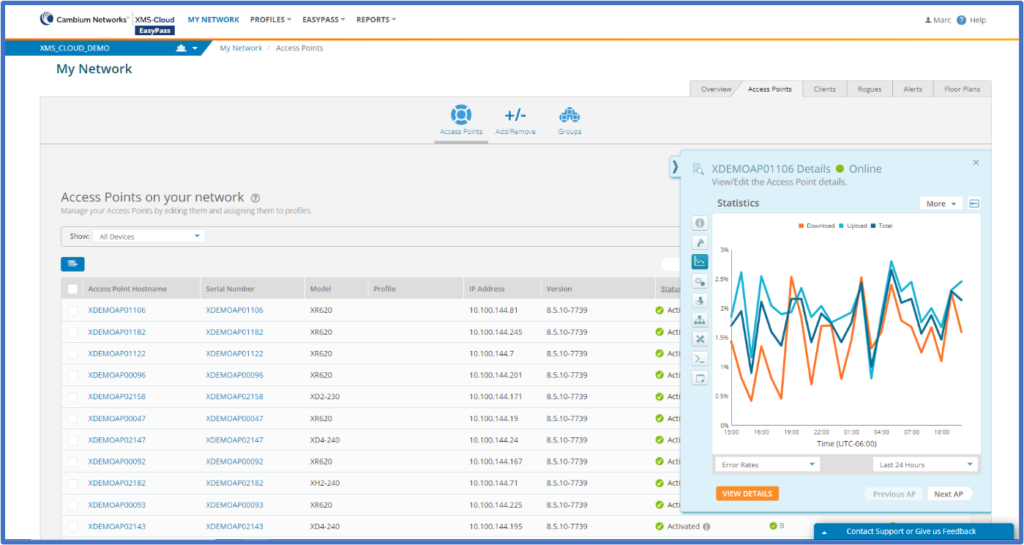
Chart for Access Point Error Rates

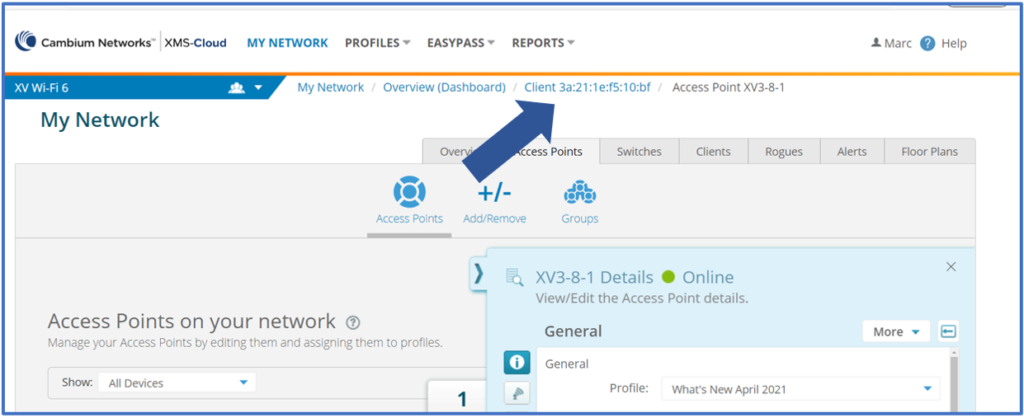
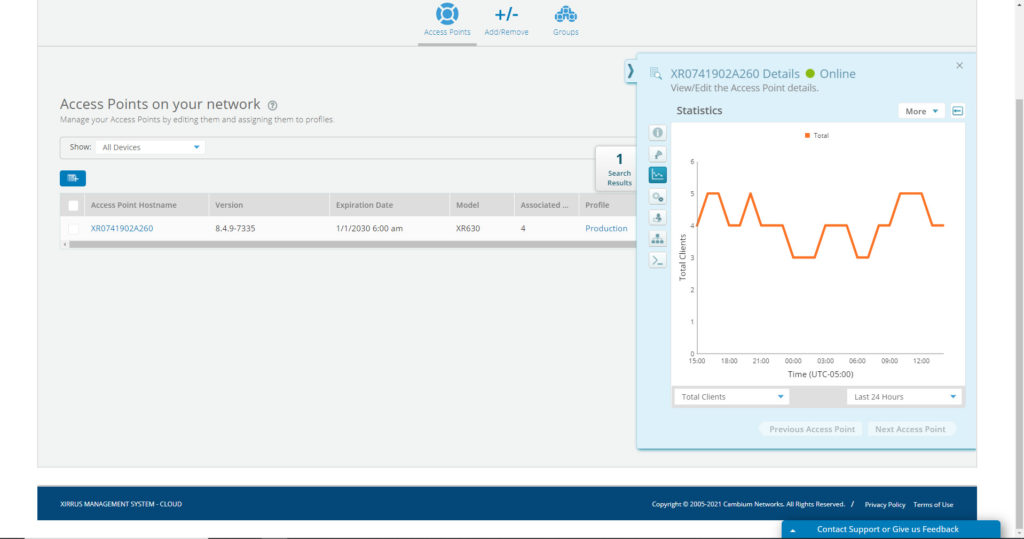
For troubleshooting access point performance issues, XMS-Cloud now offers a chart with access point error rates over time.  To review the error rates, go to My Network > Access Points.  Select an access point and click the View Access Point Details Page button.  On the access point details fly-out window, click the drop-down box and select Error Rates.

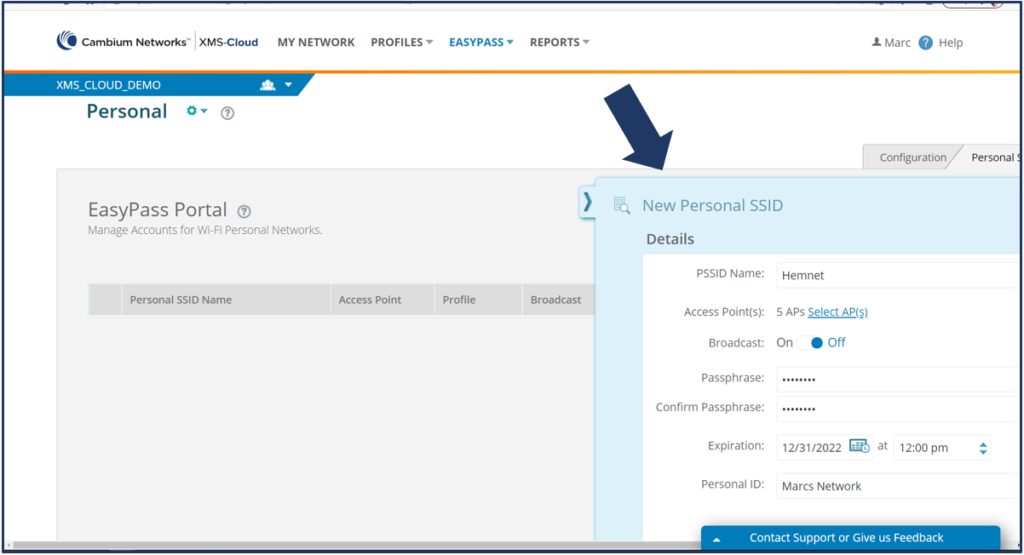
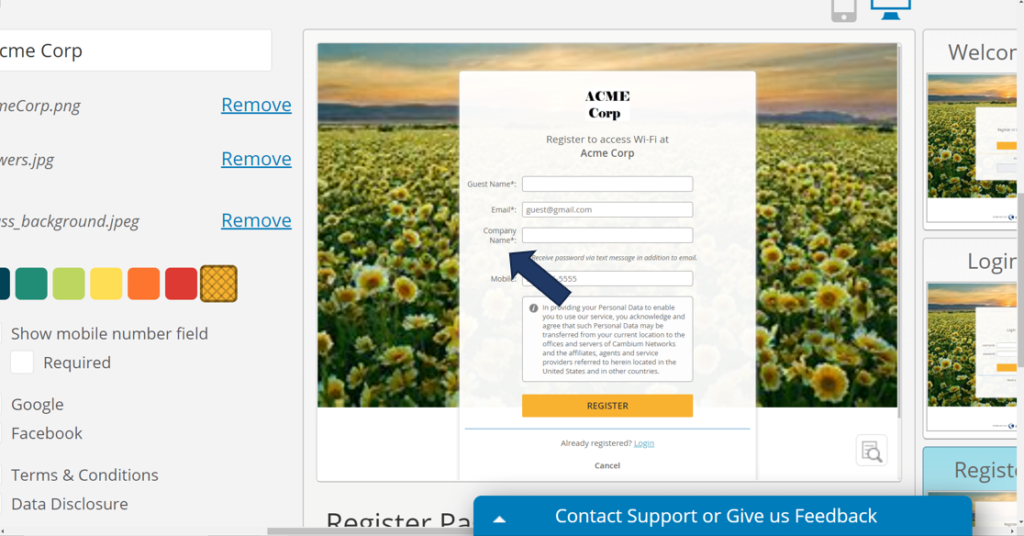
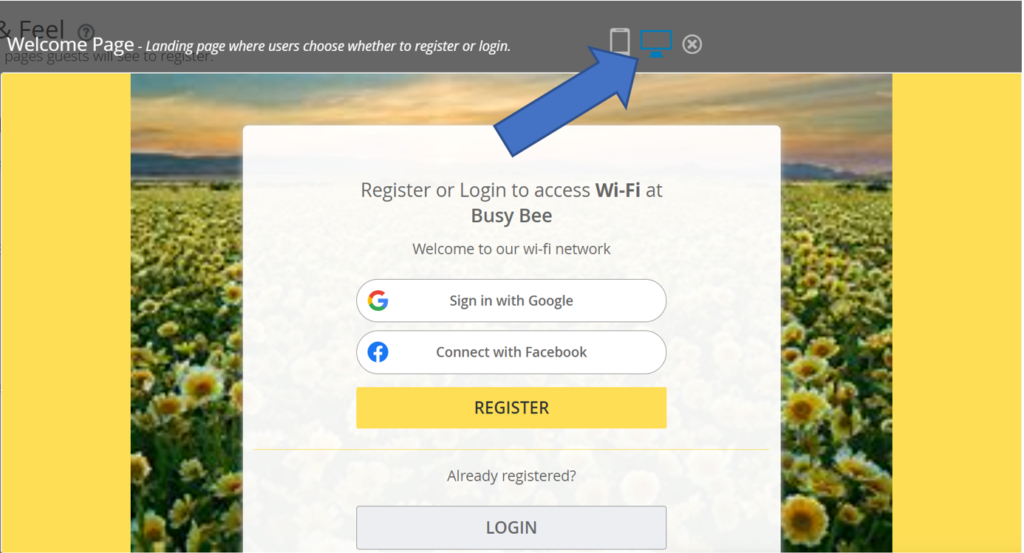
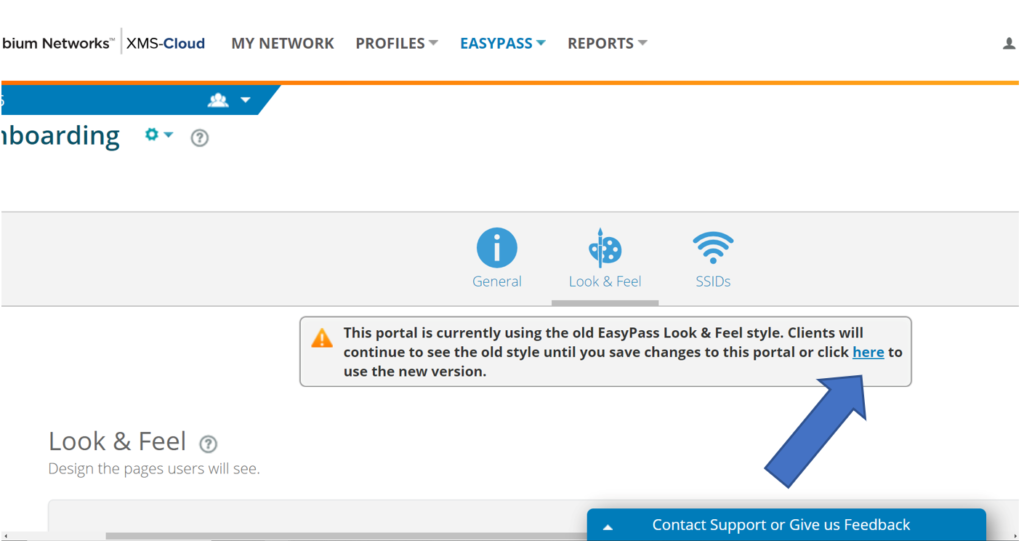
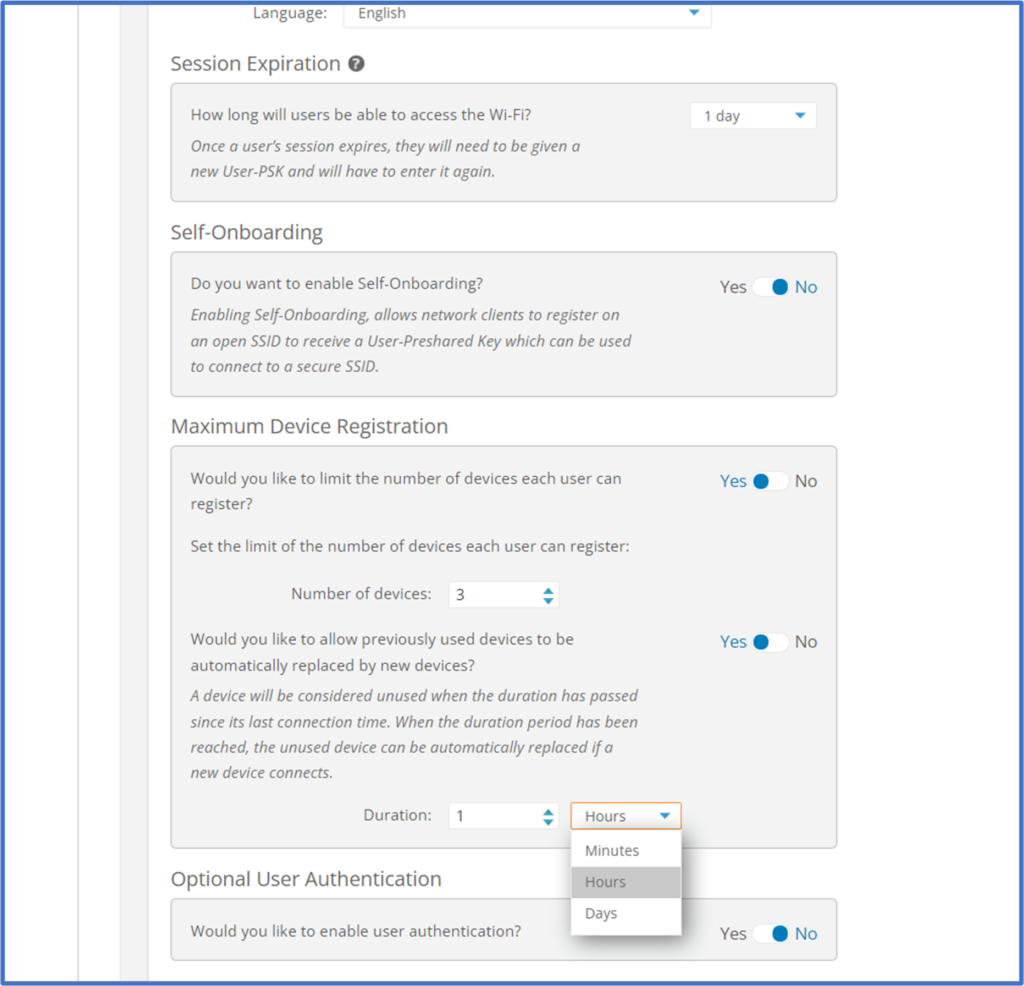
EasyPass Onboarding automatically removes devices that are not used

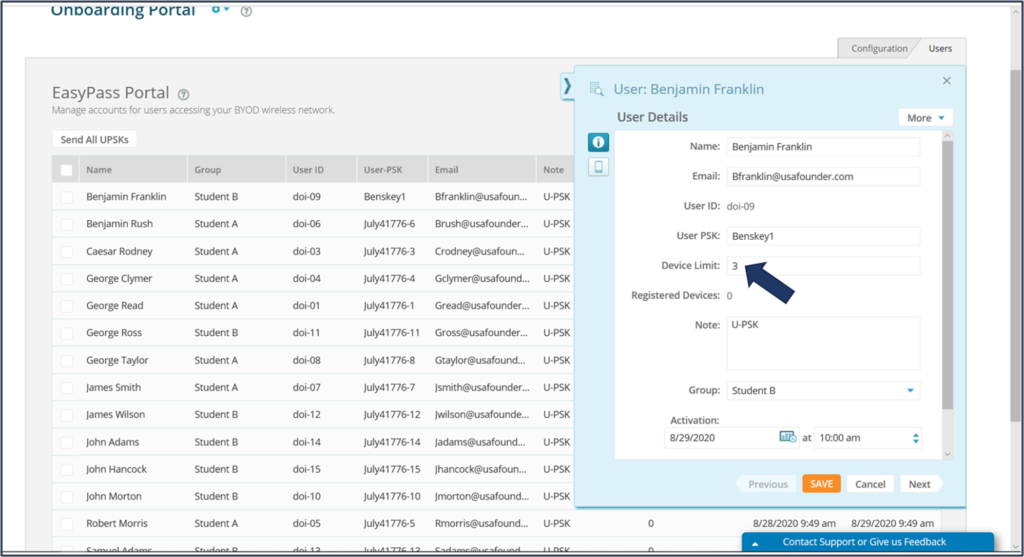
When configuring an EasyPass Onboarding portal, you can limit the number of devices a client can connect to the network.  In this release, XMS-Cloud will automatically remove a registered device if it has not been associated to the network in a configurable amount of time.  To configure this time period of inactivity, open an Onboarding portal in EasyPass, and on the General Page, go to the Maximum Device Registration section.  Select Yes to Would you like to allow previously used devices to be automatically replaced by new devices?  Then configure the duration in units of minutes, hours, or days.

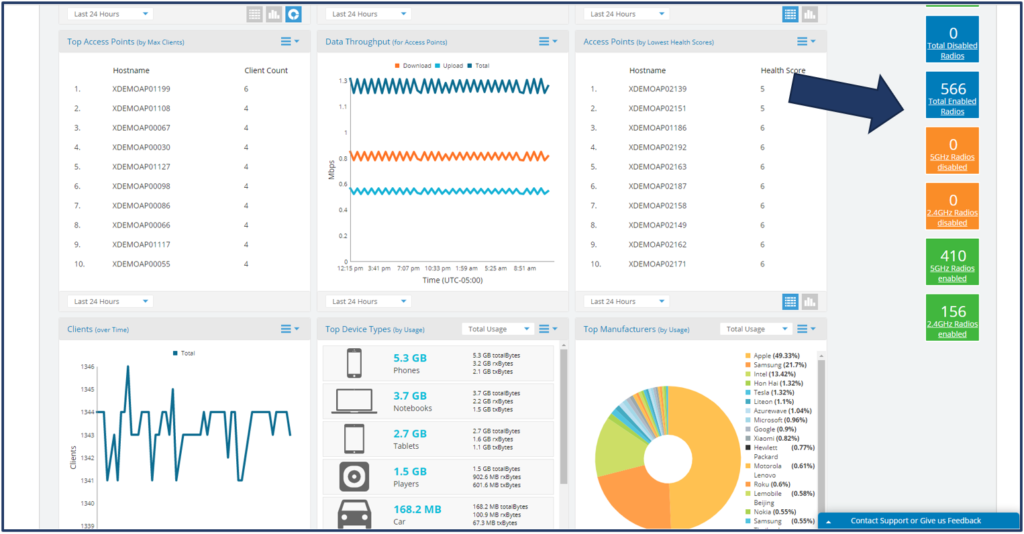
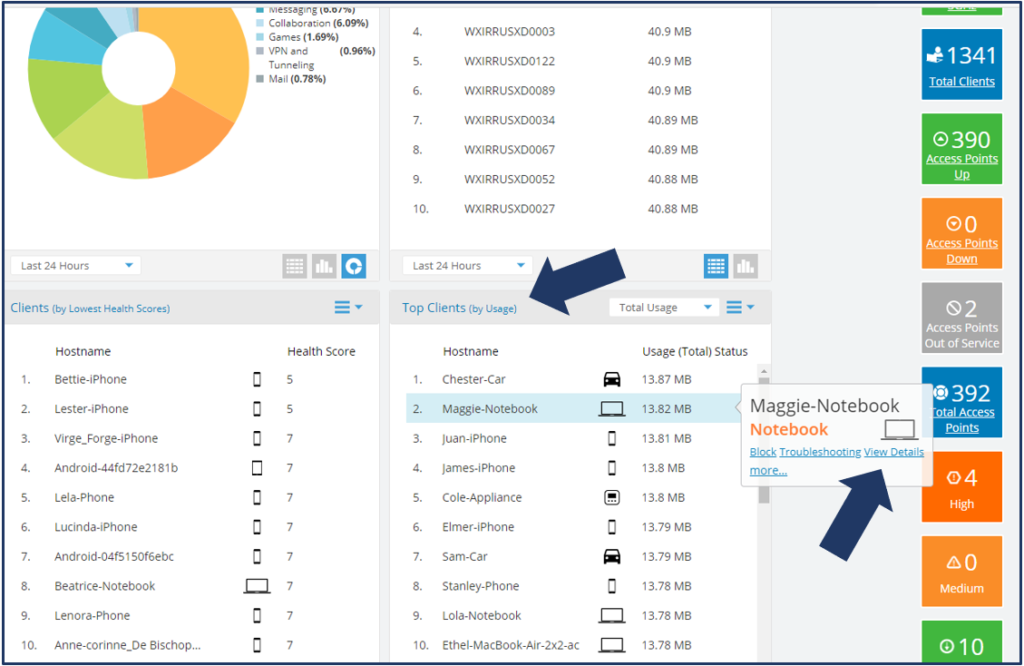
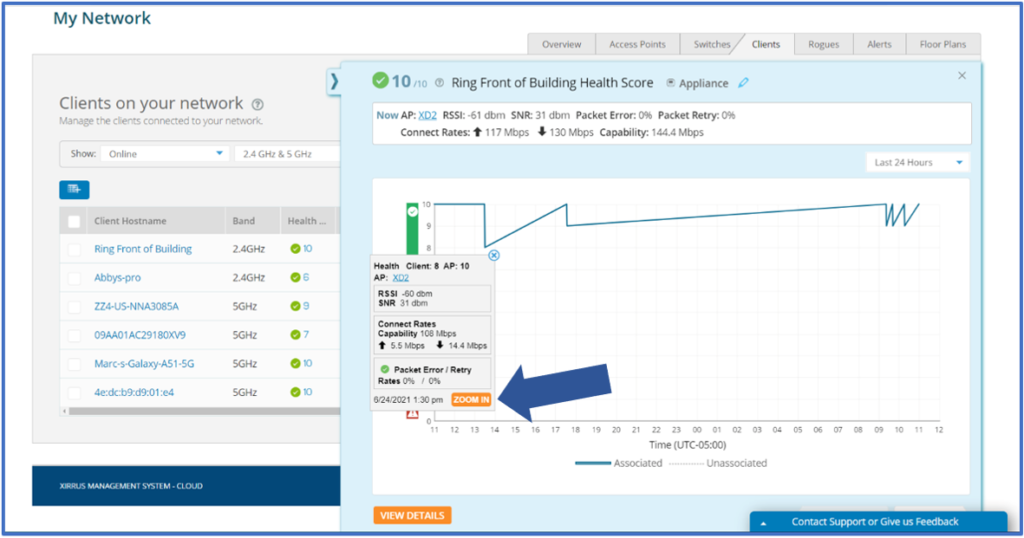
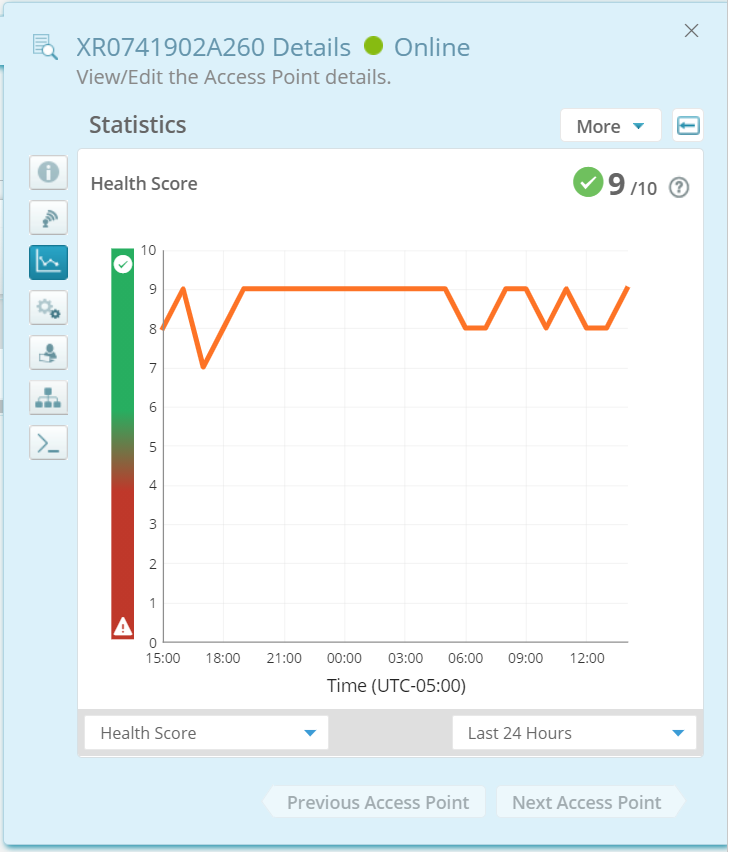
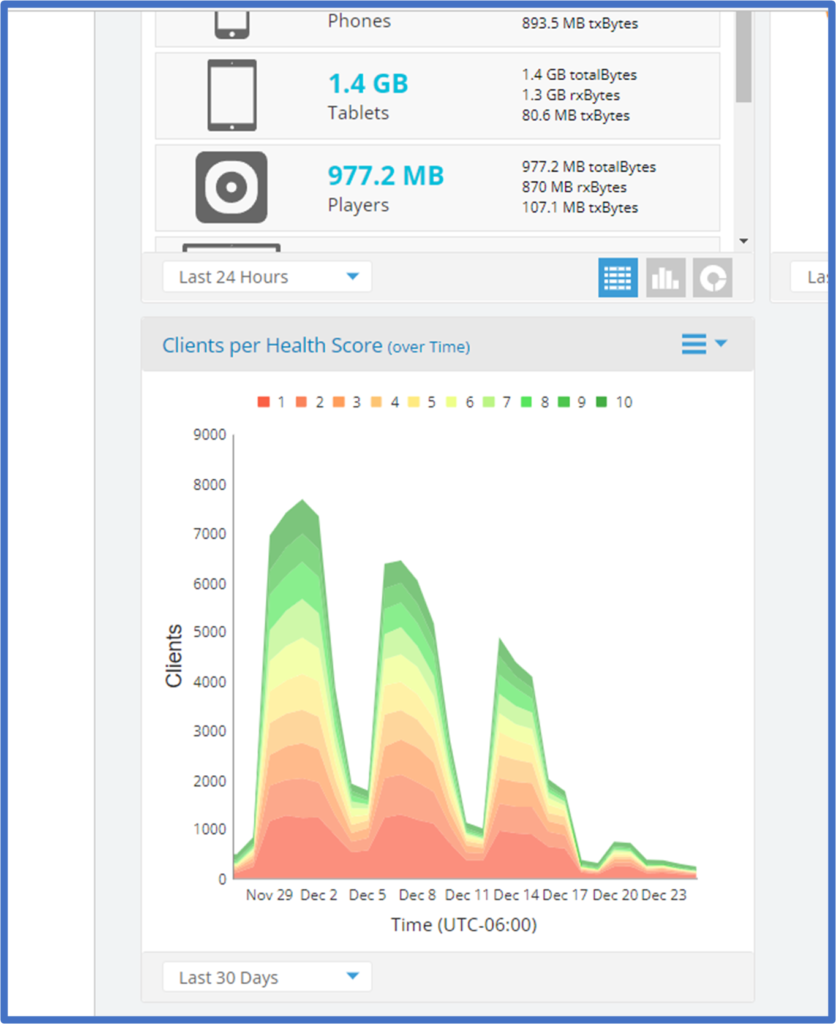
Clients per Health Score Rating

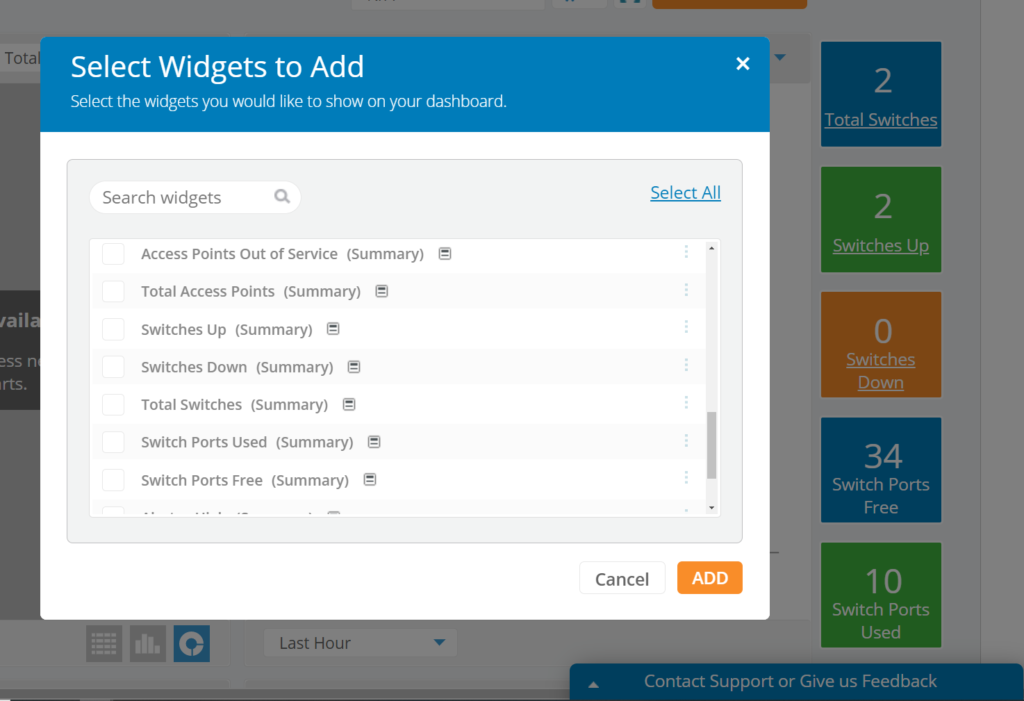
The new Clients per Health Score (over time) widget shows the number of clients with their health score range over a period of time.  The widget can display a history of the last hour, the last 24 hours, the last 7 days, or the last 30 days.  To add the widget to your dashboard, click the Add Widget button on the dashboard, select the Clients per Health Score (over time) widget, and click the ADD button.

Other New Features

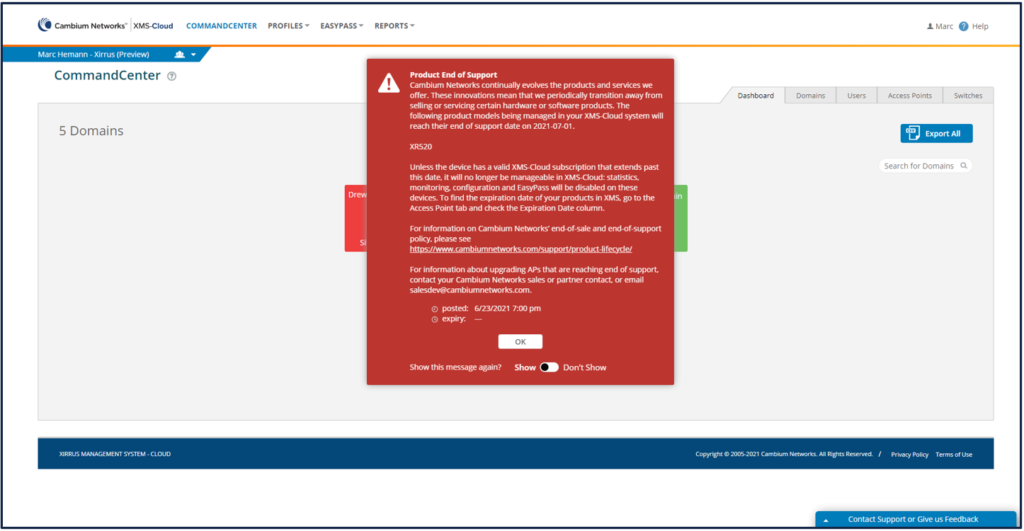
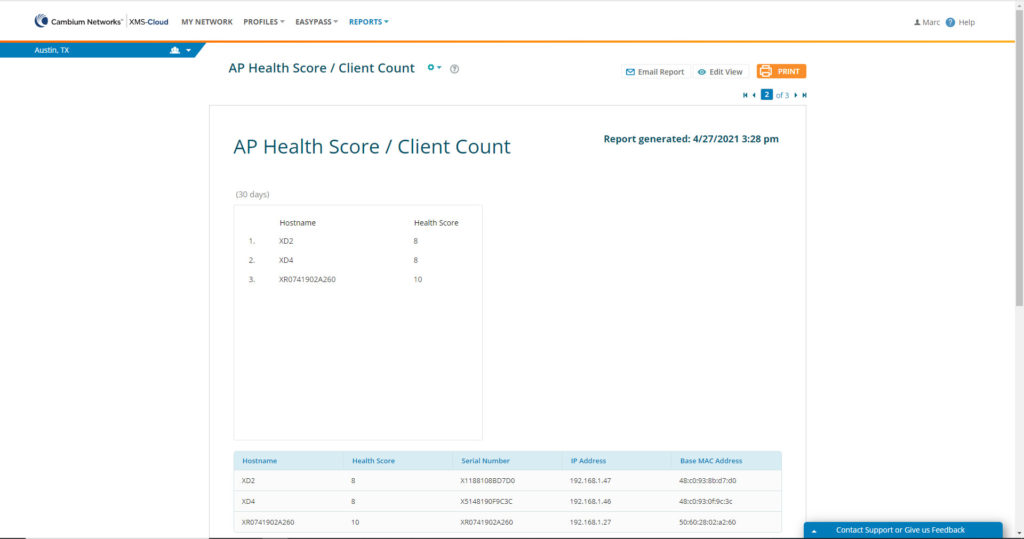
  • Add Tenant Name in Custom Report – When creating a report, the name of the tenant is now automatically added to the first page.  This will help MSP’s or other customers with multiple CommandCenter domains differentiate reports.
  • API Enhancements – We have added an API that returns a list of all clients and their information
  • Bonjour Director Enhancement – Additional mDNS printing protocol support was added for Internet-Printing
  • Multicast Optimization – Wi-Fi 6/6E access points now support the multicast optimization modes Convert to Unicast, Snoop & Prune, and Convert to Unicast & Snoop
  • Support for 802.11v – This allows for fast BSS transition management which enables the AP to send messages to associated clients notifying them of nearby APs that have a stronger signal to associate with.  This is useful for both load balancing and directly poorly connected clients to an AP with a stronger signal
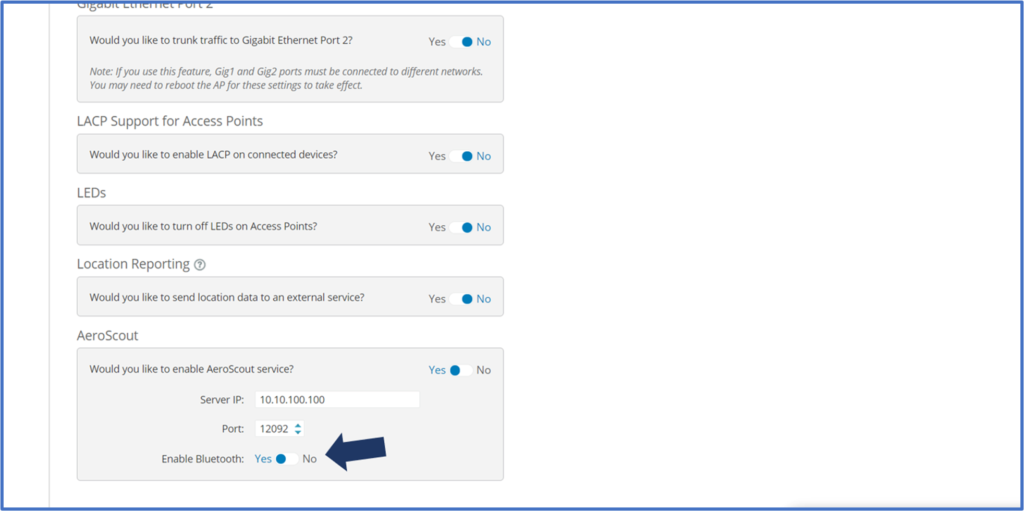
  • LACP support – Managing multiple Ethernet ports on an access point is now available for XV and XE access points
  • DHCP Pools – DHCP Pools are fully supported in Wi-fi 6/6E access points and include NAT

New Release – October 2021

The October 2021 release of Xirrus Management System – Cloud (XMS-Cloud) is now available.  This release includes support for SNMP in network Profiles and support for RSTP and PVRST Spanning Tree protocols for cnMatrix switches. In addition, support for the new 6GHz Wi-Fi band for Wi-Fi 6E has been added in advance of Cambium releasing products supporting this band.

Support for SNMP

This release of XMS-Cloud adds support for configuring SNMP on network devices.  When configuring network profiles, you have the option of enabling or disabling SNMP versions 2 and 3.  When SNMP is enabled and configured, the access point and/or switch will send SNMP information to a third-party application.  You also have the option of configuring Read-Write/Read-Only Community Strings, User access levels, security, usernames/passwords and SNMP Trap Host settings.

To configure SNMP settings, open a network profile and on the General page, click the Show Advanced link.  On the expanded page, scroll down to Simple Network Management Protocol (SNMP).  You can enable/disable and configure setting for both SNMP versions 2 and 3.

Support for RSTP and PVRST Spanning Tree Protocols

Whether you need to implement a spanning tree protocol for your entire network or on a Per-VLAN basis, XMS-Cloud supports spanning tree protocols RSTP and PVRST for cnMatrix switches.  To enable and configure the spanning tree protocol you will be using, open a network profile and click the Show Advanced link on the Network page.  Scroll down the page to the Spanning Tree section.  Enable Spanning Tree Protocol by moving the slider button to Yes and select RSTP for Rapid Spanning Tree Protocol or select PVRST for Per-VLAN Rapid Spanning Tree.

Support for 6GHz

In addition to the 2.4GHz and 5GHz bands, the 6GHz band is open for use by Wi-Fi Devices.  In preparation for our new 6GHz access points, which will be coming out soon, we have started to add support for the 6GHz band.  In this release of XMS-Cloud you will start to see the newly added support for the 6 GHz access points.

New Release – September 2021

The September 2021 release of Xirrus Management System – Cloud (XMS-Cloud) is now available.  This release includes multi-factor authentication for XMS-Cloud administrators, EasyPass Personal enhancements, management of EasyPass Vouchers in the Guest Ambassador user role, BLE support for Aeroscout services, the ability to add notes to the AP details page and XMS-Cloud will retain a history of Profile changes.

Multi-factor Authentication

XMS-Cloud now supports multi-factor authentication for administrator logins.  The system interacts with just about any Multi-Factor app such as Google Authenticator, Microsoft Authenticator, Authy, CyberArk Identity, Duo Mobile, or LastPass Authenticator.

You can require all users in an XMS-Cloud tenant to use multi-factor authentication, or you can specify that only certain individuals that must use multi-factor authentication.

To enable multi-factor authentication on all users in an XMS-Cloud tenant, click your User Icon > Settings > System.  Under Multi-Factor Authentication, move the slider to Yes.

To enable multi-factor authentication for only certain users, go to the User Accounts window, select a user and click the Enable MFA button. 

The next time the user logs into XMS-Cloud, he will be prompted to setup MFA using this favorite Authentication App.  He can scan a QR code or manually enter a system generated code and then enter a one-time code generated from the App to complete the multi-factor authentication setup process.

You can manage MFA for a user by going to User Icon > Settings > User accounts and selecting the user account.  You can then either disable or reset the MFA.

EasyPass Personal Portal SSID Selection

When creating a New Personal SSID and assigning access points to the new SSID, you are able to filter access points by Profiles or Groups.  The additional filtering capabilities makes it quicker and easier for the administrator to locate the appropriate SSIDs to add to the Personal SSID. To add a Personal SSID and access points using the Profile or Group filter, go to EasyPass and open your existing Personal Wi-Fi access portal. Go to the Personal SSIDs tab and click the +NEW PSSID button.  When selecting the access point(s) you want to create this SSID on, click the Select AP(s) link, select the Profile or Group the desired AP is a member of, then drag and drop the AP in the right side window to add the AP to the PSSID and click OK.

Update to STANLEY Aeroscout settings

When enabling and configuring XMS-Cloud Profiles for a STANLEY Aeroscout implementation, you can now enable support for Bluetooth devices.  To enable Bluetooth support, open your Profile, go to the Access Points page and click the Show Advanced link.  Under the Aeroscout section, move the Enable Bluetooth slider bar to YesSave the new configuration.

Expanded Guest Ambassador User Role

The Guest Ambassador role allows for Guest management on the EasyPass Guest Self-Registration and Guest Ambassador portals.  This role has been expanded to include managing vouchers in the Voucher portal.  When users log in with the Guest Ambassador user role and click the “Manage Vouchers” button, they will be able select the Voucher portal and then add or import new vouchers, reset expiration date and delete vouchers.

Add Notes to AP details page

You are now able to add notes to the AP details page that give a historical perspective of activity with that AP.  Details such as profile moves, maintenance, support issues or anything else you might want to record will stay with that AP until the note is removed.  To add a note to an AP, go to My Network > Access PointsSelect an AP and click the Details button.  On the AP Details fly-out window, click the Notes button, then click the ADD NOTE button.  Enter your note and click ADD

Profile change history

While saving any changes you make to a Profile, you are able to add notes before scheduling or pushing the changes immediately.  All changes to the profile will show up on the Profile > History page allowing you to keep track and to audit any changes made to the profile.  This can also help when troubleshooting issues as this will leave a trail on the profile changes.

You might determine that a previous configuration works better then the current version.  In this case you can select the previous version and click the View Version pop-up window.  Select the previous version you want to revert to and click Save Configuration.  

New Release – July 2021

The July 2021 release of Xirrus Management System – Cloud (XMS-Cloud) is now available.  New features in this release include a Configuration Overview screen highlighting the SSIDs and Policies across all profiles, an improved AP details screen, dashboard widgets for the number of enabled/disabled/total radios and the ability for XMS-Cloud administrators to adjust the password expiration interval.

Configuration Overview

The Configuration Overview page highlights the SSIDs and Policies in your network, across all profiles.  This will be very useful for customers with large networks that manage multiple profiles.  You will be able to quickly review which SSIDs and Policies are being used and verify they are in the correct Profile.

The Configuration Overview > SSIDs page will show you the SSIDs in all of the profiles you are managing.  Click on the profiles link for an SSID and the system will show you the profiles this SSID is a member of, the number of up and down access points in the profile, the number of clients currently connected and the number of vlans in use in this profile.  Click the “Profiles not using SSID” link to view the profiles that do not have this SSID assigned to them.

Click on the “Policy Rules” tab to review the policies and rules currently in use in your network.  Click on the “Profiles” link to verify the Profile the policy is a member of.

AP Details Screen

XMS-Cloud provides an improved view of connected client information, AP Health Score, number of connected clients and data throughput statistics.  When selecting an AP on the access points page and clicking the “View Details” button on the fly-out window, the system will present client and AP health information in the same format that client device information is displayed.  Client information filters include Online, Offline, Blocked and All Clients.  You can also filter by the radio band – 2.4 GHz, 5GHz, or both bands.  AP information such as the Health Score, Data Throughput and Total Clients are shown in charts.  The charts can be filtered to show the last 24 hours, 7 days or 30 days.  Hover your mouse over any of the data points on the charts to view details at that particular time.

Dashboard widgets for the number of enabled/disabled/total radios

XMS-Cloud provides a way to quickly glance at the health of your access points by showing the status of the AP radios.  XMS-Cloud has widgets that display the total number of radios, how many are enabled and how many are disabled.  These numbers are further broken down by band so you can see the number of 2.4 GHz or 5GHz radios that are enabled or disabled.  These new widgets go hand-in-hand with the “Radio Down” Alerts added in the previous release of XMS-Cloud.  Click on any of the new widgets to be redirected to the APs that are represented in that widget.

Administrator Password Expiration Interval

Included in this release of XMS-Cloud is the ability for an XMS-Cloud Administrator to adjust the password expiration interval for their account.  To adjust the Expiration Interval, go to your User Profile and click “Settings”.  Then go to the “System” tab, and under “User Password Expiration Interval”, click the drop down box to select the password expiration interval to 3, 6, 9 months, or 1 year.

Product End of Support Notifications

As Cambium Networks products and services evolve, we will periodically transition away from selling and servicing older technology hardware and software products after we introduce replacement products based on newer technology.

When logging in to XMS-Cloud, a notification will appear if you have products that are reaching their End of Support date. Cambium product End of Support dates and replacement products are documented on our Support site here: https://www.cambiumnetworks.com/support/product-lifecycle/

When the cloud subscription on a product has expired, it will no longer be manageable by XMS-Cloud. However, if a valid cloud subscription is in place on a product, it will continue to be manageable by XMS-Cloud regardless of the End of Support date. To find the subscription expiration date of your products in XMS-Cloud, go to the Access Points tab and check the Expiration Date column.

New Release – June 2021

The June 2021 release of Xirrus Management System – Cloud (XMS-Cloud) is now available.  New features in this release include alerting when radios go offline, retrieving diagnostic logs from APs, additional SSID management options in the EasyPass Personal portal, improved navigation on AP and client details pages, an improved view of the Client Health Score page and more.

Alerts upon radios becoming disabled or inoperable

When a radio becomes disabled or stops passing traffic, XMS-Cloud will generate an alert that can be viewed on the Alerts page.  You can go to the Alerts page to review and acknowledge the Alert.  You can configure the system to automatically send you an email or text message when the alert is generated by going to your user profile and clicking Settings.  Then scroll down to the Alerts Notifications section and select Email and/or SMS to receive emails and/or text messages when the alert is generated.  This feature is available on Xirrus APs only. 

Create diagnostic log from AP details

The access point Diagnostic Log file is one of the most helpful tools an engineer as when troubleshooting access point or client device performance problems.  Now you can generate a Diagnostic Log file for Xirrus access points, and a Tech Support file for XV Wi-Fi 6 access points directly from XMS-Cloud.  To generate a Diagnostic Log or Tech Support file in XMS-Cloud, go to the Access Points page and select the access point you are working with and on the popup window, click View/Edit Access Point Details.  On the fly-out window, click the Tools button and then click the RUN DIAGNOSTIC button to generate the diagnostic log file.  You can download the file to your local system by clicking the Download button.

Manage personal SSIDs in the EasyPass Personal portal

In environments where clients are using the EasyPass Personal portal and need to roam to neighboring APs, you are able to create and add the client’s Personal SSID to neighboring APs.  This makes it possible for client devices to roam between APs while still staying connected to their personal SSID.  Open your EasyPass Personal portal and go to the Personal SSIDs page.  Create the Personal SSID which will be added to neighboring APs by clicking the New PSSID button. On the fly-out window, give the new Personal SSID a name which will match the clients personal SSID, add the new PSSID to the APs that the client will roam to, assign a password, an expiration date, and a personal id which is a description of the new personal SSID.  The maximum SSID count on all APs except the XR-520 is 16.  The XR-520 supports 8 SSIDs. 

Improved navigation on AP and Client Widgets and Details pages

We have improved the drill down capabilities on the Dashboard Top Access Points by Usage and Top Clients by Usage widgets.  Hover your mouse over an AP or Client in these widgets and on the pop up window, click the View Details link to click through to the details page for the AP or client.

On either one of the Details pages, hover your mouse over any point in time on the graph and a pop up window will show you details about the AP or client connection.  On the client details page, you can click on the AP Name link and the system will re-direct you to the details page of that AP.

Breadcrumbs follow click-through actions to allow easy navigation to original page

A new breadcrumb feature makes navigation from clients to access points very simple.  You can move directly to client devices or APs by clicking a single link as opposed to going back a page. The breadcrumbs are near the top of the page and are very useful when troubleshooting AP and client issues.

Improved view of Client Health Score page

When reviewing client device performance statistics on the Client Health Score fly out window, hover your mouse over any time point in the graph and a popup window will show you information about the health statistics for that client.  Click on that point and a Zoom In button appears that you can use and the graph zooms in to focus statistics on a two hour window.

DHCP snooping and ARP inspection available in VLANs configuration

When configuring VLANs, you are able to enable or disable DHCP snooping and ARP inspections.  Start by enabling DHCP snooping on a Profile level.  Open the Profile, go to the Networks page and enable DHCP Snooping

Then go to the VLANS page and enable DHCP Snooping and ARP Inspections.

cnMatrix improvements include trusted port

Along with DHCP Snooping and ARP Inspections is the ability to assign a cnMatrix switch port as a trusted port.  This is used to configure uplinks ports so they don’t get arp inspected or dhcp snooped.  To configure a cnMatrix switch port as a trusted port, open your Profile and go to the Switches page.  Click on the port you want to configure, and on the fly-out window, scroll to the bottom and select Yes to Port Security Trusted.

New Release – April 2021

The April 2021 release of Xirrus Management System – Cloud (XMS-Cloud) is now available.  This release includes two new dashboard widgets and reporting options, Top Access Points by Client Count and AP Health Score. In addition, we have added enhancements to EasyPass which include the ability to add custom fields to splash pages and support for both horizontally and vertically oriented screens.

Top Access Points by Client Count and Access Point Health Score Dashboard Widgets

We have added two new widgets to the dashboard.  The first one is Top Access Points by Client Count to quickly determine which access points are the most heavily used based on number of clients connected.  Drill down into an access point by hovering your mouse cursor over its hostname and click “View Details”.  You will be re-directed to the Access Points page and the fly-out window for that access point. From there, click on the “Clients” button to see clients currently connected or click “Statistics” on the lower left drop down box, select “Total Clients”. You can hover your mouse cursor over any part of the graph to review the number of clients connected at a specific date and time.

Total clients over time

The second new widget is Access Point by Lowest Health Scores. Using this widget, you will get an instant view of the overall health of your access points.  XMS-Cloud looks at different criteria such as median client health score, then make adjustments based on other network performance factors and calculates a health score for the AP.  Hover your mouse cursor over an AP that you would like to review, and on the pop-up window, you will see the health score of the AP and a “View Details” link.  Click the link and you will be re-directed to the Access Points page and the access point detail fly-out window for that access point.  On the AP details fly-out window, click the “Statistics” button to review the Health Score for that AP.  You can review the health score history by clicking the time interval down arrow and selecting last 24 hours, last 7 days or last 30 days.  You can hover your mouse cursor over any part of health score indicator line to receive the average health score for a specific date and time.

AP Health Score Details

Top Access Points by Client Count and Access Point Health Score Reporting Options

Top Access Points by Client Count and Access Point Health Score are also available as Reports.  To add the new widgets to a report, either create a new report, or open and edit an existing report.  Click the “Add Page” button.  Click the down arrow on the “Widget” field and select the “Clients by Lowest Health Scores” or “Top Access Points by Client Count” page, then select the Time Range.  Click the “Save” button.

AP Health Score and Top AP by Client Count Reports

Custom Fields on EasyPass Splash Pages

We have added the option of including a custom data field on the EasyPass Self-Registration and 1-Click access portals allowing you to collect data from the guest before they onboard to your network.  To include a custom data field, create a new or open an existing EasyPass Self-Registration or 1-Click access portal and go to the “Look & Feel” page.  Select “Custom Data Field Title:” and enter a title for this field.  You can also require input from the end-user by selecting “Required”.

EasyPass Custom Fields

Horizontal and Vertical Oriented EasyPass Portal Screens

EasyPass now provides the capability of adding different backgrounds for horizontal and vertical screens, optimizing the look of the portal pages for desktop and laptop computers, and mobile devices such as tablets and phones.  To add the new background to your EasyPass Self-Registration, Guest Ambassador, 1-Click or Voucher portals, open a new or existing portal and go to the “Look & Feel” page.  On “Vertical Background”, click “Select Image”.  You can select the background or upload a new image from your local system or add an image from the internet.  Click “OK”. 

EasyPass background in a horizontal position
EasyPass background in a vertical position

Additional Enhancements:

  • AP and Switch Availability Reports through API
  • Move Self-Owned Domain between CommandCenters
  • Adjust AP Expiration Dates

New Release – March 2021

The March 2021 release of Xirrus Management System – Cloud (XMS-Cloud) is now available.  This release includes the ability to zoom in on a specific 2 hour window within the past 30 days for troubleshooting client issues, the addition of VLAN properties in Profiles, plus several features supporting cnMatrix switches including management of static routes, monitoring groups of cnMatrix switches, Profile configuration CLI snippets and support for an interactive CLI.

Granular Drill Down Client History Troubleshooting

To improve client troubleshooting, we have added the ability to zoom in on a specific 2 hour window of time over the past 30 days of a client’s history. This provides more granular detail on information such as Error Rates, SNR, RSSI and applications being used at the time a client may have experienced Wi-Fi connectivity issues. To zoom in on a clients history, go to My Network > ClientsSearch for the client in the search window, locate and select the client and click View Client Details.  In the fly-out window, select View Details. At the top of the window, select the 1 Day, 1 Week or 1 Month tab to view the appropriate time range. Then enter the date and time you want to zoom in on in the date/time boxes at the top, then click the ZOOM IN button. You can move the time window forward or backward by clicking the -1 Hour or +1 Hour button. Hover your mouse over any point on RSSI, SNR, Error Rates, or Connect Rates graphs and you will see a timestamp with the performance metric.  Notice that the graph now is very granular… you can view event transitions at one minute intervals as they occurred with the client device.  At the bottom of the screen, a list of the top 10 applications used during that time interval is displayed.

Management of VLANs Properties in Profiles

When configuring a profile, you might configure VLANs for an SSID, a Policy, or for use with your RADIUS server.  You can now manage your VLANs on the new VLANs tab within a Profile. To edit a specific VLAN, hover your mouse over the VLAN name and clicking Edit VLAN.  Manage settings such as IGMP Snooping and assign a starting IP address/mask.

Management of Static Routes

XMS-Cloud now allows you to build static routes on cnMatrix switches so that you can manually configure network routes that are added into the network routing table.  Configure network static routes in the switch by going to My Network > Switches.   Select the switch you want to build static routes on, then in the fly-out window, click the Static Routes button.  Configure the network destination, subnet mask, next hop and distance.

Support for Monitoring Groups of cnMatrix Switches

Similar to Wi-Fi Access Points, cnMatrix switches can now be assigned to switch groups allowing you to logically segment the management and monitoring of your switches.  When you select the group, only the switches that are a member of that group will be available in a particular Dashboard, Alerts, Reports, etc. view.

Profile Configuration CLI snippets

You can gain further control over the configuration of cnMatrix switches by using the CLI snippet tool now available in a Profile.  This allows you to add CLI commands to the Profile which will get pushed to all the switches which are a member of the Profile.

To add CLI snippets, create or open an existing Profile.  Click the Show Advanced link below and to the right of the Profile toolbar.  Click the Optimization tile.  Expand the Snippet section and select Yes to Do you want to append a CLI Snippet: to access the CLI snippet tool for cnMatrix switches.

Support for an Interactive CLI

Access the switch CLI by using the CLI access feature in XMS-Cloud.  You no longer need a console cable or a SSH utility to access the switch CLI.  This will assist in troubleshooting switch configuration and performance issues.

Go to My Network > Switches and select the switch you want CLI access to.  On the fly-out window, click the CLI button.

New Release – January 2021

The January 2021 release of Xirrus Management System – Cloud (XMS-Cloud) is now available.  This release includes a number of new features, including a new look for EasyPass access portal pages, new dashboard widgets for cnMatrix switches, the ability to make changes to SSIDs in Profiles using templates, filtering the dashboard by SSIDs, station-to-station blocking within SSIDs, and more.

New Look for EasyPass Access Portals

When designing an EasyPass portal, you can now preview the portal in both a mobile device view and a desktop view.  We have also refreshed the look & feel of the EasyPass Access Portal pages the end user will see when onboarding their devices in several ways.

To customize an EasyPass portal and preview for desktop or mobile devices, open an existing EasyPass portal or create a new one.  Click the small mobile device or desktop icons.

EasyPass Portal preview for a mobile device
EasyPass Portal preview for desktop

For existing EasyPass Portals, end users will continue to see the old look & feel of the EasyPass pages until you manually update the EasyPass portal by updating or clicking the link in the portal to use the new version.  Once you have updated the portal or opted to use the new version, you are unable to go back to the previous look & feel format of the portal.

New configuration features for cnMatrix switches

When creating a Global Policy for a cnMatrix switch port, instead of having that policy applied to every switch port, you can specify which switch ports this policy will be applied to.  When creating the Global policy, first select Wired (Switches).  Next select the Port icon that best fits this policy.

After Saving the Policy,  any switch port that is configured with that icon will have the Global policy applied to it. 

To configure a switch port, create a new Profile or open an existing Profile.  On the Configuration page, go to Switches.  Click on the port you want to configure and on the flyout window, select the same icon as you chose in the global policy. 

You can also create a PBA policy and while configuring the policy, select the same icon as you chose in the Global policy.  To create a PBA policy, create a new Profile or open an existing Profile.  On the Configuration page, go to Policies.  Create a new Policy Based Automation policy or edit an existing PBA policy. On the Port Automation Policy flyout window, select the same icon as you chose in the global policy.

Dashboard summary widgets for cnMatrix switches

cnMatrix switch summary widgets give you a quick, at-a-glance overview of the status and health of your cnMatrix switches.  Similar to access point summary widgets, you can click on the switch summary widgets to focus the scope of the dashboard to show only the switch information.  To add the summary widgets to your dashboard, click the ADD WIDGET button and select the switch summary widgets and click ADD.

Device Status Uptime Columns

We have added an Uptime column to the access point and switch pages. To access the device uptime information, go to the Access Points or Switches page.  Click the blue Grid button.  Add the Uptime column to your grid view.

Ability to update SSIDs in Profiles using Templates

If XMS-Cloud detects that you have an SSID template name that is identical to one of your Profile SSIDs, you will have the option to update the Profile SSID from the template.  This way you can update Profile SSID passphrases, VLANs or other settings just by applying a template instead of manually changing the SSID in each Profile.

To update a Profile SSID from a Template, go to Profiles and click Templates.  Create and configure the  template SSID and then name it identical to the Profile SSID.  Go to Profiles and then Access Points.  Select the SSID you wish to update from the template and then click the Update From Template button.

Filter by SSID to narrow focus of Dashboard

You can narrow the scope of your dashboard by filtering by SSIDs.  This allows you to quickly focus on data such as Application Usage, Access Points, Clients, Switches and more. To apply the filter to your dashboard, click filters down arrow.  Notice you can filter by Groups, Profiles, and SSIDs.

Station-to-Station blocking by SSID in Policies

To preserve Wi-Fi bandwidth or for security purposes, it may be necessary to block station-to-station traffic within an SSID. To block station-to-station traffic in an SSID policy, either create a new Profile or open an existing Profile and go to the Policies page.  Create an SSID policy by clicking the New SSID policy button , and choose the SSID you will apply this policy to.  On the SSID policy, click the Show Advanced link, then on Station-to-Station traffic, move the slider bar to Block.

New Release – December 2020

The December 2020 release of Xirrus Management System – Cloud (XMS-Cloud) is now available. This release includes a number of new features, including a streamlined look in Profiles, management support for the cnMatrix EX1000 series switches, additional management options for all cnMatrix switches, Wi-Fi 6 rogue detection and polling, and more.

Streamlined Profiles

We have streamlined the Profiles area of the application to make it more intuitive and easier to follow. We have moved some of the minor configuration options such as SSIDs, Bonjour Director and Admin from their own top level tile to placing them under different major top level configuration tiles. The key changes are:

  • Admin Password changes moves from a top level tile to the General tile.
  • SSID management moves from a top level tile to the Access Points tile.
  • Location Services moves from a top level tile to the Access Points → Show advanced page.
  • Bonjour management moves from a top level tile to the Network tile.

Additional support for cnMatrix switches

XMS-Cloud now supports the complete cnMatrix enterprise switch line with the addition of the EX1000 series models. You can manage the EX1000 series using profiles and PBA policies.

To add a cnMatrix switch to XMS-Cloud, go to Switches → Add/Remove → Add Switch to Account. Enter the new cnMatrix switch’s serial number and click Add to Account. To manage this switch in a Profile, go to Profiles and either create a new profile or open an existing profile and click the Switches tile. You can either configure the ports individually or apply a pre-configured template. To use PBA policies, click the Policies tile, then under Policy Based Automation, click New Port Automation Policy button. Configure the policy and click Save.

New in this XMS-Cloud release is the ability to power cycle individual switch ports. Go to My Network → Switches → Switch View. Select the port you need to power cycle, click the Actions button → Power Cycle → OK.

Another enhancement is that you can now quickly review which switch ports and which options have been configured by a PBA policy by going to My Network → Switches → Port View. Look for the PBA Policy column to see which PBA policy has been implemented for that port and any options configured by the PBA Policy will be displayed in a BOLD font.

EasyPass Onboarding – Modify device limit per user

EasyPass Onboarding now allows you to change the maximum number of allowed registered devices on a per user basis. To increase or decrease the maximum number of allowed registered devices for an individual user, go to Easypass, open your existing Onboarding portal and click the Users tab. Hover your mouse over the user account you want to edit and click the View/Edit User Details button. On the User Details fly-out window, you can now adjust the maximum number of registered devices for that individual’s account.

SSID Template supports advanced options

When creating an SSID template which can later be used to easily create SSIDs in any profile, you now have the option of configuring advanced features such as assigning a default QoS, AP and client traffic limits, client counts, and station-to-station blocking.

To configure the advanced features on an SSID template, go to Profiles → Templates → SSIDs → New Template → Show Advanced. Or select and existing template, click Edit → Show Advanced. Configure the necessary advanced settings and click Save.

Wi-Fi 6 Rogue device polling

XMS-Cloud now provides information on rogues detected by Cambium XV-series Wi-Fi 6 access points. To review the rogue data, go to My Network → Rogues. Data on all rogue devices detected in the area will be displayed.

Show Replaced AP Status in Add/Remove tab

There will be times when you need to replace a device on your network. When that occurs, XMS-Cloud will allow you to replace the device, instead of just decommissioning it. The system will show the status of that device as “Replaced”.

When you go to My Network → Access Points, and click the Add/Remove button, you will see APs that are currently installed or decommissioned. To replace a device, select the decommissioned device you want to replace and click the Replace button. You will be prompted to add the Serial Number of the new device you are using to replace the older device with. Click Replace.

It is important to note that once you replace a device, you will not be able to re-install it without the assistance from our Support team.

CLI access to Wi-Fi 6 APs

On Wi-Fi 6 APs, you are now able to access the CLI through XMS-Cloud. Go to My Network → Access Points. Select an XV series access point and click the View/Edit Access Point Details button. On the Access Point fly-out window, click the Commands button. This will give you access to the CLI for that access point.

Other enhancements include:

Increase in capacity

  • SSIDs 8 → 16
  • VLANs 32 → 64
  • Policies 8 → 16
  • User Groups 8 → 16

New Release – October 2020

The October 2020 release of Xirrus Management System – Cloud (XMS-Cloud) is now available.  This release includes a number of new features, including support for WPA3 authentication security on XV series Wi-Fi 6 access points, color-coded clients on floor plans based on health score, the ability to create SSID templates which can be used in different profiles, and other enhancements.

WPA3 Security for XV Series Access Points

WPA3 is the latest standard in Wi-Fi security and is now supported on the XV series of Wi-Fi 6 access points.  It is very easy to implement WPA3 security by selecting it as an option when you configure encryption/authentication on the SSID.

To setup WPA3, open your profile, go to the SSIDs tab, click the drop down box under encryption/authentication, and select WPA3 & WPA2/802.1x. On the authentication page, enter and confirm the pre-shared key, or password. fffff

WPA3 support is available on XV series Wi-Fi 6 access points.  Any 802.11ac access points, such as the XD2 and XD4 models, will automatically use WPA2 security if they are in the same profile where WPA3 security has been enabled.

Color-Coded Client Location Based on Health Score

When viewing the floorplan of your network and if Location Services are enabled, you can now easily see the health of clients located in your network based on their color. 

To review a client’s health status on the floorplan, go to My Network and click the Floorplans page.  Click on the floorplan you wish to review.  Then click the “Show Clients” button on the left side. You will see client devices appear on the map.  A green colored client indicates a good health score, a yellow client indicates an ok health score and a red client indicates a bad health score.  Using these color codes, you can quickly  find locations or individual clients that may encountering issues. Click on a client to see what AP that client is connected to. 

SSID Templates

The ability to create SSID templates that can be using across multiple profiles is now available. You can create an SSID template and use it as often as necessary instead of having to re-create the SSID every time you need it in a profile.  This will save you time and eliminate errors.

To create an SSID template, go to Profiles and click Templates.  Now click the SSID tab and click the New Template button.  Give the template a name, configure the SSID and Save. Once the SSID template has been configured, you can add firewall and application control rules. These rules will be enforced whenever this SSID template is used. After the template has been created, you can go back to edit or delete the template as needed.

To apply the template, go to the profile, click the SSIDs tile, click the NEW SSID FROM TEMPLATE button, click the dropdown and select the template you want to use. The pre-configured SSID will be added.  You can make any changes to the SSID to customize it if necessary.  Any changes made to the SSID will not affect the template.

Other Enhancements

  • Access Point Export Includes “Out of Service” APs
  • Search Alerts by Device S/N
  • Update to EasyPass Onboarding Portal email