Skip to content

XMS Cloud Posts

New Release – August 2020

The August 2020 release of Xirrus Management System – Cloud (XMS-Cloud) is now available. This release includes a number of new features related to the management of cnMatrix switches, including support for management VLANs, channel ports, and Policy Based Automation. There are also new statistics for connected wired clients. We have also added configuration flexibility for UPSK in EasyPass Onboarding, as well as heatmap functionality and station-to-station blocking for XV-series Wi-Fi 6 access points.
Support for cnMatrix EX2010, EX2028, EX2052, and EX2052R-P switches

In this release of XMS-Cloud, we have added support for these four cnMatrix switch models. Adding switches to your XMS-Cloud account is very similar to the way you add APs.
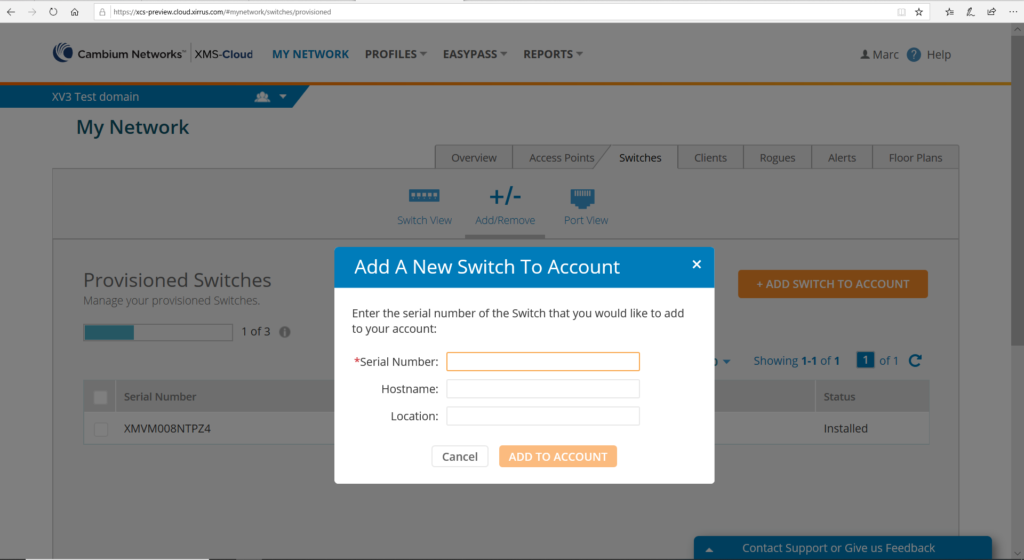
Go to the MY NETWORK → Switches page and click the Add/Remove button, then insert the switch’s S/N and click “+ADD SWITCH TO ACCOUNT”.
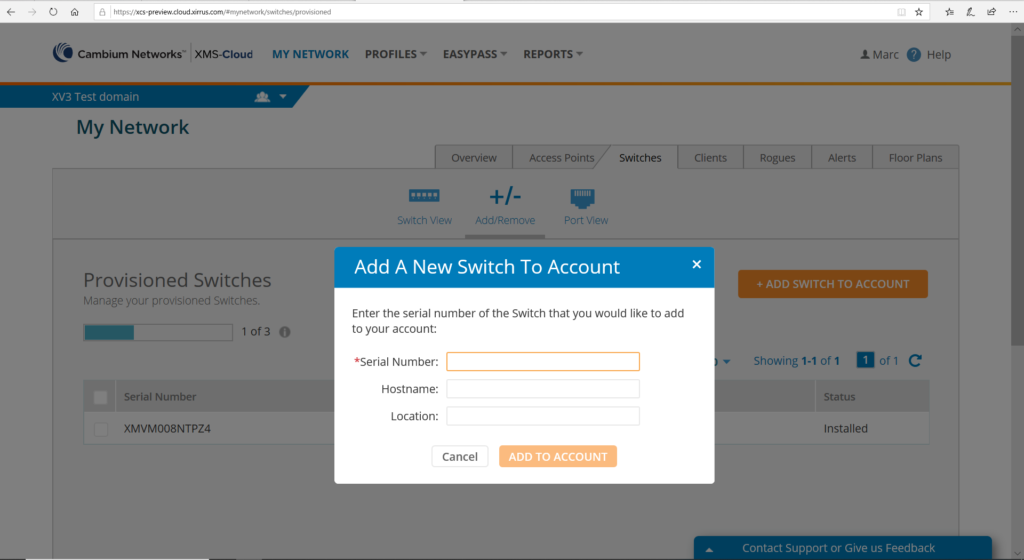
You will be able to create Templates and Profiles to configure port settings, making it easy to configure and manage a single switch or 100’s of switches.
Configuration of cnMatrix VLANs and Policy Based Automation (PBA)

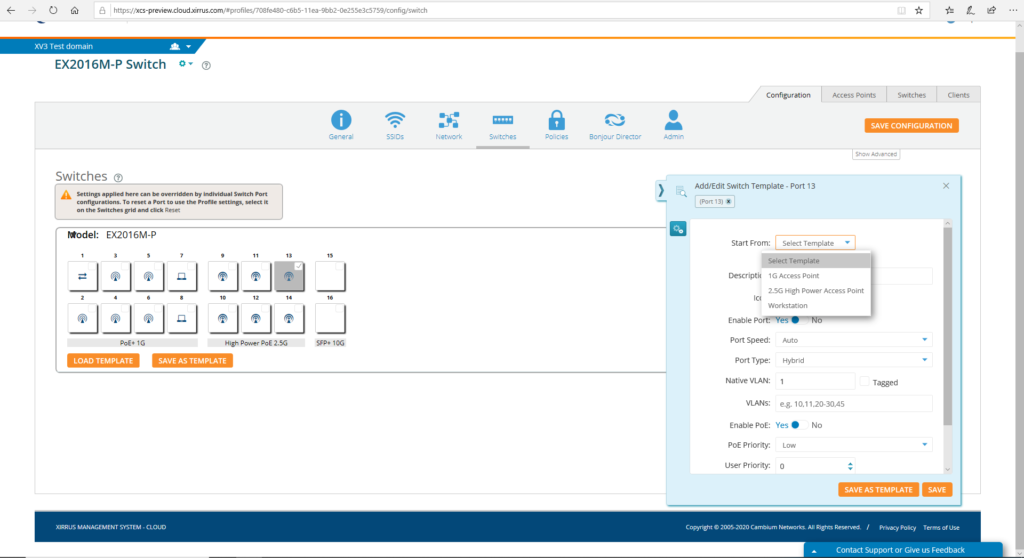
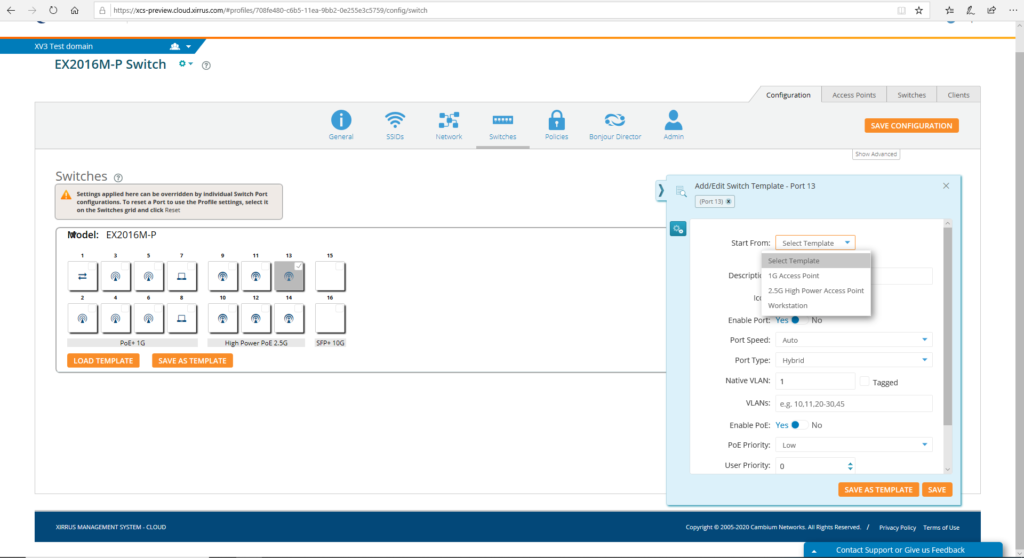
When configuring switch ports using a Profile or Template, you can configure VLANs and Policy Based Automation. To get started, first to create a Template or Profile and then click the Switches tile.
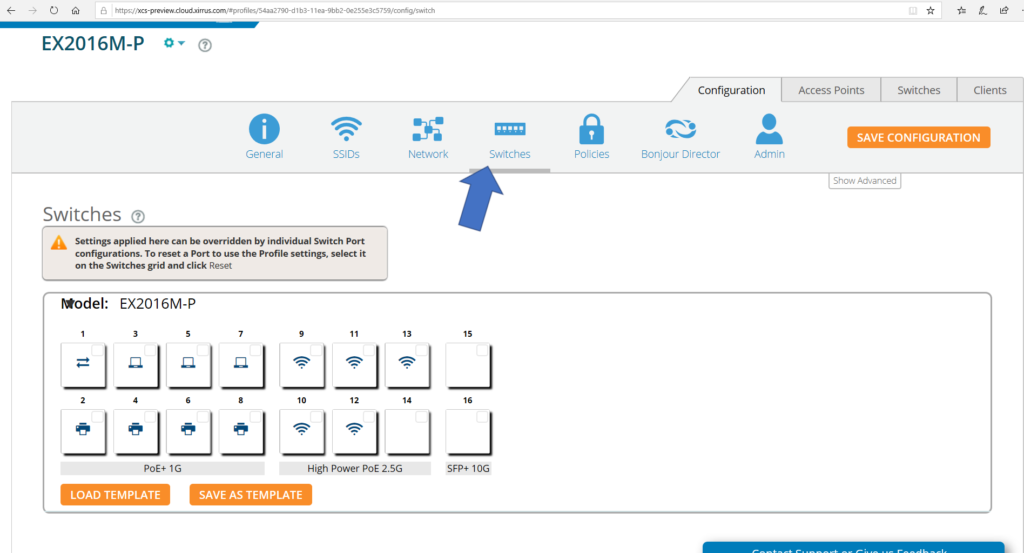
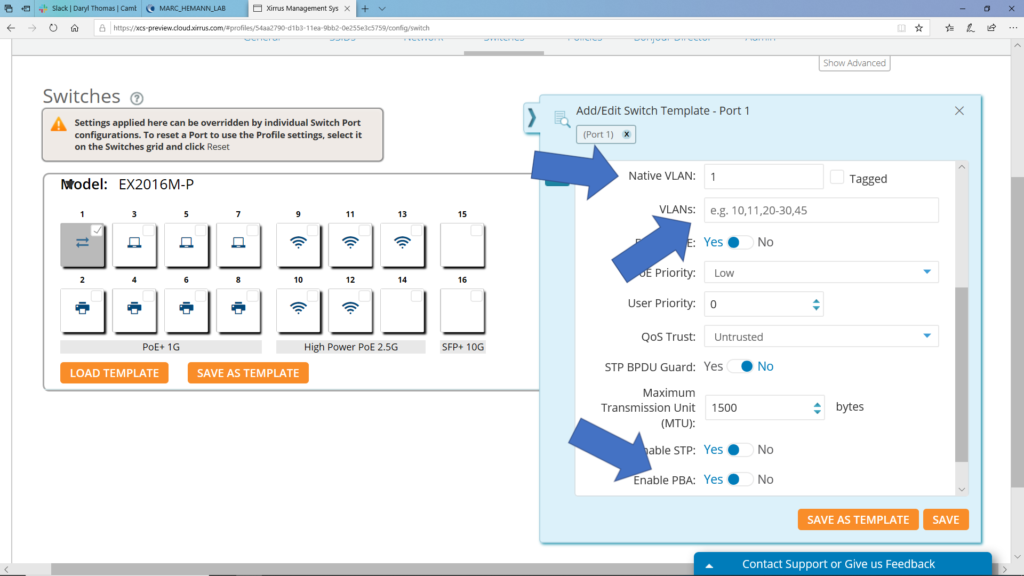
Click on any of the ports. On the fly-out window you will find the fields to configure/add the Native VLAN (Management VLAN), multiple VLANs, and enable PBA.
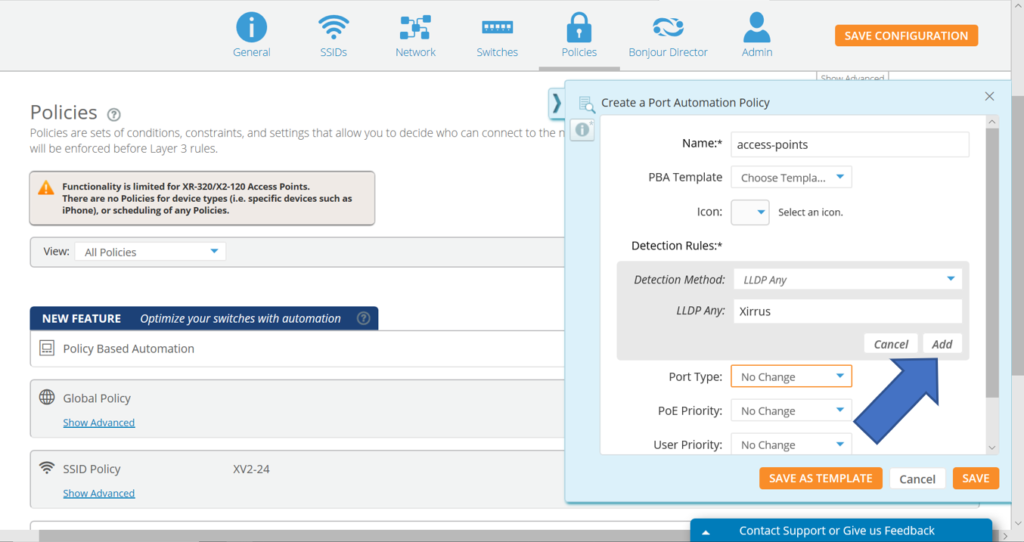
To create policies and rules for PBA, go to MY NETWORK → PROFILES and open the Profile for your cnMatrix switches. Then go to the Policies page. Under “Policy Based Automation”, click the “+” button to add a new PBA policy. On the fly-out window, give the policy a name and the click “+Add Rule”. Select the “Detection Method” you wish to use and the parameters for your selected method. Then click the “Add” button. Then finish configuring the policy with your requirements.
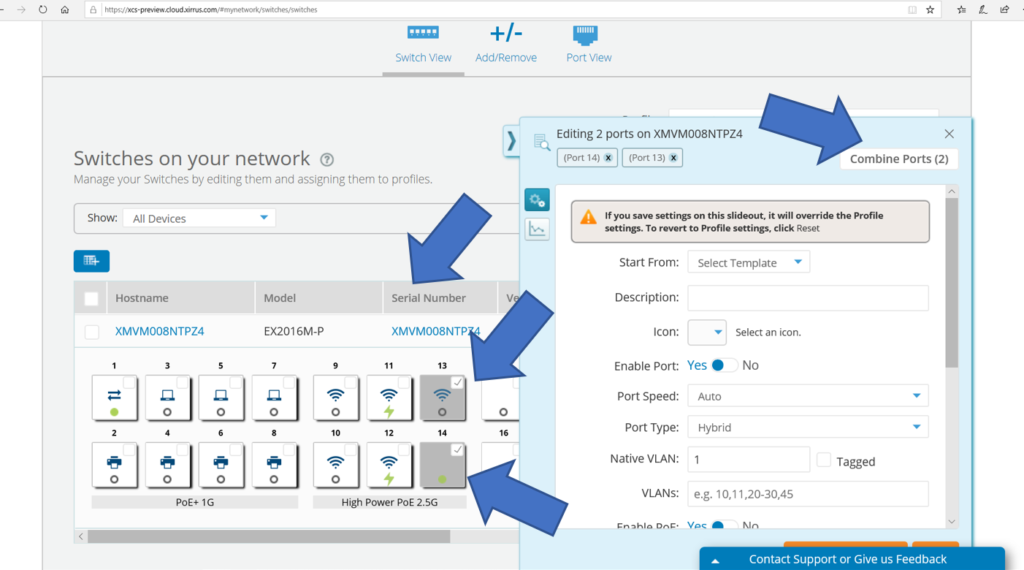
Creating cnMatrix port channels

To create a cnMatrix port channel to aggregate ports, go to the MY NETWORK → Switches page. Next click the model of the switch and the ports for that switch will appear. Select the two (or more) ports you want to combine. Then click the “Combine Ports” button.
View statistics on connected cnMatrix wired clients

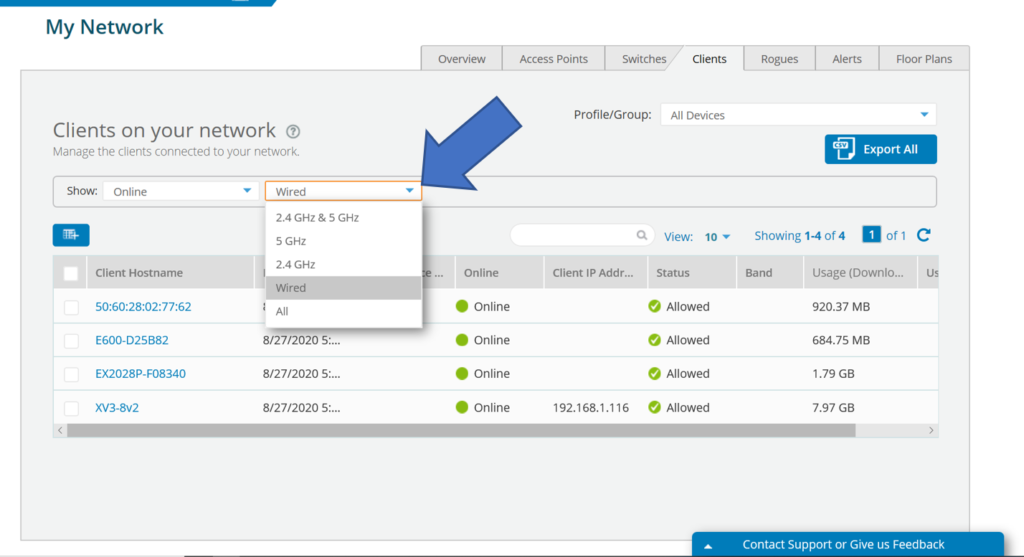
XMS-Cloud provides the ability to monitor usage statistics of devices that are connected to cnMatrix switch ports. All these stats can be exported for further analysis. To review the wired client stats, go to the MY NETWORK → Clients page, then click the type of client box and select “Wired”.
Customizing UPSKs in EasyPass Onboarding

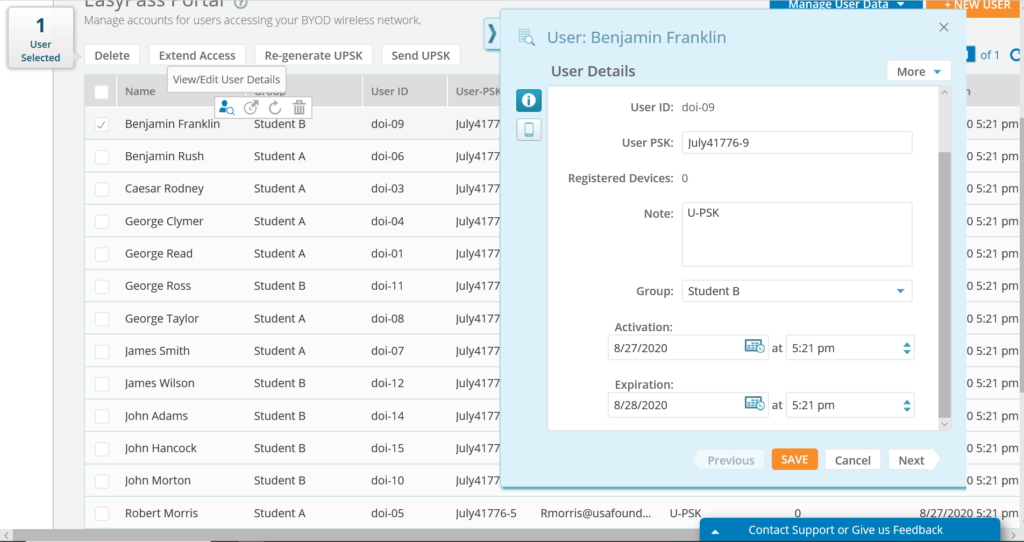
To customize UPSKs in EasyPass Onboarding, go to EASYPASS, open your Onboarding Portal and click the “Users” tab. Select the User that you wish to modify, and click “View/Edit User Details”. On the fly-out window, you can change the User PSK, and you can also change the Activation and Expiration Date/Time.
Heatmap functionality for XV-series Wi-Fi 6 APs

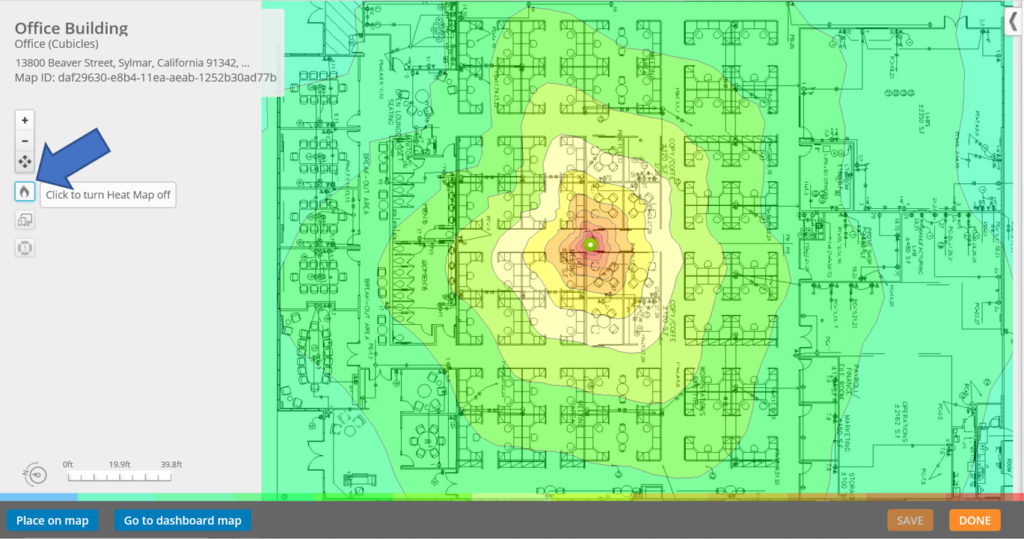
To see the heatmaps available for XV3-8 and XV2-2 access points, go to MY NETWORK → Floorplans. Click on the map that has your XV3-8 and/or XV2-2 access points and click the button to turn the heatmap on.
Blocking station-to-station traffic on XV-series Wi-Fi 6 APs

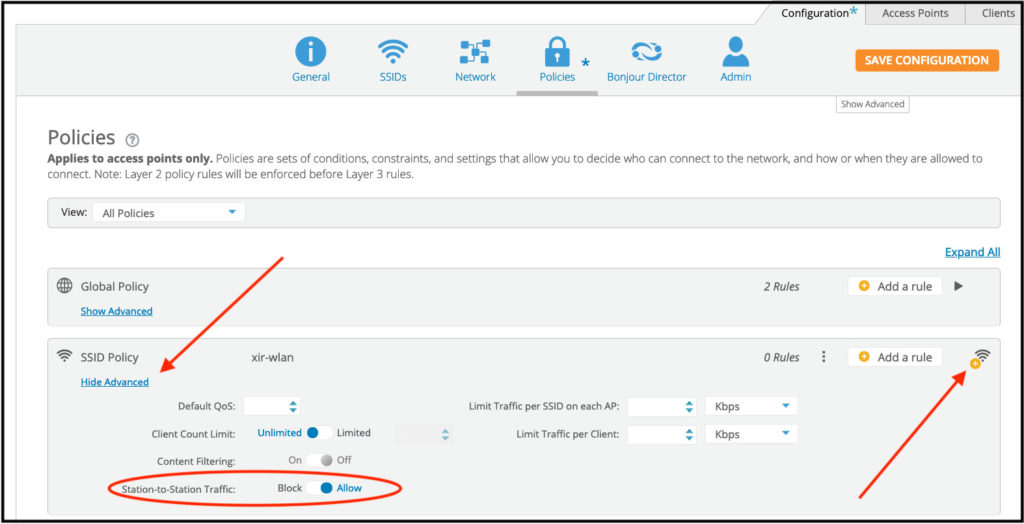
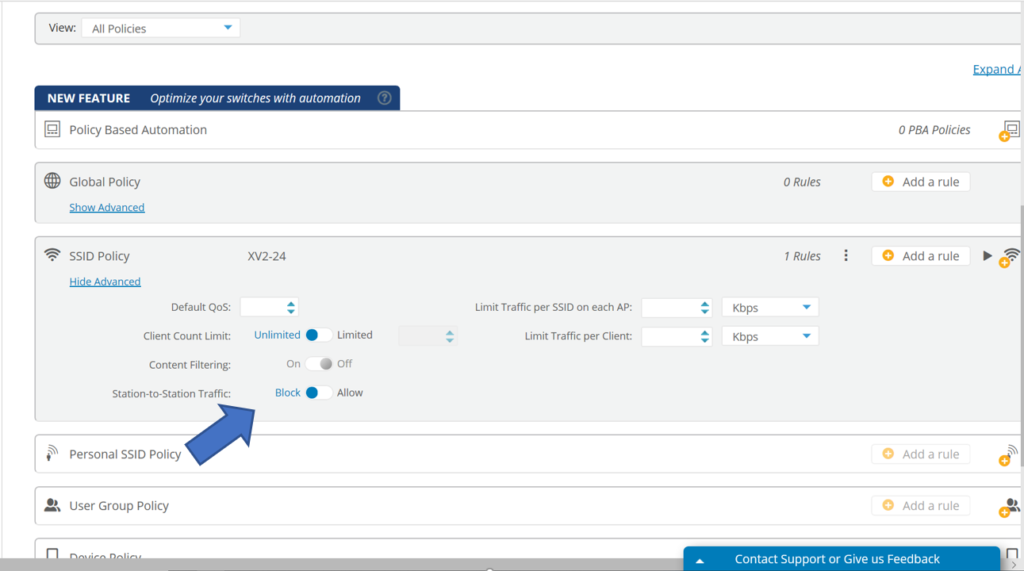
To block station-to-station traffic on Wi-Fi 6 access points, go to MY NETWORK → PROFILES and open the profile that you have applied to the XV3-8 and/or XV2-2 access points. Then click the Policies tile. You can set station-to-station blocking on SSID policies. If you already have an SSID policy, click the “Show Advanced” link, then for “Station-to-Station Traffic”, select “Block”. If you don’t already have an SSID Policy in place, under SSID Policy, click the “+” button and then choose the appropriate SSID. Then click the “Show Advanced” link, and then for “Station-to-Station Traffic”, select “Block”.
New Release – July 2020

The July 2020 release of the Xirrus Management System – Cloud (XMS-Cloud) is now available.  This release adds support for several new products as described below.

Support for the new XV2-2 Wi-Fi 6 AP

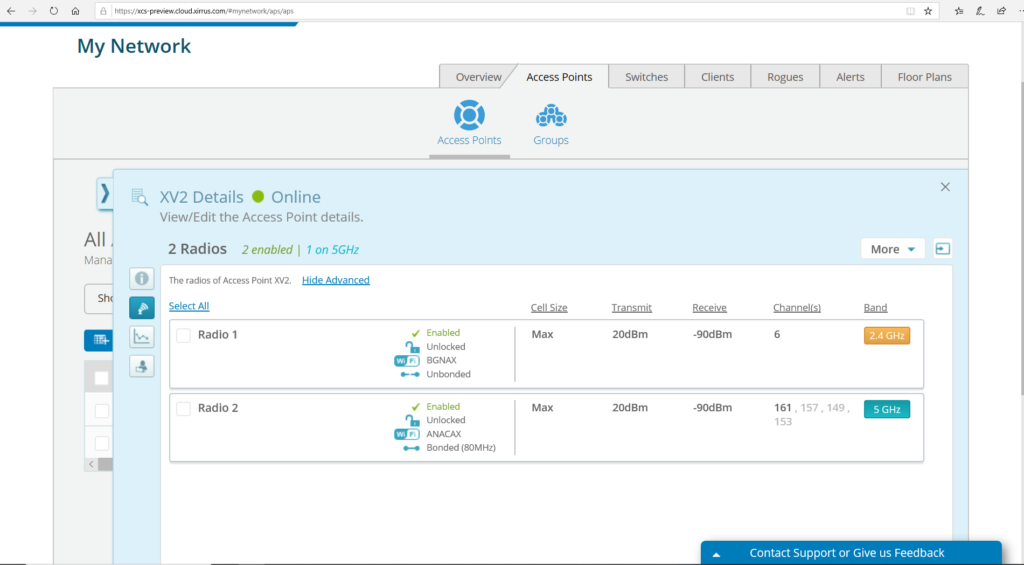
This release adds support for the new XV2-2 Wi-Fi 6 access point.  The XV2-2 is a cost effective, dual radio 2×2 access point designed to bring the power of 802.11ax to small business, hotels, primary schools, and similar networks. 

XV2-2 Capabilities At-a-Glance:

  • 5GHz radio 2×2, 2.4GHz radio 2×2
  • Supports 802.11a/b/g/n/ac/ax
  • 802.11ax MU-MIMO, MU-OFDMA, TWT
  • 10/100/1000/2500 Mbps Ethernet via RJ45 (2.5GbE)
  • 802.3at PoE Powered Device

Support for cnMatrix EX2010-P, EX2016M-P, EX2028-P, and EX2052P switches

This release adds beta support for managing the cnMatrix EX2010-P, EX2016M-P, EX2028-P, and EX2052P models of switches in XMS-Cloud. If you wish to participate in the beta testing of this functionality, please contact your Cambium Networks sales manager or reseller.

Adding switches to your XMS-Cloud account is similar to adding APs. After slot(s) have been added to your XMS-Cloud for switches, a new Switch tab will appear under My Network. To add a switch, go to the Switch tab and click the Add/Remove button. Insert the switch serial number, then click “+ADD SWITCH TO ACCOUNT”.
You will be able to create Templates and Profiles to configure port settings making it easy to configure and manage a single switch or 100’s of switches.
New Release – May 2020

Manage AP Radios in Bulk

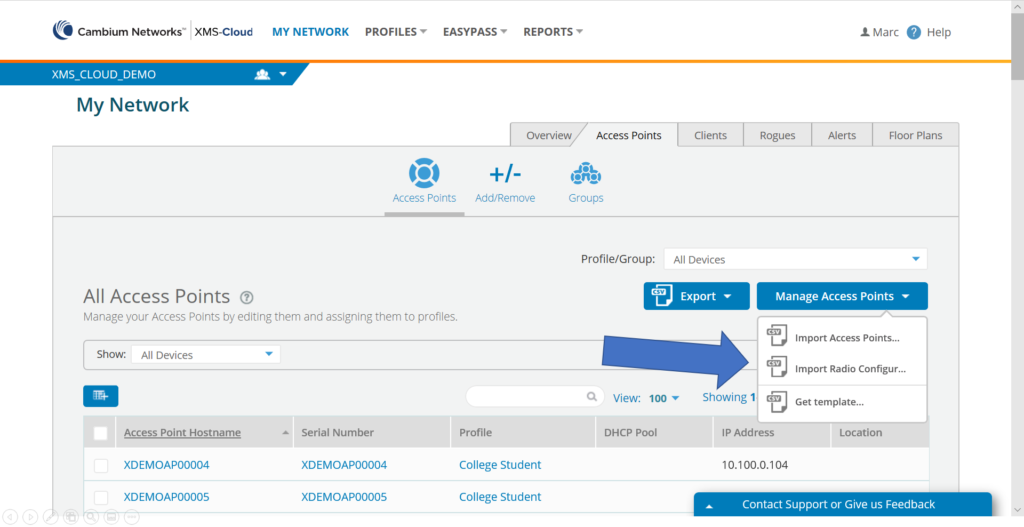
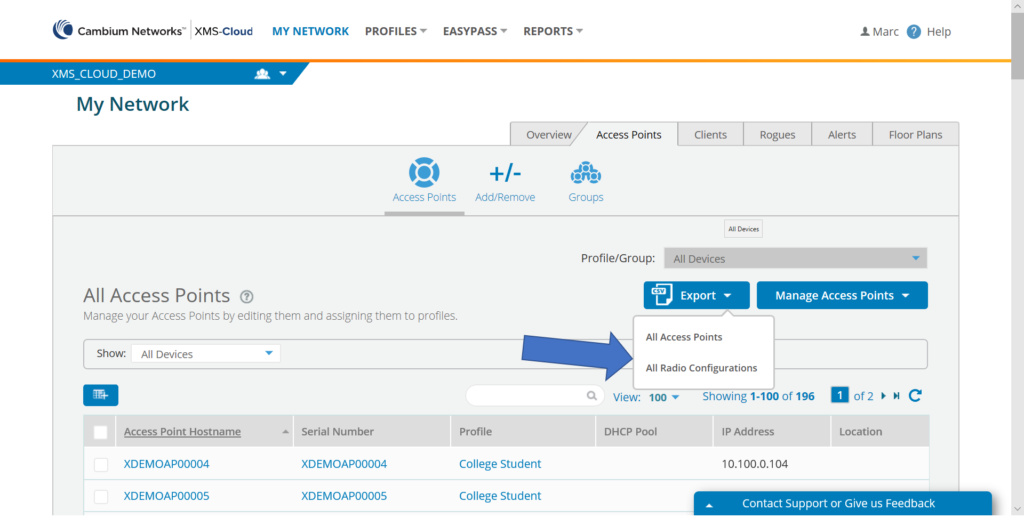
Configuring the radios in your network has just gotten much easier in XMS-Cloud. We have added the ability to export and import the radio setting of all your access points. This allows you to view and change radio settings in a spreadsheet format, allowing for faster, more accurate, configuration of your network radios.

To export the csv file with the current radios setting, go to the “Access Points” tab, click “Export → All Radio Configurations”. After the system downloads the csv file to your local system, you open the export csv file in Excel and make changes such as AP Hostname, Profile, Channel, Band, Wi-Fi Mode, TX Power, Bonding, and even assign an IP address.

Once updates are complete, import the csv file into XMS-Cloud and the system will apply the updated configuration.

New Release – April 2020

EasyPass Onboarding UPSK expiration date can now be extended

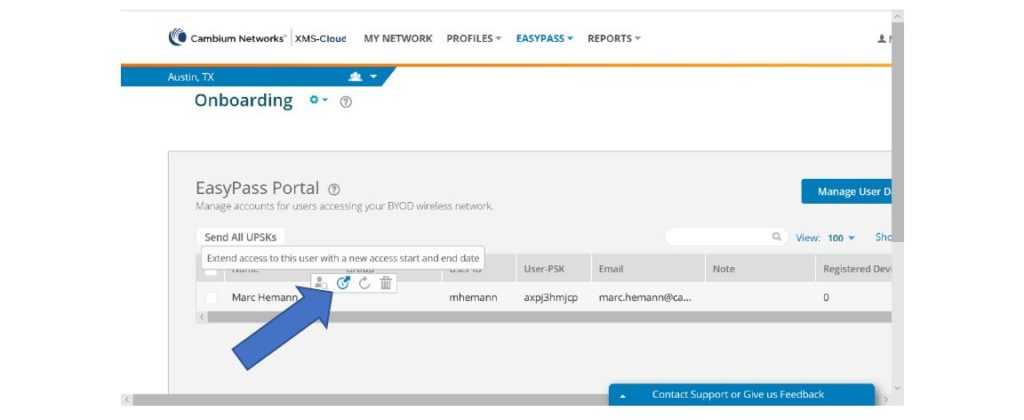
When using the EasyPass Onboarding portal, the Unique Pre-Shared key for each client can now be extended beyond
the original expiration date. No longer must you create a new UPSK for a client when their original UPSK expired. This
will save the client from having to onboard each of their devices each time a UPSK expires. From the Users tab on the EasyPass Onboarding portal, hover your mouse over the user you want to extend the UPSK for. On the new window that pops up, select the “Extend access to this User” button, and click the “Yes, Extend Access” button.

Allow a new device to replace an old device on the Access Points page while retaining the original subscription term

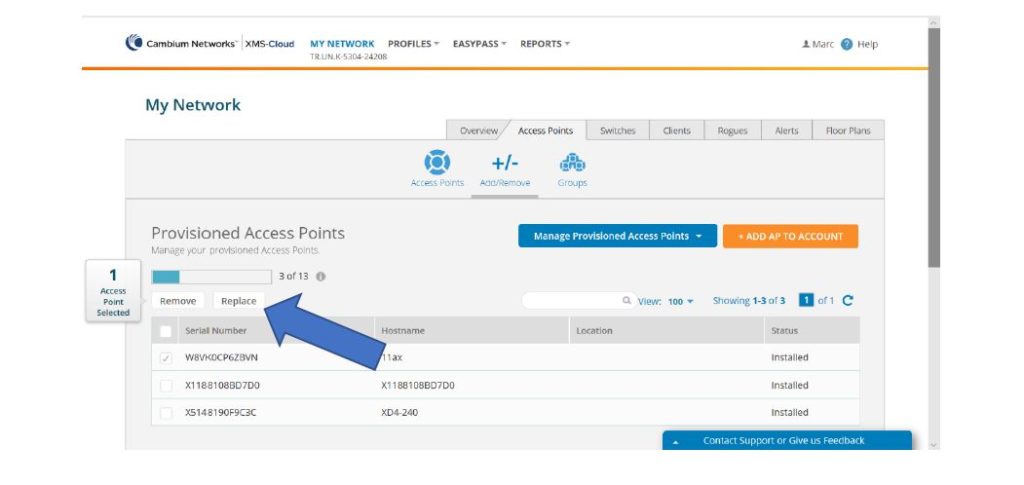
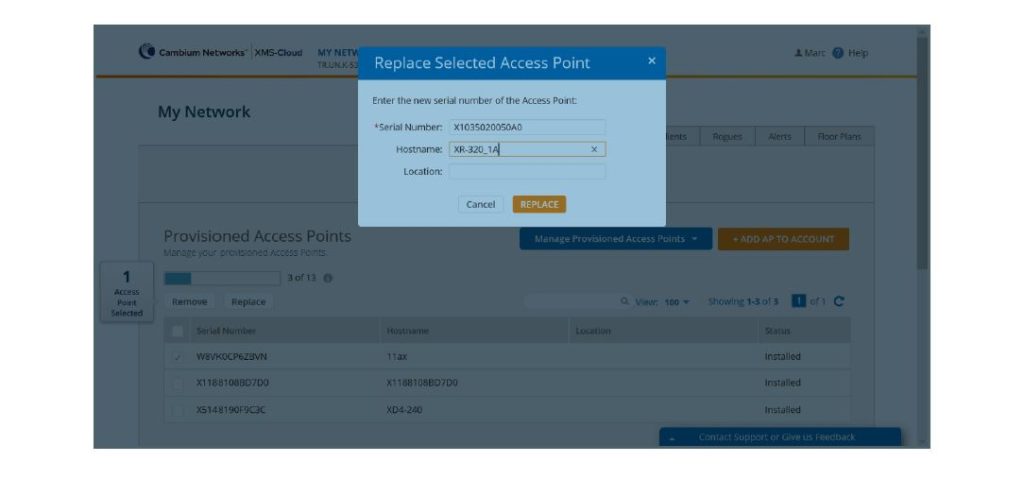
When adding a new device to your XMS-Cloud account, you are able to replace an older device which will no longer be managed by XMS-Cloud. This new device will now be synced with your XMS-Cloud licensing term, eliminating the confusion that can happen when multiple devices have different license subscription terms.
To replace a device, go to the Access Points page and click the Add/Remove button. Select the old device you want to replace, click the “Replace” button, and on the window that pops up, enter the serial number and hostname of the new device you wish to add into XMS-Cloud.

New Release – February 2020


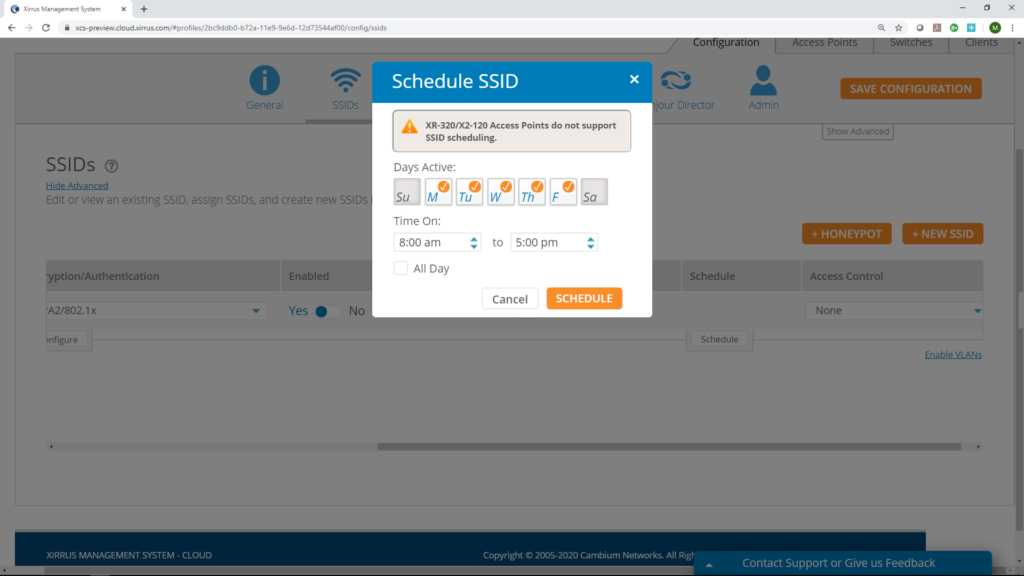
SSID Scheduling also found on SSID tab


We have provided more functionality to the SSID scheduling feature by adding it to the SSID tab in Policies. Now you can place a schedule on a SSID directly on the SSIDs tab and no longer have to create an SSID Policy before applying a schedule to an SSID. You are able to schedule an SSID based on days of the week and hours of the day.

Support for Wi-Fi 6 Access Points


This XMS-Cloud release adds support for Cambium Networks XV-series access points for the product beta. For more information, contact xirrus@cambiumnetworks.com.

New Release – December 2019

The December 2019 release of the Cambium Xirrus Management System – Cloud (XMS-Cloud) is now available.  New enhancements in this release include full functionality of our new access points licensing scheme. In addition, we have completed rebranding of the application from Riverbed to Cambium, and added a firmware version column to the Access Points tab on the My Network page.

Watch this brief video tutorial about the release.

New access point licensing in XMS-Cloud

In the October release of XMS-Cloud, we introduced a new way of managing access point licenses. Instead of access point serial numbers being directly associated to an XMS-Cloud account, the new scheme provides general access point “slots” for the number of APs you want to manage with XMS-Cloud. You now have the freedom to add and remove access points from your XMS-Cloud account on your own and not need assistance from our support team for this.

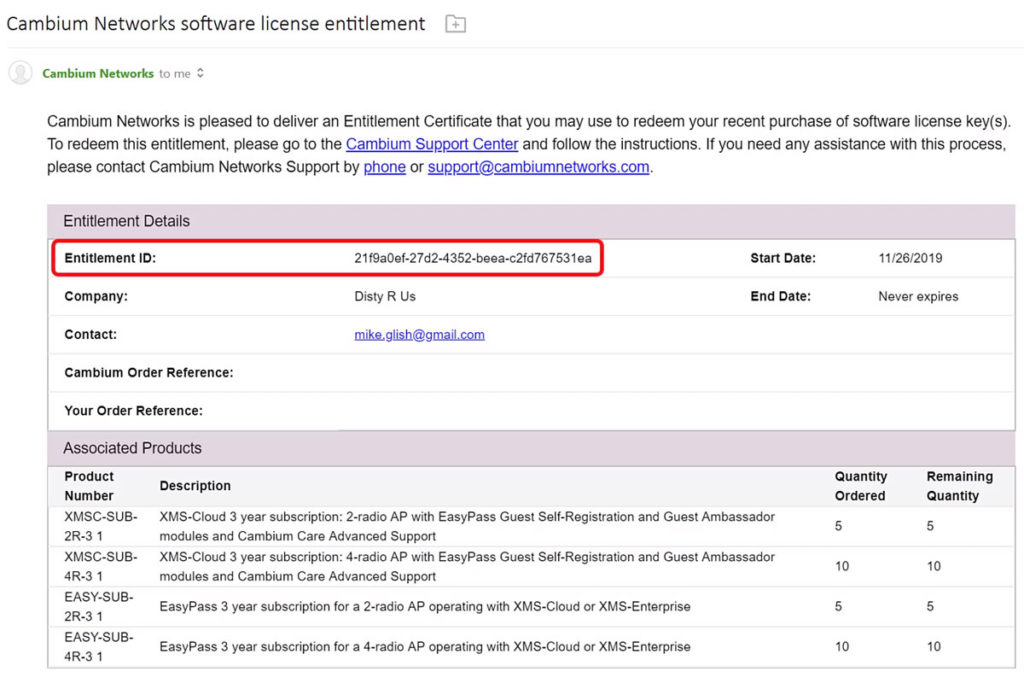
When you place your order for Xirrus equipment, you will receive an email with an Entitlement ID (EID) that contains your XMS-Cloud subscription, and if applicable EasyPass.

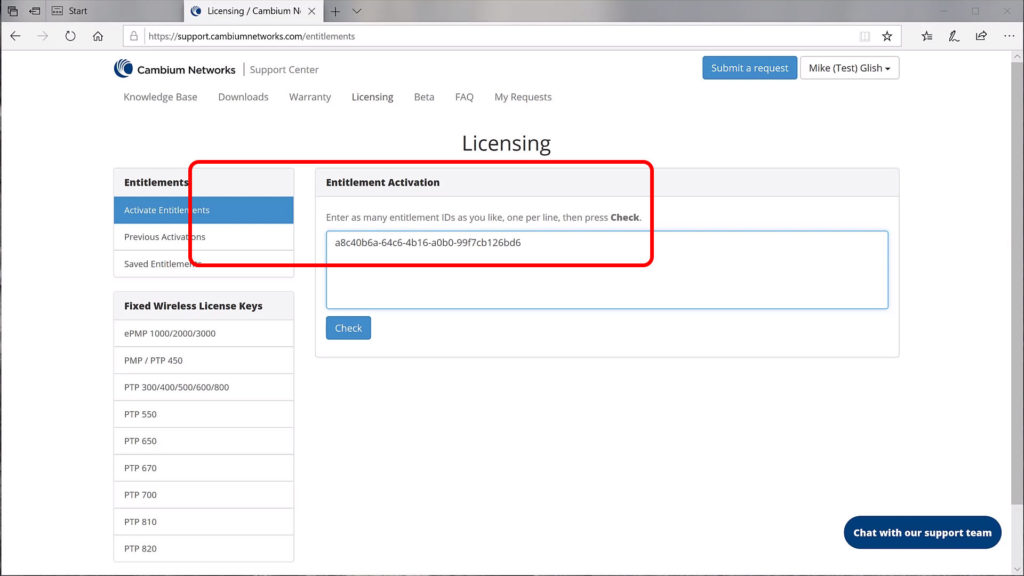
Go to the Cambium Support Center, log in to your account, and enter the EID into the licensing section.

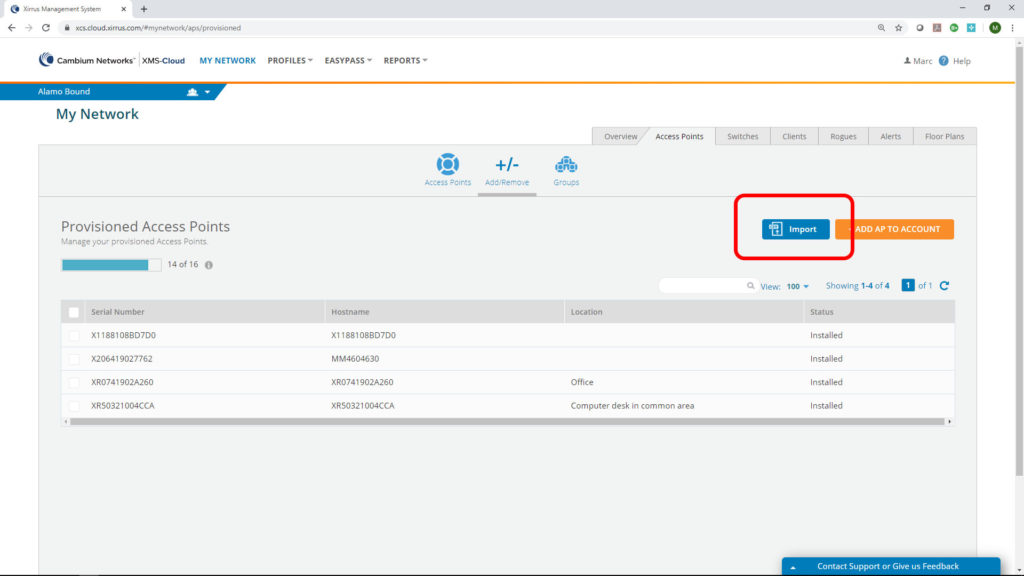
Next, log in to your XMS-Cloud account, then go to My Network -> Access Points -> Add/Remove. Select ADD AP TO ACCOUNT and add the serial numbers of the APs you purchased so that you can start to manage your new access points. The Import option allows you to enter serial numbers in bulk from a csv file.

After the access point(s) are powered up, they will contact XMS-Cloud and their Status show up as “Installed” when ready to be managed in XMS-Cloud.

Click here to view a video on adding an EID to your Cambium Networks account

Click here to view a video on adding APs to your XMS-Cloud account

Access point firmware version

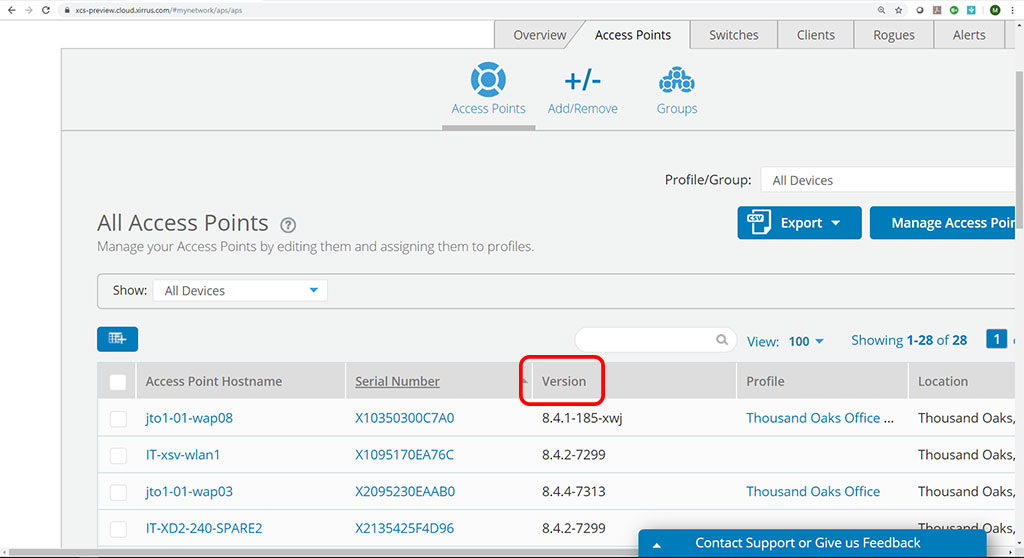
In this release of XMS-Cloud, we have added a new column on the Access Points page that shows the firmware version of the access points so that you can easily view this information.

Cambium rebranding

In this release, we have completed the branding change from Riverbed to Cambium Networks.

New Release – October 2019

The October 2019 release of the Cambium Xirrus Management System – Cloud (XMS-Cloud) is now available. New enhancements in this release include a new way of licensing access points, initial rebranding of XMS-Cloud to Cambium Networks, clear-text viewing of pre-shared keys, and a new Cambium Networks app in the Microsoft Azure gallery.

Watch this brief video tutorial about the release.

Introducing new access point licensing in XMS-Cloud

We are introducing a new way of managing licenses in XMS-Cloud. Instead of access point serial numbers directly tied to an XMS-Cloud account, we are moving to a system where you will purchase general access point “slots” for the number of APs you want to manage with XMS-Cloud. Full functionality of the new licensing scheme will be introduced over the course of several XMS-Cloud releases.

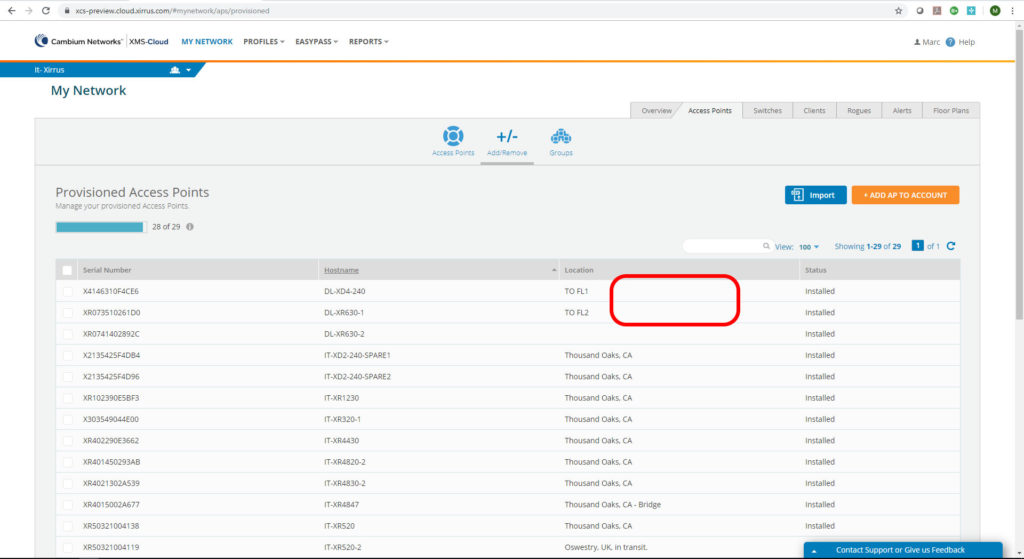
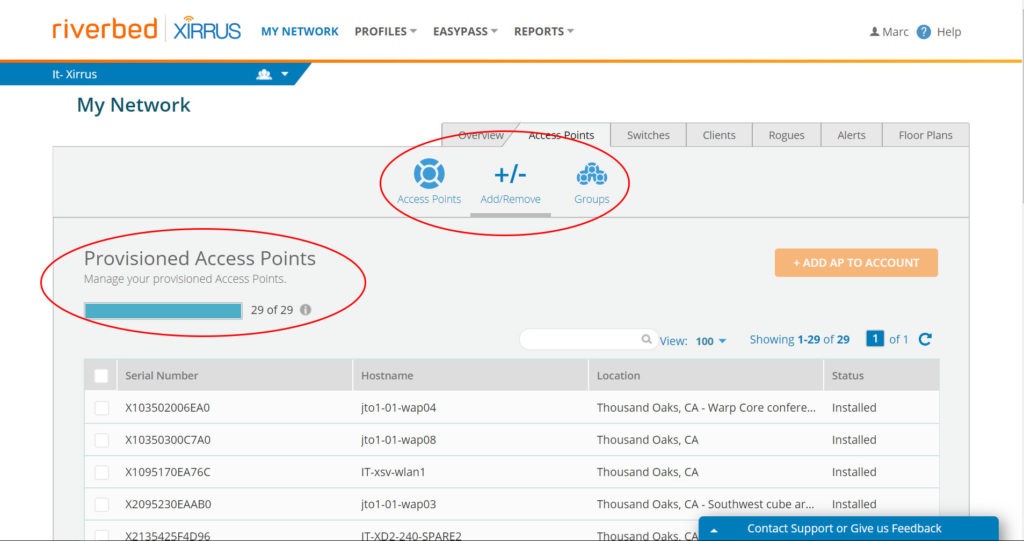
If you go to the Access Points tab on the My Network page in XMS-Cloud, you will see the first functionality of this change. The new Add/Remove tab has an AP slot meter that shows how many APs you are managing in cloud out of the total number of AP slots you have licensed. From this tab, you can add and remove access points from XMS-Cloud. If you have purchased 29 AP slots, as in the example below, you can manage up to 29 Cambium Xirrus access points. Need to remove some older access points you are no longer using? No problem. You can remove them yourself from the system and put them into a Decommissioned state. You will then have open slots available to add new access points.

When this feature becomes fully functional, we will provide detailed information on how to manage your access point licenses.

Rebranding of XMS-Cloud

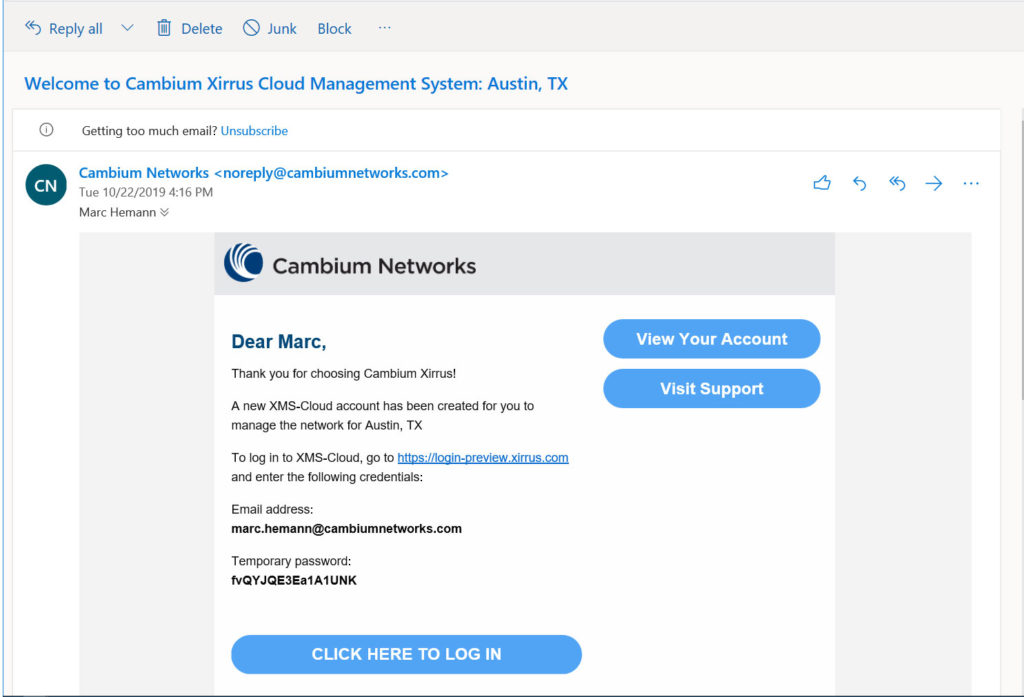
The rebranding of XMS-Cloud to Cambium Networks will occur over the course of several releases. Starting with the October 2019 release, automated emails sent from XMS-Cloud will now have Cambium Networks branding.

Clear-text viewing of pre-shared key

How many times have you forgotten a pre-shared key? When this happens, there may be no way to see the key in clear text as it is encrypted. You end up creating and distributing a new pre-shared key.

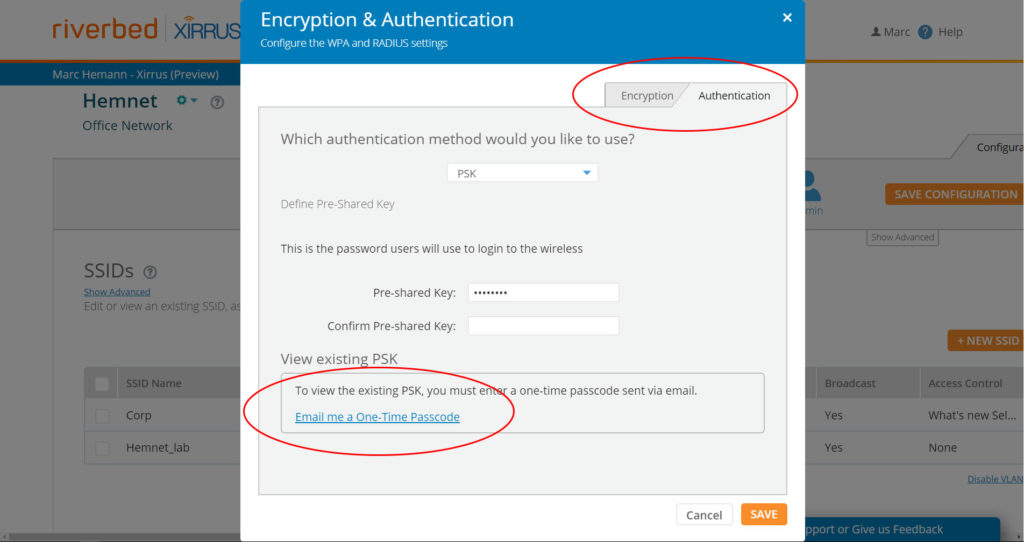
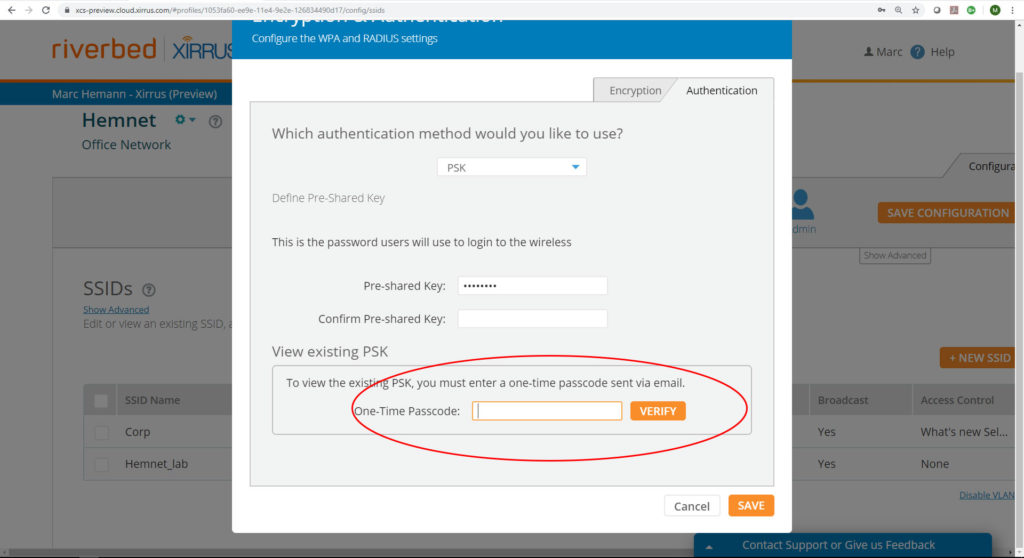
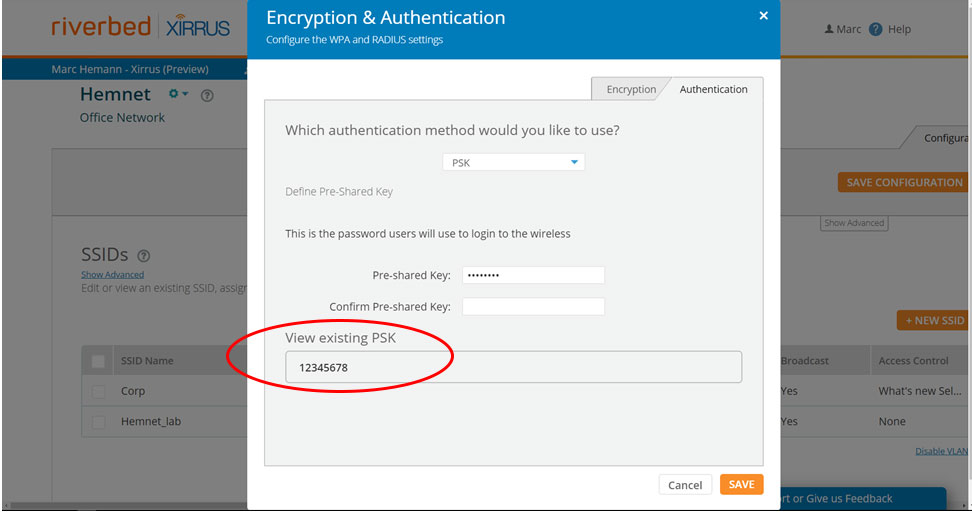
In the October release of XMS-Cloud, we have provided a way to view the pre-shared key in clear text. Once the XMS administrator makes a request, they are sent a one-time passcode to enter into the system. Once verified, the system will display the pre-shared key in clear text.

Start by going to Profiles and opening the Profile where the SSID is. Next open click the SSIDs tile, go to the SSID and click on the Configure button for the Encryption/Authentication. Then click the Authentication tab followed by the “Email me a One-Time Passcode” link.

The One-Time Passcode will be sent to your email address. Once received, enter the One-Time Passcode into the system.

The Pre-shared key will now show up in clear text.

New Cambium App in the EasyPass Microsoft Azure Portal

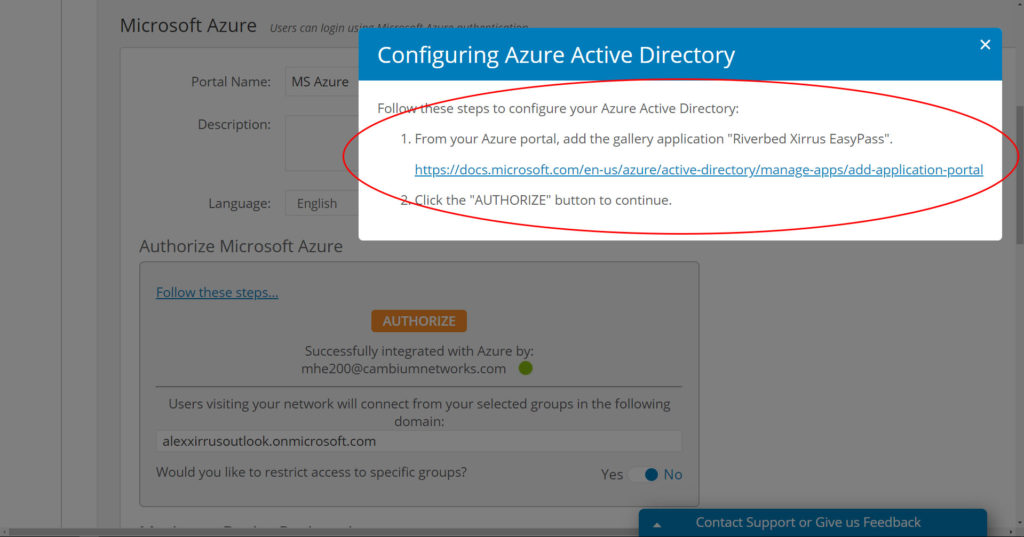
If you use the Easypass Microsoft Azure access portal, you could add a Riverbed app from the Microsoft Azure gallery to make it easier for non-Azure admins to create EasyPass Microsoft Azure login portals.

A new Cambium Networks app is replacing the Riverbed app in the Microsoft Azure gallery (pending availability). Azure admins will need to download the Cambium Networks app and replace the Riverbed app.

The installation and configuration process are the same as before. If you need assistance, click the “Follow these steps” link to be redirected to the instructions for how to configure this portal.

New Release – August 2019

The August 2019 release of the Xirrus Management System – Cloud (XMS-Cloud) is now available. This release contains a number of enhancements, including role-based access control for XMS admins, data quotas in EasyPass One-Click and Voucher portals, custom client hostnames, enhanced dashboard drill downs, and more..

WATCH THE VIDEO FOR A QUICK TUTORIAL OF NEW FEATURES 

Role-based Access Control for XMS admins based on profiles, groups, and EasyPass portals

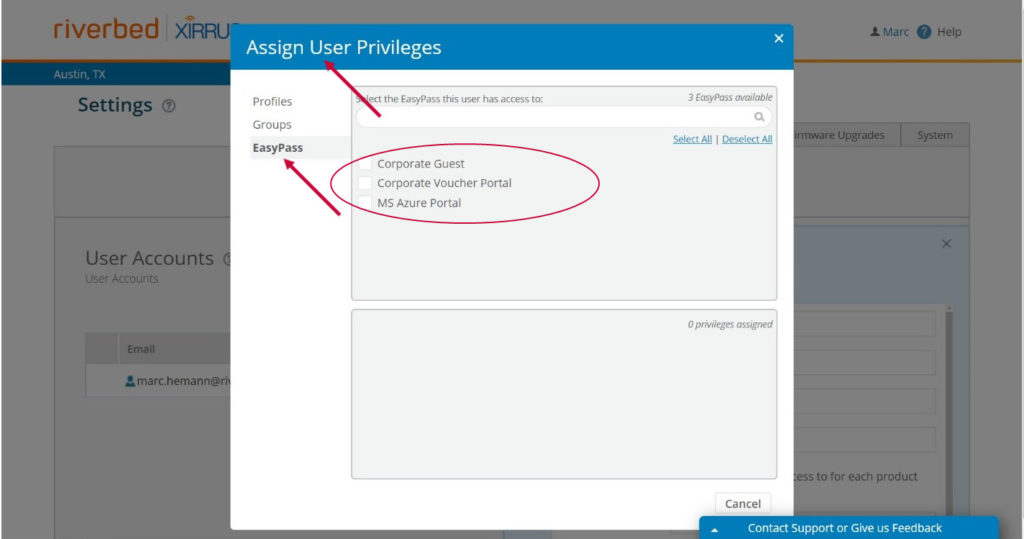
XMS-Cloud provides multiple layers of security to protect your users and data.  In this release, we’ve further enhanced security by allowing you to restrict access to XMS-Cloud functionality based on admin role. You can now create user accounts based on Profiles, Groups or EasyPass portals.

To create new user accounts, click the “user icon” next to your name at the top right of the XMS-Cloud webpage, then click “Settings”.   Select the “User Accounts” tab, and click the “+ NEW USER” button.  In the section “Would you like to restrict this account to specific sections of your network?”, select “Yes”.  Click the “Edit” button next to “0 privileges assigned”.  Select either “Profiles”, “Groups”, or “EasyPass”, depending on which area of the system you want to give the user access to.  Now select the specific profile, group, or EasyPass portal to further restrict the user’s access.

There are several restrictions with this new functionality. First, users with restricted privileges cannot create new profiles, groups or EasyPass portals. This must be done by the XMS Admin. Second, users with restricted privileges do not have an “All Devices” filter when customizing the Dashboard and Reports. They will only see the Profiles or Groups to which they have access.

Set data quotas in EasyPass One-Click and Voucher portals

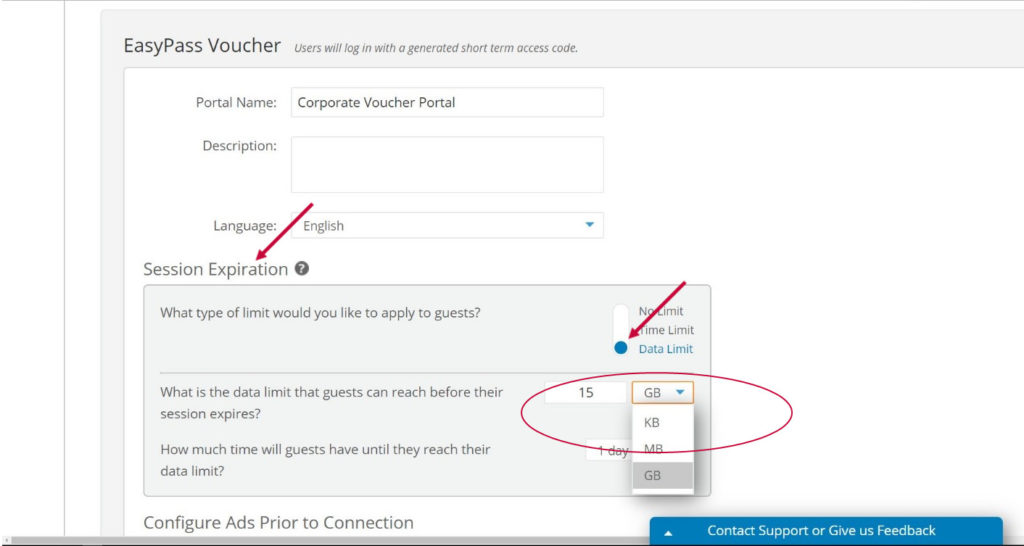
EasyPass One-click and Voucher portals now allow you to set limits on how much data a guest can consume in a specified period of time.  You can set customizable limits in KB, MB, or GB depending on your needs, and you can specify how much time the guest has to reach this limit.

To set the data limit, either create a new, or open an existing, EasyPass One-Click or Voucher portal.  On the “General” page, go to the Session Expiration section and set the type of limit desired to “Data Limit”.  Enter the amount of data the client can use in amounts of KB, MB, or GB.  Then enter the amount of time they have to use this data.

There are several restrictions with this new functionality. First, users with restricted privileges cannot create new profiles, groups or EasyPass portals. This must be done by the XMS Admin. Second, users with restricted privileges do not have an “All Devices” filter when customizing the Dashboard and Reports. They will only see the Profiles or Groups to which they have access.

Manually customize client hostnames

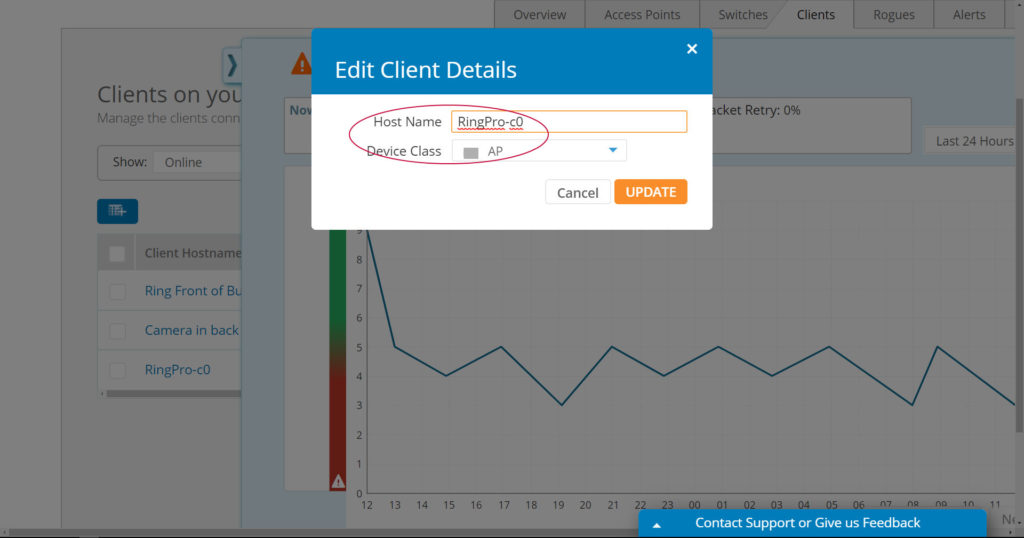
XMS-Cloud now makes it easier to track users on your Wi-Fi network.  Administrators can now customize hostnames to more easily identify clients in the system.

Go to the Dashboard and click on the “Clients” tab.  Hover the mouse on a specific client and select “View Device Details”.  From the fly-out panel, click the “Edit” button (it looks like a blue pencil).  Now you can customize the client hostname and click “UPDATE”.

Speed Up Troubleshooting with Enhanced Dashboard Client Device Usage Drill Downs

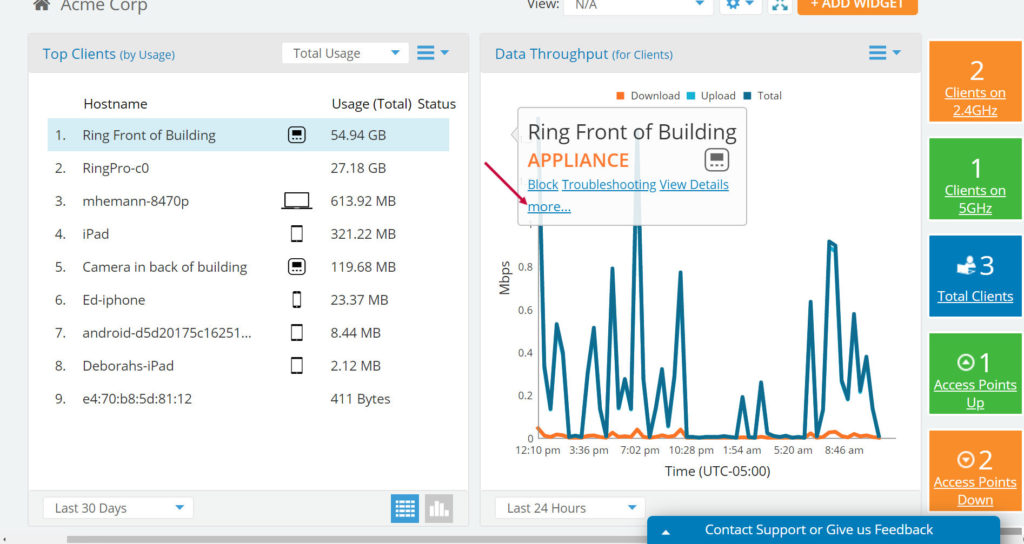
This release adds the ability to view the percentage of bandwidth a client is using towards certain applications.

On the dashboard, go to the “Top Clients by Usage” widget.  Hover the mouse on the client you wish to review, then click the “More” link.  Now you see the top bandwidth-consuming applications for that client and the usage percentage breakdown.

Other Enhancements

  • The Client Troubleshooting fly-out window now shows IP address trouble warnings.

New Release – June 2019

The June 2019 release of the Riverbed Xirrus Management System – Cloud (XMS-Cloud) is now available. We are introducing a number of significant enhancements in this release, including flexible software upgrades, new reports, manual device classification, additional data privacy, dashboard AP drill-downs, improved client health scores, and more.

WATCH THE VIDEO FOR A QUICK TUTORIAL OF NEW FEATURES 

AP Software Upgrade Management

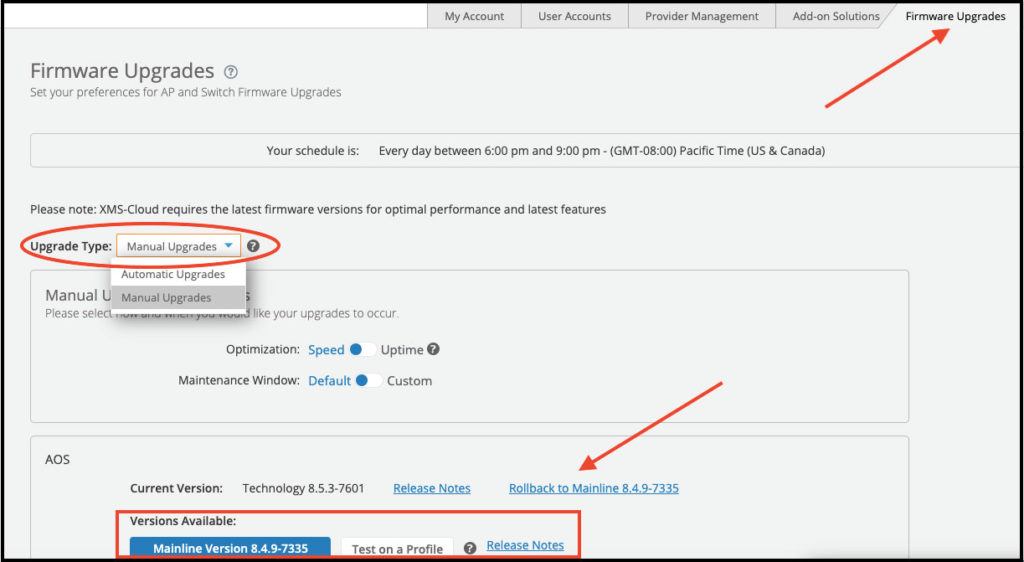
XMS-Cloud offers a significant advantage to operations teams by automating infrastructure maintenance, including upkeep of software versions. Starting with the June release, manual control of software upgrades is now available for customers who need to manage their existing AP software version under special circumstances.

The manual upgrade feature enables you to:

  • Override automated upgrades and retain the existing software version
  • Test new software releases in a test profile before deploying
  • Back out to a previous version of the software

These changes are applicable to both Mainline and Technology code bases.

NOTE: Manual override should be chosen only after careful consideration to maximize the operational benefits of the SaaS platform.

From the Username/Settings drop-down menu, choose the Firmware Upgrades tab. Select Manual Upgrades from the Upgrade Type. Here, you can access Test Profiles and Rollback options.

Availability and Wi-Fi Data Usage Reports

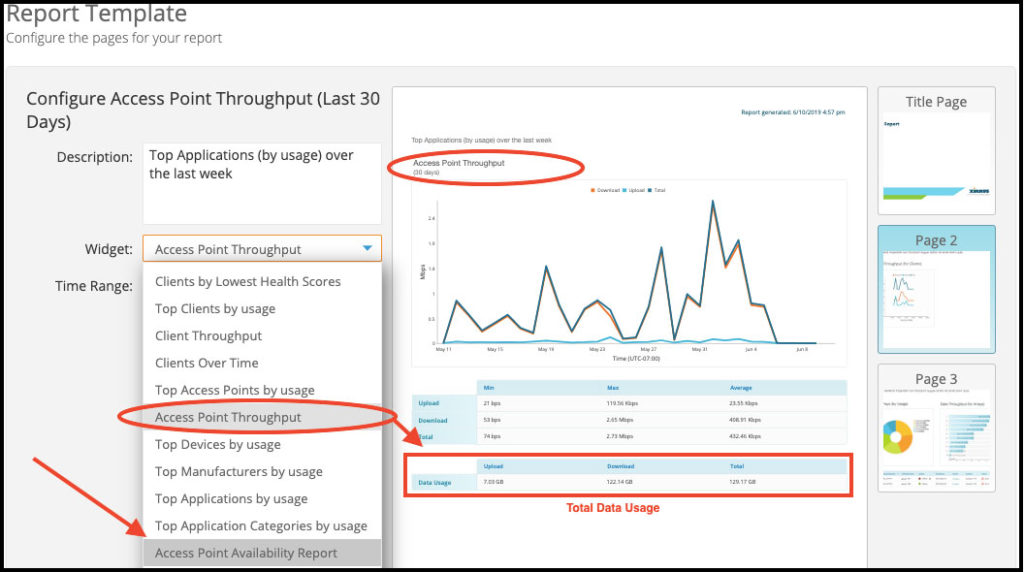
We have included total data flowing through the Wi-Fi network to the existing Access Point Through reports widget. You can use total usage data for capacity planning and client bill back for Wireless Internet Service Providers (WISPs). In addition, we have enhanced reporting capability to provide greater visibility into the uptime of your network. A new Access Point Availability Report widget is added to the reports to provide AP uptime information.  

From the top-level Reports, menu chooses a report template or create your own report. Access the appropriate widget to generate Wi-Fi usage and AP availability reports.

Wi-FI Usage Data
AP Availability Report

Option to Classify Devices Manually

Built-in intelligence in our solution automatically identifies Wi-Fi device types and classifies them. As new types of devices show up on the network, XMS-Cloud categorizes them as “Unknown” if it is unable to identify. In this release, we have provided the ability to classify or re-classify devices manually to more accurately reflect the device type.

Go to the Clients tab from the My Network dashboard. Hover the mouse on a specific client and select View Device Details. From the flyout panel, use the Device Class drop down to choose the appropriate device. Add the Device Type field to the client table if the column is not visible.

Data Retention and Privacy Enhancements

Riverbed Xirrus is committed to maintaining your data privacy and we continue to enhance functionality to protect your data. To help comply with local data privacy requirements, including Global Data Privacy Regulations (GDPR), we have added the ability to delete specific client data and set a global client data retention duration.

Select a specific client from the Clients tab within My Network dashboard. The Delete button will be displayed if the client is offline. You cannot delete the client data if the client is online.

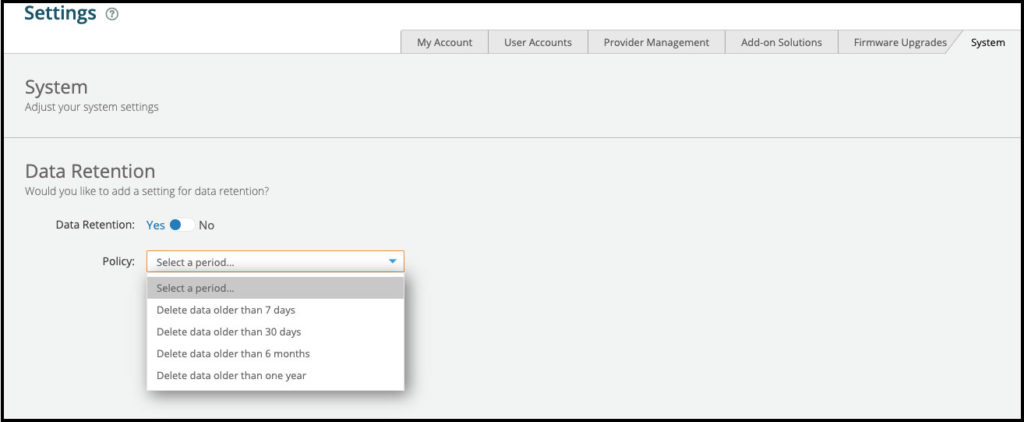
Set your data retention policy from the Settings menu under the username icon. Turn on the Data Retention policy and then choose the Policy from the System tab.

Speed Up Troubleshooting with AP Drill Downs

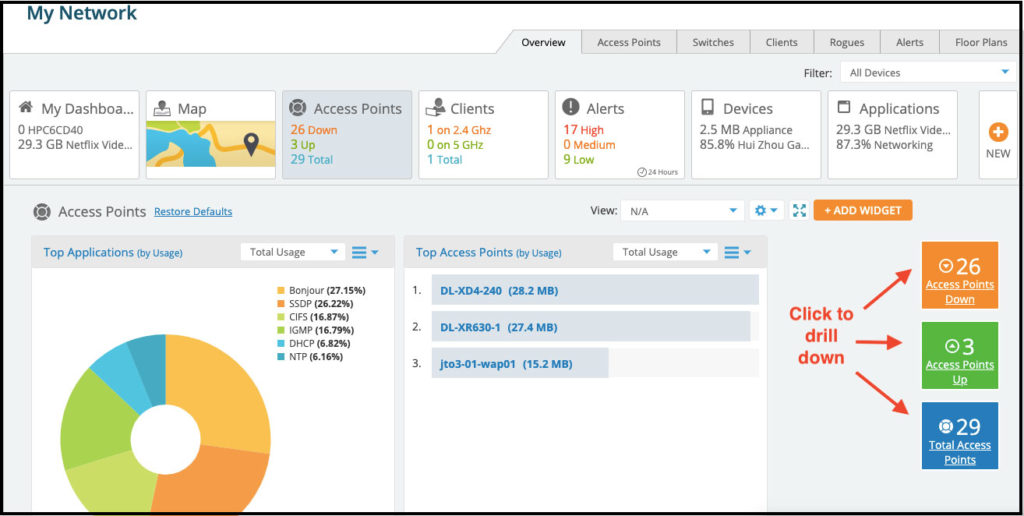
We have enabled drill down from the AP summary widget to help troubleshoot AP issues easily. You can view AP metrics such as number of clients connected over time, bandwidth consumed over time and others from this filtered list.

Click on the Online APs or Offline APs summary widget in the My Network dashboard. You will be presented with a list of relevant APs.

Improved Client Wi-Fi Connectivity Health Score

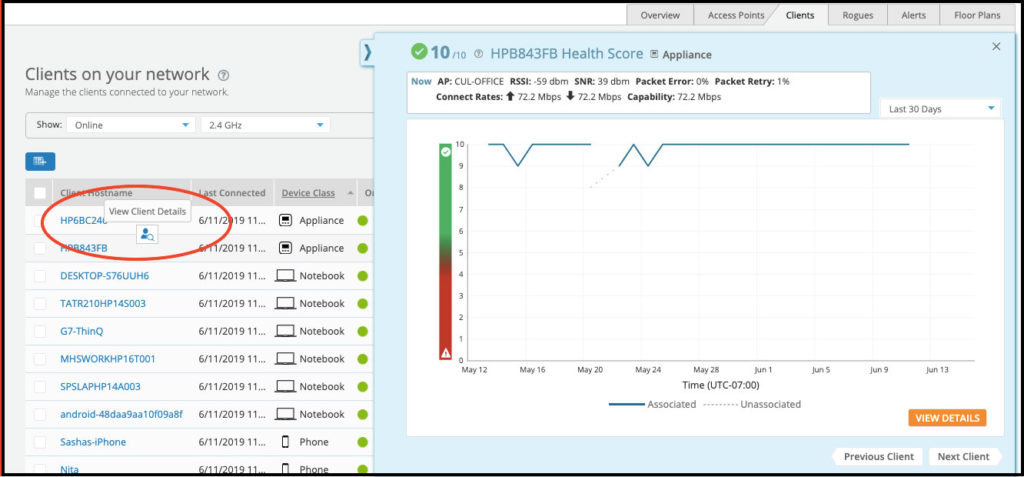
We continue to enhance the client health score algorithm to provide a more refined indication of client connectivity health. This score provides real-time visibility into a specific client’s connection state, including historical information for forensics.

From the Clients tab within My Network dashboard, hover the mouse over any client name and click on View Client Details to view the refined health score trends.

Other Enhancements

  • To focus on a specific subset of alerts, filter alerts by Profiles or AP groups.
  • The XMS-Cloud administrator passwords now expire and must be changed every 90 days to improve security.
  • Software update notifications are now sent only to customers with relevant AP models.

New Release – March 2019

The March 2019 release of the Riverbed Xirrus Management System – Cloud (XMS-Cloud) is now available. In this release, we have enabled per SSID station-to-station blocking, improved privacy with MAC address hashing and enhanced guest user visibility with MAC address exporting functionality.

WATCH THE VIDEO FOR A QUICK TUTORIAL OF NEW FEATURES 

You must be running Technology firmware on your Xirrus APs to use most of these new functionalities. This can be set on the Firmware Upgrades tab under Settings. 

Per SSID Dashboards Station-to-Station Blocking

Optimize your RF spectrum and secure your network by blocking station to station communications. This feature blocks unnecessary local traffic such as broadcasts and also local peer-to-peer sharing to better secure your Wi-Fi network. This functionality was available previously at the global network level but blocking can now be enabled on any given SSID

From the Profiles top-level menu, select the profile associated with the specific SSID. Click on Policies and expand the Show Advanced panel for the given SSID under the SSID Policy. If you do not see the specific SSID in this panel, you should first add the SSID to the SSID policy panel.  

MAC Address Hashing for Privacy

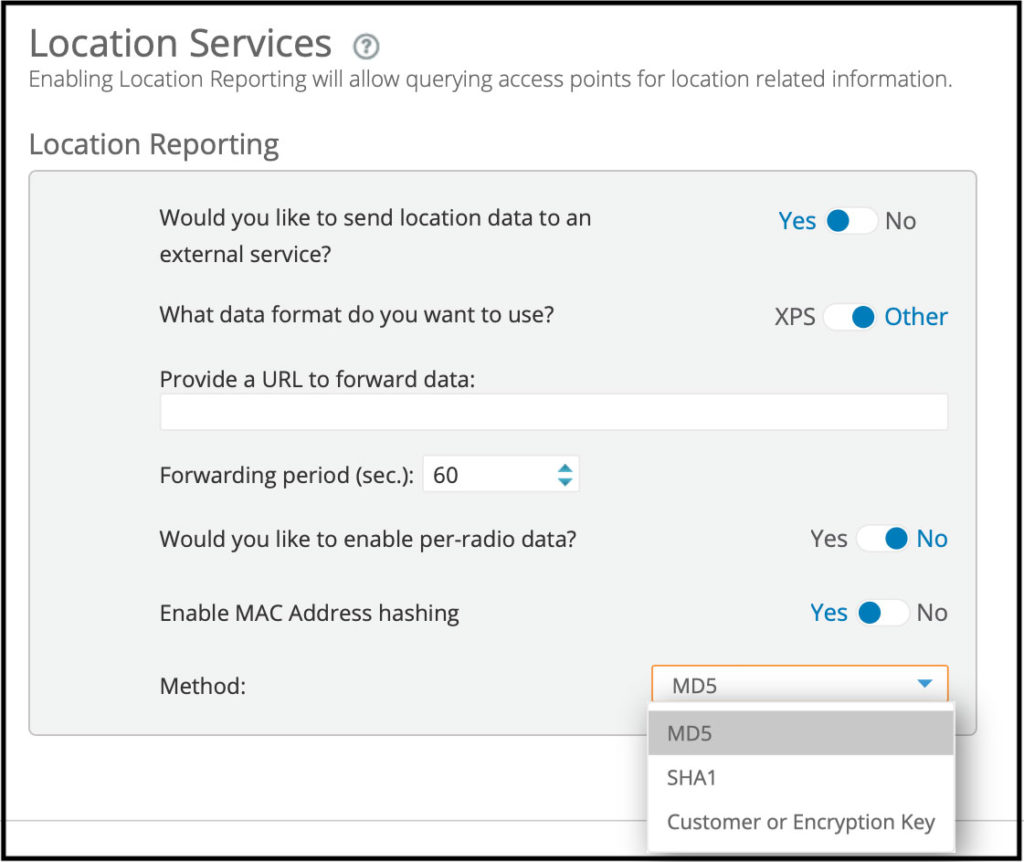
When exporting location data to third-party location services, you can now protect the privacy of your users by masking MAC addresses with hashing. This will enable you to comply with Global Data Privacy Regulations (GDPR).

From the Show Advanced link within a given profile, select the Services option. You can enable MAC address hashing under Location Services. Choose the appropriate method required by your location services provider.

Export Guest User MAC Addresses

Gain detailed visibility into the guest users on your network, including the MAC addresses of the devices your guests use to connect to your network.

Select the Self Registration Guest Portal from the EasyPass top level menu. From the Guests tab, choose the Export Guest MACs from the Manage User Data drop down. This will download a .csv file on your computer with the guest users’ details.